| Access offers an extraordinary number of formatting properties that you can use to customize the appearance of your forms and the control objects they contain. You also can apply most of the property settings described in the following sections to subforms. Default Values for Forms You can change some of the default values used in the creation of all forms by choosing Tools, Options and clicking the Forms/Reports tab (see Figure 14.11). You can create a form to use as a template and replace the standard (Normal) template, and you can determine how objects are displayed when chosen. The effects of these options are described in the sections that follow. The options that you or other Access users choose in the Options dialog are saved for each user ID in the MSysOptions table of the current System.mdw workgroup system file. Figure 14.11. You can change default values in the Forms/Reports page of the Options dialog. 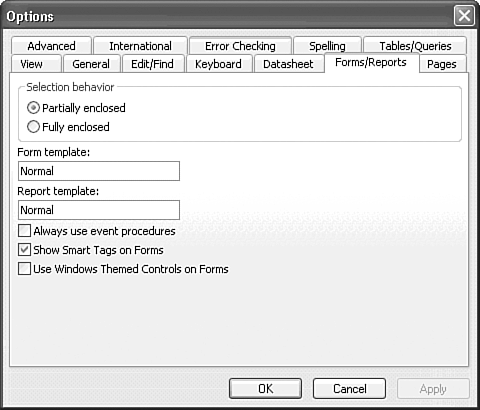  You can change the default values for the current form, section, or controls by choosing the object and then changing the default values displayed in the Properties window for that object. You can also use the AutoFormat feature to quickly apply a predefined format to all controls in the form. The next section describes using AutoFormat to change a form's appearance, and subsequent sections describe ways to change the format of text or controls manually on a form. You can change the default values for the current form, section, or controls by choosing the object and then changing the default values displayed in the Properties window for that object. You can also use the AutoFormat feature to quickly apply a predefined format to all controls in the form. The next section describes using AutoFormat to change a form's appearance, and subsequent sections describe ways to change the format of text or controls manually on a form.
Tip  | Check the title bar of the Properties window before you change property values to make sure the selected object is the one whose properties you want to change. It's a common practice to leave the Properties window open as you alter the form design, and the selected object might not be the object you intend. Access 2002 added a drop-down list to the Properties window that lets you select any object on the form or report. Selecting objects from the list in the Properties window is faster than selecting from the Object list on the toolbar. |
Using AutoFormat  AutoFormat lets you apply a predefined format to an entire form with only a few mouse clicks. Access 2003 comes with several predefined formats, and you also can create your own formats for use with AutoFormat. The AutoFormat dialog is similar to the third Form Wizard (form layout) dialog described earlier in the chapter. AutoFormat lets you apply a predefined format to an entire form with only a few mouse clicks. Access 2003 comes with several predefined formats, and you also can create your own formats for use with AutoFormat. The AutoFormat dialog is similar to the third Form Wizard (form layout) dialog described earlier in the chapter.
Applying an AutoFormat To apply a format to a form with AutoFormat, follow these steps:  Press Ctrl+R or click the Form Select button to apply your AutoFormat selection to the entire form. If you select a control or other object, AutoFormat is applied only to the selected object. Press Ctrl+R or click the Form Select button to apply your AutoFormat selection to the entire form. If you select a control or other object, AutoFormat is applied only to the selected object.
Click the toolbar's AutoFormat button to open the AutoFormat dialog shown in Figure 14.12. Figure 14.12. Use the AutoFormat feature to apply a predefined format to an entire form or a section of a form. 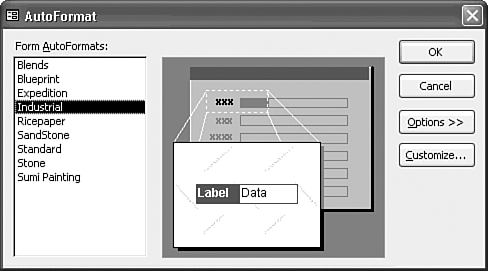 Click to select the format you want to use in the Form AutoFormats list; a preview of the format you select appears in the window in the center of the dialog. Click OK to apply the format to the form. Figure 14.13 shows the frmHRActions form after the Industrial format has been applied. Figure 14.13. The frmHRActions form has the Industrial format (a tread-plate pattern) applied to the main form. Applying this format also changes label formatting (refer to Figure 14.12). 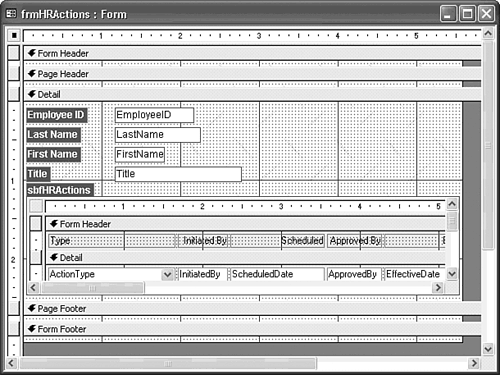 Change the style to the original Standard format you selected when creating the form, if you want. You can't undo initial application of an AutoFormat.
The AutoFormat dialog, when expanded by clicking the Options button, lets you omit the application of font, color, or border style information to your form when you apply the AutoFormat. Deselect the check box for the elements of the AutoFormat that you don't want AutoFormat to apply to your form. Creating and Customizing AutoFormats The predefined AutoFormat styles might not suit your tastes, or you might want to create AutoFormat styles specific to your company or application. Applying formatting to a form through an AutoFormat style is by far the easiest way to create standardized forms for your database application especially because the Form Wizard uses the same format style list as the AutoFormat feature. In other words, any AutoFormat you create also becomes available in the Form Wizard dialog. To create a new AutoFormat or customize an existing one, follow these steps: Create a form and alter its appearance (using the techniques described in the next five sections of this chapter) so that the form has the font, border, background picture, and other options adjusted exactly the way you want them for your new or customized AutoFormat. Click the AutoFormat button to display the AutoFormat dialog. If you want to modify an existing AutoFormat, select it in the Form AutoFormats list now. Click the Customize button to display the Customize AutoFormat dialog shown in Figure 14.14. Figure 14.14. The Customize AutoFormat dialog is used to create, modify, or delete an AutoFormat. 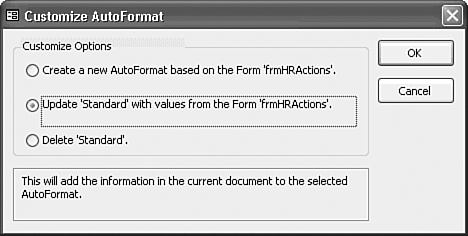 Select the Create a New AutoFormat Based on the Form formname option, or the Update formatname with Values from the Form formname option to create or modify an AutoFormat, respectively. (Deleting AutoFormats is covered in the next section.) Click OK. If you're creating a new AutoFormat, the New Style Name dialog opens. Type an appropriate name for your new AutoFormat and click OK. Access creates or updates the AutoFormat and returns you to the AutoFormat dialog. Click Close to close the AutoFormat dialog.
Deleting AutoFormats If you've created your own AutoFormats, you might want to delete an AutoFormat that you no longer use. To delete an AutoFormat, follow these steps:  Open any form in Design view. Open any form in Design view.
Click the AutoFormat button to display the AutoFormat dialog. Click to select the AutoFormat you want to delete in the Form AutoFormats list and then click the Customize button. Access displays the Customize AutoFormat dialog (refer to Figure 14.14). Select the Delete formname option and click OK. Access deletes that AutoFormat from the list. Tip Be sure to select the correct AutoFormat for deletion before you click OK. Access doesn't ask for confirmation when you delete an AutoFormat. Click Close to close the AutoFormat dialog.
Changing an Object's Colors You select object colors through the buttons on the Formatting toolbar, as well as through property settings that are accessible through the Properties window of the form and individual objects on the form. The following sections describe how to use the Formatting toolbar controls and the Property dialog to change background and foreground colors of form sections and control objects, as well as border properties of control objects. Background Colors  The background color (Back Color property) of a form section (Header, Detail, or Footer) applies to all areas of that section except areas occupied by control objects that don't have a transparent background. The default background color of all sections of forms created by the Form Wizard depends on the specific form style you choose when you create the form; the Standard format scheme used to create the frmHRActions form, for example, is the Windows system color for 3D Objects (the default is light gray). The background color (Back Color property) of a form section (Header, Detail, or Footer) applies to all areas of that section except areas occupied by control objects that don't have a transparent background. The default background color of all sections of forms created by the Form Wizard depends on the specific form style you choose when you create the form; the Standard format scheme used to create the frmHRActions form, for example, is the Windows system color for 3D Objects (the default is light gray).
The 40 default color choices on the palette displayed by the Fill/Back Color toolbar button are standard colors of Windows XP/2000 in 256+ color mode. If you're creating a form that you intend to print, a dark or deeply textured background will not only be distracting but will also consume substantial amounts of printer toner. Data-entry operators often prefer a light gray background rather than a colored, or textured background. Colored and textured backgrounds tend to distract users. If you've selected a picture as the background for a form or used an AutoFormat style that includes a background picture, such as the International style of Northwind.mdb's Customers form then any changes you make in the background color of the form are hidden by the overlying picture. To change the background color of a section of a form, follow these steps: Click an empty area within the section of the form (Header, Detail, or Footer) whose background color you want to change. Alternatively, click the section's header bar. This step selects the appropriate section. Click the Fill/Back Color button on the toolbar to display the color palette. Click the box that contains the color you want to use.
Because the background color of each form section is independent, you must repeat the process if you want to change the color for other sections of your form. The Transparent button of the Fill/Back Color palette is disabled when a form section is chosen because a transparent background color isn't applicable to forms. You choose the background color for a control object, such as a label, just as you do for a form. In most cases, the chosen background color of labels is the same as that of the form, so click the Transparent button to allow the background color to appear. The default value of the Back Color property of text boxes is white so that text boxes (and the data they contain) contrast with the form's background color. Changing the Background Bitmap You can use a bitmap picture as the background for a form. Unlike background colors, of which you can have several, you select a single bitmap picture for the entire form. Access 2003 comes with a few bitmap pictures that it uses in the AutoFormat formats International, for example, uses the Globe.wmf graphics file (stored in the Program Files\Microsoft Office\Office11\Bitmaps\Styles folder) as the background for the form. You can use any .bmp, .dib, .emf, .gif, .ico, .jpg, .pcx, .png, or .wmf graphics file as a background for a form. Access 2000 added the capability to use compressed .gif, .jpg, .pcx, and .png files. Tip Forms with bitmap graphics as a background can look dramatic and, therefore, are best suited for decision-support forms intended for management personnel. (Management types are known to prefer form over substance.) For accurate, high-speed data entry, keep your transaction-processing forms visually simple so that users can easily distinguish data fields on the form and easily read text labels.
You set or remove a form's background bitmap through the Properties window of the form; you can also specify several viewing and formatting properties for the background picture. Follow these steps to set the background picture properties of a form: Open the form in Design view if necessary. Click the Form Select button. If the Properties window isn't already open, click the Properties button on the toolbar to display this window. Click the Format tab in the Properties window and scroll down to the end of the Format properties list to view the various Picture properties: Picture, Picture Type, Picture Size Mode, Picture Alignment, and Picture Tiling. These properties and their effects are described in the list following these numbered steps. Specify the path to the graphics file in the Picture text box, and set the various Picture properties until you're satisfied with the appearance of the form. As you change each property, results of the change become immediately visible on the form. Figure 14.15 illustrates use of a .gif image of a book cover as the background for the detail section of a form. Figure 14.15. A bitmap from a scan of a book cover creates the background for this form. 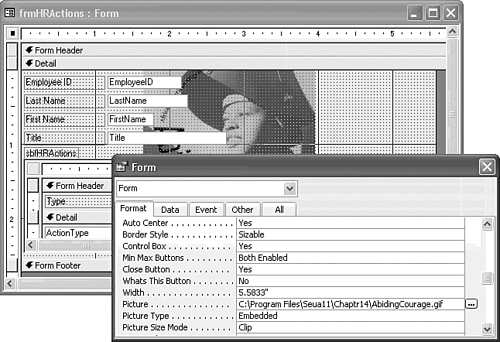 Optionally, close the Properties window.
The following list summarizes form properties related to the background picture, available choices for each property, and the effects of each choice:  The Picture property contains the folder path and file name of the graphics file that Access uses as the form's background. You can either type the folder path and file name directly in the Picture property text box, or use the Builder to help you select the background graphics file. To use the Builder, click the Picture property field to select that field and then click the Build button that appears next to the text box. Access opens the Insert Picture dialog; navigate to the location and select the graphics file to use, as shown in Figure 14.16. The Picture property contains the folder path and file name of the graphics file that Access uses as the form's background. You can either type the folder path and file name directly in the Picture property text box, or use the Builder to help you select the background graphics file. To use the Builder, click the Picture property field to select that field and then click the Build button that appears next to the text box. Access opens the Insert Picture dialog; navigate to the location and select the graphics file to use, as shown in Figure 14.16.
Figure 14.16. Use the Insert Picture dialog to select a graphics file for a form's background. 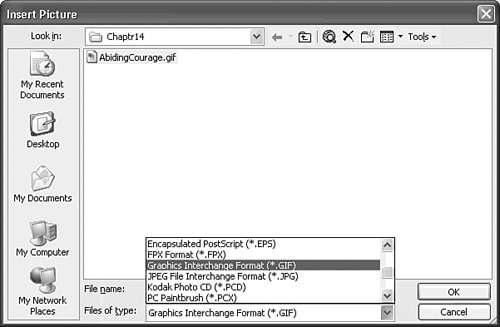 Tip To remove a background picture, delete the entry in the Picture text box and click Yes when asked if you want to remove the picture from the form.
The Picture Type property specifies the method that Access uses to attach the background picture to the form. You can select either Embedded or Linked as the picture type. Use the Embedded picture type, especially if you intend to distribute your database application; the resulting form is self-contained and doesn't rely on the presence of external files that might be moved or deleted. If you have many forms that use the same background bitmap graphic, linking the background picture can save some disk space. The Picture Size Mode property controls how Access sizes the background picture. The available choices are Clip, Stretch, and Zoom. Clip causes Access to display the picture at its full size behind the form; if the picture is larger than the form, the picture is clipped to fit the form. If the picture is smaller than the form, the form's own background color shows in any part of the form background not covered by the picture. Stretch causes Access to stretch the picture vertically and horizontally to match the size of the form; the Stretch option permits distortions in the picture. Zoom causes Access to magnify the picture, without distortion, to fit the size of the form. The Picture Alignment property controls where Access positions the background picture. The available choices are Top-left (aligns the upper-left corner of the picture with the upper-left corner of the form window), Top-right (aligns the upper-right corner of the picture with the upper-right corner of the form window), Center (places the picture in the center of the form window), Bottom-left (aligns the lower-left corner of the picture with the lower-left corner of the form), Bottom-right (aligns the lower-right corner of the picture with the lower-right corner of the form), and Form Center (centers the picture on the form). Tip To ensure that a background picture is displayed relative to the form, rather than the form's window, select Form Center as the value for the Picture Alignment property.
The Picture Tiling property has two permissible values: Yes or No. Tiling means that the picture is repeatedly displayed to fill the entire form or form window (if the Picture Alignment property is set to Form Center, the tiling fills just the form).
Now that you know how to adjust the background picture and colors of a form, the next section describes how to adjust the foreground colors and border properties of the form and objects on the form. Foreground Color, Border Color, and Border Style You might set the foreground color, border color, and border width through buttons on the Formatting toolbar or directly in the Properties window for a selected control. To set a border style (solid style or a variety of dashed-line styles), you must set the property directly in the Properties window.   Foreground color (the Fore Color property) is applicable only to control objects. (The Font/Fore Color button on the toolbar is disabled when you select a form section.) Foreground color specifies the color for the text in labels and text boxes. The default value of the Fore Color property is black. You choose border colors for control objects that have borders by using the Line/Border Color toolbar button. Foreground color (the Fore Color property) is applicable only to control objects. (The Font/Fore Color button on the toolbar is disabled when you select a form section.) Foreground color specifies the color for the text in labels and text boxes. The default value of the Fore Color property is black. You choose border colors for control objects that have borders by using the Line/Border Color toolbar button.
  The Special Effects button of the Formatting toolbar lets you simulate special effects for control objects, such as a raised or sunken appearance. The Line/Border Width button allows you to control the width of the border of controls. The Formatting toolbar buttons were listed earlier in this chapter in Table 14.2. The Special Effects button of the Formatting toolbar lets you simulate special effects for control objects, such as a raised or sunken appearance. The Line/Border Width button allows you to control the width of the border of controls. The Formatting toolbar buttons were listed earlier in this chapter in Table 14.2.
To set a control's foreground color, border width, or border color by using the Formatting toolbar buttons, first click the control whose properties you want to change and then click the arrow to the right of the toolbar button for the property you want to change. Click the color or line width you want for the control. To set a control's foreground color, border width, border color, or border style in the Properties window, first select the control whose properties you want to change by clicking it. If necessary, open the Properties window by clicking the Properties button on the toolbar. Click the Format tab in the Properties window and then scroll to the text box for the property you want to change. Most of the border properties are selected from drop-down lists; color properties require you to type a number that represents the desired color in Windows 98/Me or Windows 2000/NT color notation. (Windows color notation is too complex to explain here; the easiest way to enter color values is with the toolbar buttons or by using the color Builder described in the following section, "Creating Custom Colors with the Color Builder.") Creating Custom Colors with the Color Builder If you aren't satisfied with one of the predefined colors for your form sections or control objects, you can specify your own custom colors by following these steps: Place the cursor in the Back Color, Fore Color, or Border Color text box of the Properties window for a form section or control. Click the Builder button to open the Color dialog. The basic form of this dialog enables you to choose from a set of 48 colors. If one of these colors suits your taste, click the color square and then click OK to assign that color as the value of the property, and close the dialog. If you want a custom color, proceed to step 3. Click the Define Custom Colors button to expand the Color dialog to include the Hue/Saturation and Luminance windows, as shown in Figure 14.17. Figure 14.17. Define a custom color in the expanded Color dialog. 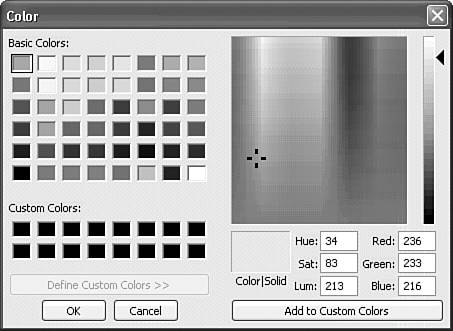 Click and drag the cursor within the square Hue/Saturation area to choose the color you want. Click and drag the arrow at the right of the rectangular luminance area while observing the Color block; release the mouse button when the Color block has the luminance (brightness) value you want. Click Add to Custom Colors to add your new color to the first of the 16 custom color blocks. Click the new custom color block to select it. Click OK to add this color value to the property, and close the Color dialog.
In 256-color VGA mode, any colors you choose or create, other than the standard Windows 256-color palette, are simulated by a dithering process. Dithering alternates pixels of differing colors to create the usually imperfect illusion of a solid color. |