| The Connection object has a property, ConnectionString, which you can use to inform ADO where to find the data source, as well as information about opening it. Here's a simple example: Dim cnConnectToLedger As New ADODB.Connection With cnConnectToLedger .Provider = "Microsoft.Jet.OLEDB.4.0" .ConnectionString = _ "Data Source=C:\Documents and Settings\GL.mdb" End With
Building More Complicated Connections The ConnectionString is a wide-ranging property and typifies the flexibility of ADO: You can use it to specify aspects of the connection that can also be specified elsewhere. The example given earlier specified the provider using the Provider property. It could also have been managed this way: Dim cnConnectToLedger As New ADODB.Connection With cnConnectToLedger .ConnectionString = _ "Provider = Microsoft.Jet.OLEDB.4.0;" & _ "Data Source=C:\Documents and Settings\GL.mdb" End With
Notice that the provider is specified within the connection string instead of in its own property. Building Connection Strings with UDL Files If you want, you can get help building a connection string. The approach relies on creating a universal data link, or UDL, file. The file is saved as text, so you can open and view it with Notepad, Word, or any application that can read text files. You begin by creating a blank data link file and then opening it by double-clicking it. The Data Link Properties dialog box appears and assists you in building the link. When you're through, the information is saved as text, much like a DSN file. When you've opened the data link file with a text reader, you'll see the connection string and you can copy and paste it into the VBA code where you're using a connection string. More explicitly, take these steps: - Start Notepad. Without typing anything, choose Save As from the File menu. In the File Name box, type something such as New Data Link.udl. The filename is irrelevant (although it helps to make it a meaningful one); what's important is that the file have the extension .udl. Quit Notepad.
- Using Windows Explorer or My Computer, browse to the location where you saved the file in step 1. Locate the file and double-click its icon. The Data Link window opens. Click the Providers tab, shown in Figure 8.2.
Figure 8.2. All providers available to your workstation appear in the list box. 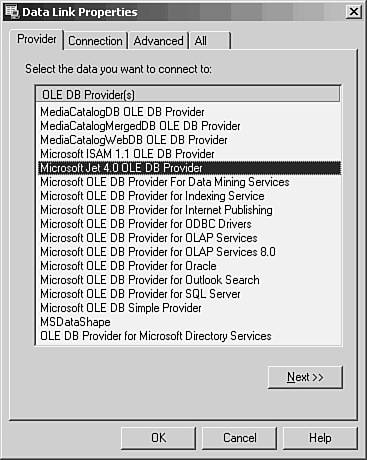
- Select the provider you want from the OLE DB Providers list box. For an Access database, select Microsoft Jet 4.0 OLE DB Provider or (for more options) select Microsoft OLE DB Provider for ODBC Drivers. For a SQL Server database, select Microsoft OLE DB Provider for SQL Server. For an Excel workbook, select Microsoft OLE DB Provider for ODBC Drivers. When you've selected a provider, click the Connection tab or the Next button. The Connection tab appears (see Figure 8.3).
Figure 8.3. This Connection tab is based on selecting Microsoft Jet 4.0 OLE DB Provider on the Provider tab. 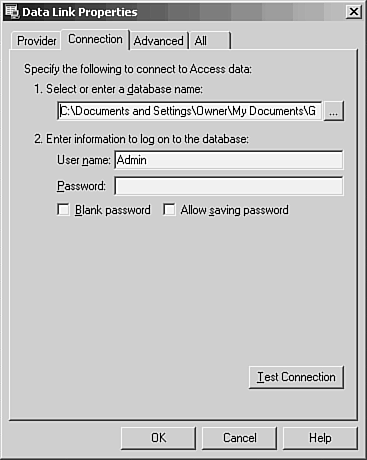
- Click the button to the right of the box in step 1. This enables you to browse to the location of an Access database.
NOTE The contents of the Connection tab vary, depending on the provider you selected on the Provider tab. The ODBC Drivers provider, for example, lets you supply a DSN. NOTE The username that's supplied by default in step 2 is Admin. This is also the default username for opening an Access database. The normal state of affairs is for the Admin user to have no password. When the Admin user has a password, Access requires the user to supply a recognized username and password. - Supply a username and password if the database has been secured and the Admin user has a password. If you do not supply a password, or if you fill the Blank Password check box, the resulting text file will show, among other things, Password="". If you supply a password and fill the Allow Saving Password check box, the password will be saved in the text file, easily read by anyone who cares to point Notepad at it. (You'll get a warning if you try this.)
- Click the Test Connection button. If the data source can be opened with the information you've supplied, you'll see a message box that says Test connection succeeded. If for some reason the connection failed, you'll see a message to that effect, along with some brief information about the reason for the failure.
- Click the Advanced tab. For Jet databases and some other providers, such as ODBC, you can check permission levels that will apply to this connection (see Figure 8.4).
Figure 8.4. An additional access permission, Write, is hidden in the list box until you scroll down to it. 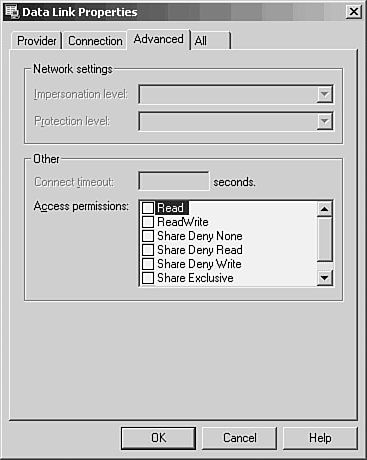
- Fill the check box of one or more permissions. If the database has been secured, make sure that the permissions you assign to this connection do not conflict with those assigned in the database to the user named on the Connection tab.
- If you want, click the All tab on the Data Link Properties dialog box. There, as shown in Figure 8.5, you'll see all the properties that can be set for the provider you chose: The components of that list depend on which provider you chose. You shouldn't normally find it necessary to edit a property. If you do, though, you can edit each of them from this tab by selecting it and clicking the Edit Value button.
Figure 8.5. Any of these properties, including those farther down the list, can be set in the connection string. 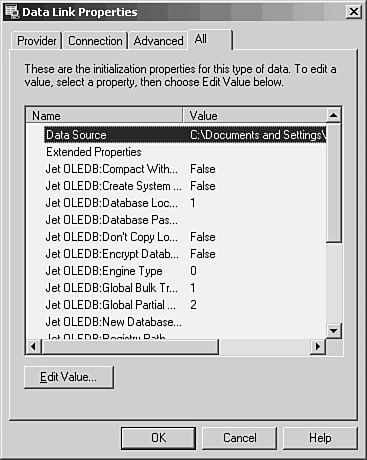
- Click the OK button whenever you're through.
- Now restart Notepad or whatever other application you used to create the UDL file in the first place. Choose Open from the File menu, browse to the location where you saved it, set its Files of Type dropdown to All Files, and open the UDL file. You'll see something like this:
[oledb] ; Everything after this line is an OLE DB initstring Provider=Microsoft.Jet.OLEDB.4.0;Password=""; _ Data Source=C:\Documents and Settings\Owner\My Documents\GL.mdb; _ Persist Security Info=True
Using the Code The code developed in the prior section needs some comments: You can name the UDL file in a connection string, much as you do with a DSN. Your connection string might look like this: Dim cnConnectToLedger As New ADODB.Connection With cnConnectToLedger .ConnectionString = "File Name=C:\Documents and Settings\_ Owner\My Documents\MyUDL.udl" End With
The first line of the UDL file, [OLE DB], is a section declaration. The second line, beginning with the semicolon, is a comment. If you use the UDL file directly, by naming it in a connection string, make sure that both the section declaration and the comment line are in place if either is not, you'll get an error message that The file is not a valid compound file. You can use the UDL file's connection string indirectly, by putting its contents in your connection string. Then, your connection string might look like this: Dim cnConnectToLedger As New ADODB.Connection With cnConnectToLedger .ConnectionString="Provider=Microsoft.Jet.OLEDB.4.0;" & _ "Data Source=C:\Documents and Settings\Owner\My Documents\GL.mdb;" & _ "Persist Security Info=False" End With
If you paste the connection string from the UDL file into an actual connection string in your VBA code, be sure to replace this Password="";
with this Password=;
or delete the Password argument completely to avoid confusing the interpreter as to where the connection string ends.
|