Placing Custom Commands on Menus and Toolbars
3 4
In addition to dragging built-in commands to toolbars and menus, you can add your own functions and macros to toolbars and menus so that you can execute the macros and functions by clicking buttons or selecting menu commands. For example, let’s say you’ve created a macro to run a series of actions needed to import and process data from a mainframe and a function to track down and delete partial records from a table. You can create toolbar buttons to run the macro and the function with a single click.
To create a toolbar button that runs a macro, follow these steps:
- Open the Customize dialog box by right-clicking the gray background of a toolbar and selecting Customize from the shortcut menu.
- Click the Commands tab, and then select All Macros in the Categories list.
- Locate the macro in the Commands list, and drag it to the desired location on the toolbar of your choice, as shown in Figure 13-3.
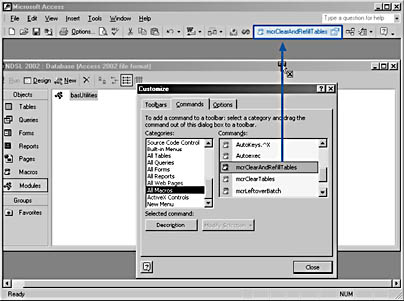
Figure 13-3. Create a toolbar button that runs a macro by dragging the macro to a toolbar.
- By default, the toolbar button has a small scroll image and the name of the macro. To display an image only, right-click the button to open its shortcut menu, and select Default Style. To give the button a shorter caption, edit the name in the Name property shown on the shortcut menu.
The technique for creating a toolbar button to run a function is somewhat more complicated. To place a button that executes a function on a toolbar, follow these steps:
- Open the Customize dialog box by right-clicking the gray background of a toolbar and selecting Customize from the shortcut menu.
- Click the Commands tab of the Customize dialog box.
- Select File in the Categories list.
- From the Commands list, drag the Custom command to the toolbar, creating a new, blank toolbar button.
- Right-click the new Custom button, and then select Properties from the shortcut menu to open the control’s properties sheet.
- Type the name of the function in the On Action combo box, preceded by an equal sign, as shown in Figure 13-4.

Figure 13-4. Assign a function to a toolbar button by entering its name as the button’s On Action property.
note
The drop-down list for the On Action combo box displays only macros, so you can’t use it to select a function. - Change the button’s name in the Caption text box.
- Change the text in the ScreenTip box to describe the button’s function.
- Change the button style and any other properties in the properties sheet. (This step is optional.)
- Click OK to close the properties sheet.
note
You can place only functions on toolbar buttons—this technique doesn’t work for subroutines.
Figure 13-5 shows two new buttons (one button runs a macro, and the other runs a function) on the Database toolbar, with the ScreenTip for the button that runs the function.
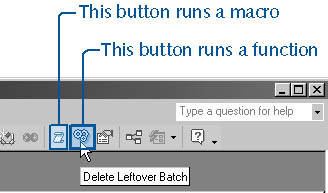
Figure 13-5. One of these toolbar buttons runs a macro; the other runs a function.
EAN: 2147483647
Pages: 172