Retrieving Data
3 4
The simplest queries retrieve, group, and organize data, but they don’t limit the results or evaluate expressions. You saw two examples of simple queries in the previous sections. Using the Simple Query Wizard might be convenient, but you can create a select query without the wizard. In addition, whether you start with the Simple Query Wizard or build the query from scratch in the query Design view, you can modify a query in a number of ways.
In this section, instead of using a wizard to create the list, let’s use the query Design view.
To create the list without using a wizard, follow these steps:
- On the Database window’s Objects bar, click Queries, and then double-click Create Query In Design View.
Troubleshooting - I can’t see the Create Query In Design View item in the Database window
If the Create Query In Design View item isn’t visible in the Database window, the New Object Shortcuts option might be turned off. (The Create Query In Design View item is one of these shortcuts.) To turn the option back on, choose Tools, Options, and select the New Object Shortcuts check box on the View tab of the Options dialog box.
After you open query Design view, the Show Table dialog box should appear automatically, as shown in Figure 9-9. If the Show Table dialog box isn’t displayed, click the Show Table button on the Query Design toolbar.
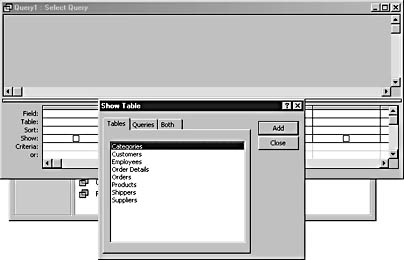
Figure 9-9. When you begin a new query in Design view, the Show Table dialog box is automatically displayed.
- The Show Table dialog box allows you to identify data sources that you want to add. If the data source is a query instead of a table, click the Queries tab. The Both tab will display both tables and queries. You can also add more than one data source. For this example, add the Customers table, and then click Close.
- Add the CompanyName, ContactName, ContactTitle, and Phone fields from the Customers table to the design grid, as shown in Figure 9-10.
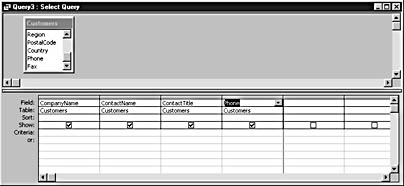
Figure 9-10. The CompanyName, ContactName, ContactTitle, and Phone fields have been added to the design grid.
There are five methods for adding fields to the design grid, as follows:
- Double-click the field in the field list. Access will add the field to the first blank column.
- Drag the field to a column.
- Double-click or drag the asterisk (*) in the field list to add all the fields from a table. The asterisk represents all the fields in the data source.
- In the design grid, choose a field from the Field drop-down list.
- In the design grid, type the field name in a column’s Field cell.
When you use either of the last two methods and the query is based on more than one table or query that have a field name in common, choose the appropriate table from the Table drop-down list. (If the Table row isn’t displayed, choose View, Table Names.)
Adding Multiple Fields to the Design Grid
You can also select multiple fields in a table and drag them to the design grid. To select a contiguous block, click the first field in the set, hold down the Shift key, and then click the last field in the set. To select a noncontiguous group, hold down the Ctrl key while clicking each field in the field list. Once the desired fields have been selected, drag the group to the design grid. Access will add the fields to the design grid in the same order in which they appear in the field list.
You can also double-click the field list’s title bar to highlight all the fields at once, and drag them to the design grid as a block. This method has some advantages over the asterisk method described earlier. If you drag all the fields to the design grid as a block, you can remove a few fields you don’t need in the query, and you can add criteria to individual fields. But if you drag the asterisk to the design grid, you won’t have to update the query if you add, delete, or change the names of fields in the query’s data sources.
- After you have added the CompanyName, ContactName, ContactTitle, and Phone fields to the design grid, you can specify additional options. Although it’s not necessary in this example, you can specify a sort order in a column’s Sort field, enter criteria expressions in a column’s Criteria or Or cell, and clear the Show check box when you don’t want a particular field to appear in the results.
- To execute the query, on the Query Design toolbar, click the Run button. The results shown earlier in Figure 9-5 should be displayed.
tip - Preload a data source
Here’s a shortcut to preload a new query with a single data source table or query. Before you open query Design view, in the Database window, select the table or query you want to include in the query. Then, on the Database toolbar, click the arrow to the right of the New Object selector, and then click Query. In the New Query dialog box, double-click Design View. The query Design view will open with the selected table or query. You can identify only one data source this way, so if your query is based on more than one table or query, you’ll still need to use the Show Table dialog box (by clicking the Show Table button) and select the remaining sources.
EAN: 2147483647
Pages: 172