Form Features and Properties
3 4
Forms have a great many properties, which are divided into five tabs on a form’s properties sheet, as shown in Figure 5-40.
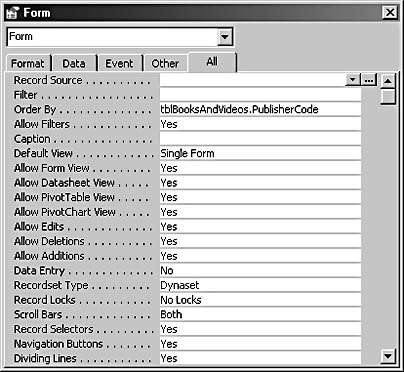
Figure 5-40. A form’s properties sheet divides form properties into five tabs.
Three of the tabs (Format, Data, and Other) list subsets of the form’s properties. The All tab lists all the form’s properties in a single list. The Event tab lists the form’s events, which are used for writing VBA code.
The same properties sheet displays the properties of the entire form, a form section, or a control on the form. To open a properties sheet, click the Properties button on the Form Design toolbar (see Figure 5-41), press Alt+Enter, or press F4, which is a new hot key in Access 2002.

Figure 5-41. You can open a form’s properties sheet by clicking the Properties button on the Form Design toolbar.
note
You have two other (slower) ways to open the properties sheet: Choose View, Properties, or right-click the form or control and select Properties from the shortcut menu.
tip
In Access 2002, you can open a form’s properties sheet in Design view, Form view, and Datasheet view.
Once the properties sheet is open, you can use the following techniques to display the appropriate information:
- To display the form’s properties, click the form selector (the gray square in the upper left corner of the form, in Design view), as shown in Figure 5-42. When the form is selected, a smaller black square appears in the middle of the gray square, and the properties sheet’s caption is Form.
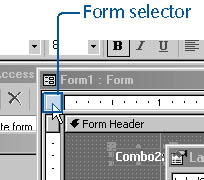
Figure 5-42. You can display form properties in the properties sheet.
- To display the properties of a specific form section, click the section selector (the gray bar over the section). Figure 5-43 shows the form header selector being clicked to display the form header’s properties in the properties sheet. The properties sheet’s caption is Section: FormHeader (or the appropriate section name).
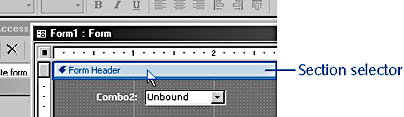
Figure 5-43. You can display form header properties in the properties sheet.
- To display the properties of a control, click the control. The properties sheet’s caption displays the control type and control name, such as Text Box: Text4.
- To display the properties of a group of controls, select the controls. The properties sheet’s caption becomes Multiple Selection, and only the properties shared by all the controls are available.
Sections and Pages
All forms have a detail section. Forms can also have a form header and form footer or a page header and page footer. Headers and footers are paired sections; you can’t have a page header without a page footer, for example, although you can keep a section from being displayed by shrinking it to zero height. To add form header and form footer sections to a form, choose View, Form Header/Footer, as shown in Figure 5-44. The Page Header/Footer option on the same menu toggles a form’s page header and page footer sections.
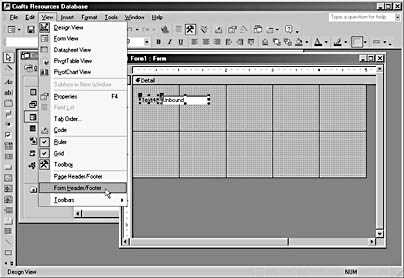
Figure 5-44. You can choose to turn on and off a form’s header and footer sections.
caution
Ifyou turn off the form header/footer sections, any controls in these sections will be permanently deleted.
Form header and footer sections are quite useful. You can place controls such as record selector combo boxes or command buttons in these sections to perform actions that apply to the entire form. In the earliest versions of Access (before Access 2.0), page headers and footers were also useful when multipage forms were used to display more data than could be displayed at one time. However, multipage forms have not been useful (except for very unusual situations) since the tab control was introduced in Access 2.0, as the Tab control is a more efficient way of displaying large amounts of data on a form.

Figure 5-45 shows the primary form in the Crafts database, shrunk vertically to show only the form header and footer sections. The form header includes a record selector combo box (actually, two combo boxes; only one is visible at a time) and two command buttons, which are used to display one combo box or the other.
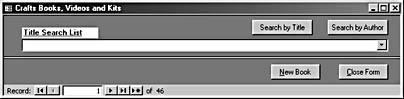
Figure 5-45. Only the header and footer sections of this form are visible.
tip
If you shrink a form vertically, its header and footer sections won’t shrink; only the detail section shrinks.
The form footer section has two command buttons: one to go to a new record (it could also be used to pop up a New Book form), and another to close the form and return to the main menu. The event procedures attached to the controls in this form’s header and footer sections are listed here:
Private Sub cboAuthorSearchList_AfterUpdate() On Error GoTo ErrorHandler strSearch = "[BookID] = " & Me![cboAuthorSearchList].Column(2) Debug.Print strSearch 'Find the record that matches the control. Me.Requery Me.RecordsetClone.FindFirst strSearch Me.Bookmark = Me.RecordsetClone.Bookmark ErrorHandlerExit: Exit Sub ErrorHandler: MsgBox "Error No: " & Err.Number & "; Description: " _ & Err.Description Resume ErrorHandlerExit End Sub Private Sub cboTitleSearchList_AfterUpdate() On Error GoTo ErrorHandler strSearch = "[BookID] = " & Me![cboTitleSearchList].Column(1) Debug.Print strSearch 'Find the record that matches the control. Me.Requery Me.RecordsetClone.FindFirst strSearch Me.Bookmark = Me.RecordsetClone.Bookmark ErrorHandlerExit: Exit Sub ErrorHandler: MsgBox "Error No: " & Err.Number & "; Description: " _ & Err.Description Resume ErrorHandlerExit End Sub Private Sub cmdSearchbyAuthor_Click() On Error GoTo ErrorHandler Me![cboTitleSearchList].Visible = False With Me![cboAuthorSearchList] .Visible = True .SetFocus .Dropdown End With ErrorHandlerExit: Exit Sub ErrorHandler: MsgBox "Error No: " & Err.Number & "; Description: " _ & Err.Description Resume ErrorHandlerExit End Sub Private Sub cmdSearchbyTitle_Click() On Error GoTo ErrorHandler Me![cboAuthorSearchList].Visible = False With Me![cboTitleSearchList] .Visible = True .SetFocus .Dropdown End With ErrorHandlerExit: Exit Sub ErrorHandler: MsgBox "Error No: " & Err.Number & "; Description: " _ & Err.Description Resume ErrorHandlerExit End Sub Private Sub cmdNew_Click() On Error GoTo ErrorHandler DoCmd.GoToRecord , , acNewRec Me![txtTitle].SetFocus ErrorHandlerExit: Exit Sub ErrorHandler: MsgBox "Error No: " & Err.Number & "; Description: " _ & Err.Description Resume ErrorHandlerExit End Sub Private Sub cmdClose_Click() On Error GoTo ErrorHandler Dim dbs As Object Set dbs = Application.CurrentProject If dbs.AllForms("fmnuMain").IsLoaded Then Forms![fmnuMain].Visible = True Else DoCmd.OpenForm "fmnuMain" End If DoCmd.Close acForm, Me.Name ErrorHandlerExit: Exit Sub ErrorHandler: MsgBox "Error No: " & Err.Number & "; Description: " _ & Err.Description Resume ErrorHandlerExit End Sub
See Chapter 20, "Customizing Your Database Using VBA Code," for more information about writing code behind forms procedures.
Format Properties
The properties displayed on the Format tab of a form’s properties sheet are related to the appearance of the form. Some of the more frequently changed properties are described in the following list. In most cases, the remaining properties can be left at their default values.
- Caption. Use this property to change the text displayed in the form’s title bar.
- Default View. This property offers a selection of available views for the form.
- Allow…View. Set any of these four properties to No to make the specified view unavailable.
- Scroll Bars. This property controls which scroll bars will be visible on the form.
- Record Selectors. This property turns on or off the record selector (the vertical gray bar at the left of the form), which is used to select the entire record. Figure 5-46 shows the record selector.
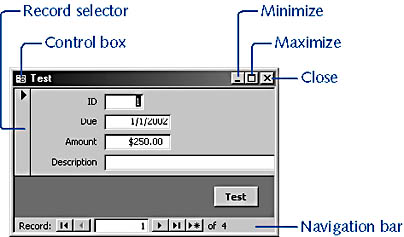
Figure 5-46. This form’s record selector is turned on.
Navigation Buttons. This property turns on and off the navigation bar at the bottom of the form.
Control Box, Min/Max Buttons, Close Button, What’s This Button. These properties control the small buttons in the upper left and right corners of a form.
tip
You can get help for any property by positioning the mouse pointer in the property’s current value and pressing F1.
Data Properties
The following properties are the most frequently used properties on the Data tab of a form’s properties sheet:
- Record Source. This property specifies the table, query, or SQL statement that provides the form’s data.
- Filter. This optional property can contain an expression that specifies a field and a value for filtering the form.
- Order By . You can add a field or expression to this property to sort the form’s records.
- Allow. You can set these properties to allow or prohibit filters, edits, deletions, or additions.
- Data Entry . This property specifies whether only the records entered in the current session are visible.
Other Properties
The following properties are the most frequently used properties on the Other tab of a form’s properties sheet:
- Pop Up. When you set this property to Yes, the form will always be on top of other forms.
- Modal. When you set this property to Yes, users can’t do anything else until they close the form. Use this property cautiously—modal forms can drive users crazy.
- Cycle. For users tabbing through form controls, this property offers a choice of cycling among all records, the current record (generally the best choice), or the current page.
- Menu Bar, Toolbar, Shortcut Menu, Shortcut Menu Bar. These properties allow you to specify one of four types of custom command bars.
See Chapter 13, "Customizing Access Toolbars and Menus (Command Bars)," for more details on command bars.
- Has Module. This property specifies whether the form has an attached code module.
- Allow Design Changes. If All Views is selected, this property allows you to make design changes in all views. This doesn’t mean that you can (for example) resize a control in Form view, however; all changes must be made in the properties sheet.
Conditional Formatting
Conditional formatting for form controls is a long-requested feature that was added in Access 2000. This feature lets you apply a specific color, a special effect, or another formatting choice to a control in certain circumstances, by means of a user-friendly dialog box. (You don’t have to write code, as you did with Access 97 and earlier.) For example, if you have a txtDue control bound to a Date field and you want the control to have a yellow background if the due date is earlier than today, you can select the control in Design view and choose Format, Conditional Formatting (or right-click the control, and choose Conditional Formatting from the shortcut menu) to open the Conditional Formatting dialog box, as shown in Figure 5-47.
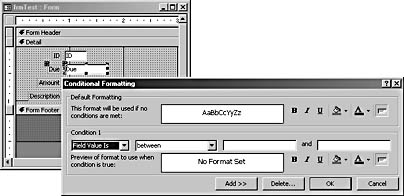
Figure 5-47. The Conditional Formatting dialog box enables you to specify formatting that appears when certain conditions are met.
note
You might expect to be able to use the Expression Builder to aid in constructing expressions to use in conditions in the Conditional Formatting dialog box, but unfortunately the Expression Builder is not available in this dialog box.
You can construct up to three conditions for formatting a control. Each condition has three parts: the formatting element, the comparison phrase, and the comparison expression.
The Formatting Element drop-down list provides the following three choices:
- Field Value Is. Uses the values in the control as formatting criteria.
- Expression Is. Uses an expression as the formatting criterion.
- Field Has Focus. Applies the formatting when the control has the focus.
The Comparison Phrase drop-down list provides eight choices:
- Between
- Not Between
- Equal To
- Not Equal To
- Greater Than
- Less Than
- Greater Than Or Equal To
- Less Than Or Equal To
caution
Any conditional formatting that you apply to a control won’t be preserved when the form is exported to another data format, such as an Excel worksheet. This is understandable because conditional formatting is a feature of Access.
To complete the condition, type a constant value or an expression in the text box. (If you’re using either Between or Not Between as the comparison phrase, specify two values or expressions.)
Figure 5-48 shows the Conditional Formatting dialog box with Field Value Is selected for the formatting element, Less Than selected for the comparison operator, and the Date function specified for the constant value. A yellow background color and bold formatting are selected as well.
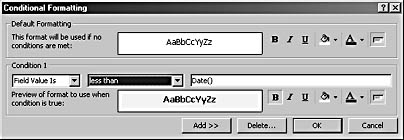
Figure 5-48. The condition in this Conditional Formatting dialog box is complete.
Figure 5-49 shows the sample form in Form view, displaying a record for which the due date is earlier than today.
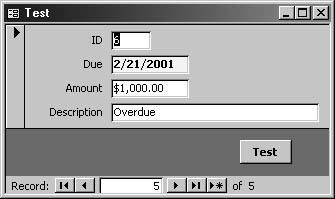
Figure 5-49. The conditional formatting has been applied to this form, shown in Form view.
Sometimes you’ll want to clarify which control has the focus by giving the current control a different background color. You can do this by selecting Field Has Focus for the formatting element (the other selections will disappear), as shown in Figure 5-50. You must set the same condition on all controls on the form to get the desired effect (or at least set the condition on all controls that display text, such as text boxes and combo boxes).
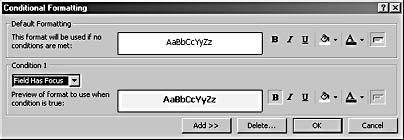
Figure 5-50. You can create a condition to clarify which field has the focus.
note
You can’t select several controls and apply the same conditional formatting to all of them. You can apply conditional formatting to only one control at a time.
After applying this condition, as you tab from control to control in the form, the current control will appear in boldface and with a yellow background.
EAN: 2147483647
Pages: 172