Creating Data Entry Forms
3 4
All data entry forms—and all database users—are not created equal. For that reason, good database developers think carefully about the people who will be using their forms to enter data into the database, and design forms to meet the users’ needs and preferences.
With some databases, new records are added one at a time, by the same person who will be working with the data later on. For these database users, an easy-to-understand and attractive form is of primary importance. The form should be laid out in a logical fashion (such as grouping name and address components together), and should have appropriate tools to aid in selecting or entering data. Option groups, check boxes and combo boxes are very useful on these forms. We’ll call this type of form a standard form.
In other cases, data is entered in large batches by data entry operators and is later reviewed and modified by managers and others. Data entry operators need a form that is designed for quick data entry, which means limiting the use of controls (such as option groups and combo boxes) that require use of the mouse, and arranging controlsin a simple (usually top-to-bottom) layout. We’ll call this type of form a quick data entry form.
Whether a form is designed for review by managers or for full-time data entry, it should have features that ensure that data entered into the form is accurate. The following sections cover form design strategies that help ensure accurate data entry as well as the use of quick data entry forms for full-time data entry and for entering a new record from a command button on a standard form.
Ensuring Data Accuracy
A standard form has its fields positioned in a logical way so that users have a visual guide to the sequence of data entry. For example, most users are familiar with forms that ask for name, address, city, state, ZIP or Postal code, phone, and e-mail address. It’s a logical and familiar progression. Mixing up the order, or introducing new fields in the middle of the sequence (such as adding a Birthdate field just after Address), would be confusing. Replicating a familiar structure that managers or other data entry personnel find comfortable will help make the database easier for users—which is one of your primary goals as a developer.
If you are creating a database for a customer, as you begin the process of interviewing your customer about the goals of the database you are creating, be sure to ask for any paper forms that are currently used to capture the data. By creating standard forms that follow the field sequence in existing paper forms, you’ll cut down on the time it takes users to get comfortable with the new process, which should benefit your project.
However, there are some caveats: Replicating a paper form is feasible only when the paper form is itself well-designed. Attempting to duplicate a poorly designed paper form won’t lead to a good form design. Additionally, you shouldn’t hesitate to use form features (such as combo boxes) that have no analog on paper forms. Selecting a value from a list, rather than typing it in, eliminates the possibility of making a mistake when typing an entry.
For managers, making the standard form layout similar to the layout of a familiar paper form can be helpful. For data entry operators (as discussed earlier), the top-to-bottom layout of a quick data entry form facilitates rapid, interruption-free data entry.
In addition to creating a form that is easy to understand and based on a familiar interface, you can ensure that the form fits the user’s needs by including error-trapping features, such as input masks and validation rules. Error trapping helps control the accuracy of data, making sure, for example, that dates are entered in the correct format, that text data is entered in text fields, that numeric values are in the appropriate range, and that numeric data is entered into numeric fields. If data is entered incorrectly, a good form will prompt the user to enter the data in the correct format.
The techniques listed below can make a form easier to use (and reduce errors in the process):
- Default values – Enter the appropriate value (or expression) in the DefaultValue property of a field to automatically fill in the field when a new record is created. For example, entering Date() as the DefaultValue property of a Date field puts the current date into the field when a new record is created. Entering Now() puts the current date and time into the field, which is useful as a time stamp indicating when the record was created.
- Input masks force data entry to adhere to a specific sequence of letters and/or numbers, such as telephone numbers and Social Security numbers. The Input Mask Wizard has a selection of standard input masks, and you can create your own custom input masks as well. Input masks are particularly useful for IDs, product codes and other such highly structured data.
- Validation rules check data after it is entered, and if data fails the validation test, a message pops up with information telling you what data is valid. For example, entering >Date+7 into a Date field’s ValidationRule property pops up an error message if the user enters a date earlier than a week from the current date.
- ControlTip text is the text that displays in a floating yellow box when the mouse cursor is hovered over a control. For example, a txtNotes text box bound to a memo field might have a control tip saying "Parent-teacher quarterly discussion notes." Use this feature sparingly; it can be distracting if overused.
Creating Quick Data Entry Forms
Forms designed for focused data entry (continuous typing of data from paper documents or voice recordings) have significantly different requirements than forms designed for managers or others who primarily review and edit data. In focused data entry form, speed and accuracy of data entry are the prime requirements, and an attractive layout is secondary, if it matters at all. Data entry operators should be able to quickly add, correct, and save records without taking their hands off the keyboard, and error trapping should be as unobtrusive as possible (no modal dialog boxes!)—often just a beep is enough.
Designing a Simple Quick Data Entry Form with the AutoForm Selection
A simple top-to-bottom form layout, with all the controls lined up in a single column, although less than glamorous in appearance than other form layouts, is well suited to quick data entry. To create a simple quick data entry form, follow these steps:
- Select a table in the Database window. This table will be the form’s record source.
- Click the New Object tool in the Database toolbar to display the drop-down list.
- Choose AutoForm (see Figure 5-30). Access creates a simple data entry form similar to the one shown in Figure 5-31.
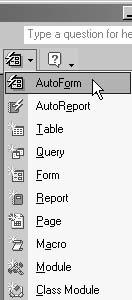
Figure 5-30. You can select AutoForm from the New Object selector’s drop-down list to have Access create a simple data-entry form for the selected table.
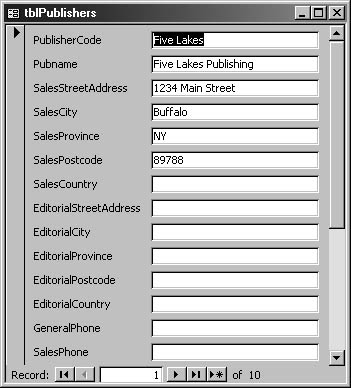
Figure 5-31. The form created with the AutoForm feature isn’t fancy, but it’s functional for quick data entry.
note
The data entry form you create by using the AutoForm selection in the New Object drop-down list doesn’t exactly correspond to any of the five AutoForm selections in the New Form dialog box.
Designing a Quick Data Entry Form by Dragging and Dropping Fields
If you want to be selective about the fields you include on your data entry form, you can use the drag-and-drop method to create your quick data entry form. Here are the steps:
- Select a table in the Database window.
- Click Forms; then click New. The New Forms dialog box appears.
- Design View is selected; click OK to create the new form.
- If the field list is not visible, click the Field List button on the toolbar to display it.
- Drag the fields you want to use from the field list to the form, as shown in Figure 5-32.

Figure 5-32. You can create a quick data entry form by dragging the fields you want to a form displayed in Design view.

Figure 5-33 shows a standard form from the Crafts sample database, designed primarily for viewing and modifying information, although it could also be used for entering new Publisher records.

Figure 5-33. The Publishers form is intended primarily for reviewing and modifying data.
Figure 5-34 shows the quick data entry version of this form, designed for rapid entry of multiple data records. Notice that the quick data entry form is streamlined and includes only a selection of fields; it lacks the Specs and Add New Specialty subforms that you’ll find on the standard form because this information would most likely be added later and because navigating quickly between a main form and subforms without leaving the keyboard is difficult.
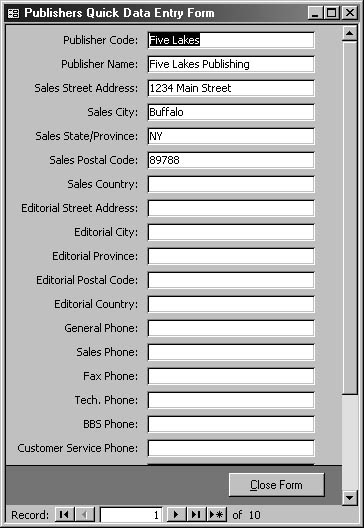
Figure 5-34. The Publishers quick data entry form includes only selected fields and allows users to enter data quickly.
Creating Effective Quick Data Entry Forms
As you can see, quick data entry forms can help you streamline data entry for the people who will be using the database you create. Here are some additional suggestions for ways you can make your quick data entry forms even more effective:
- Prefill fields with data whenever possible, using default values such as Date() for a date field or the most commonly used values for a text or numeric field.
- If a group of records commonly has the same data in a number of fields in a series of records, create a command button or hot key for copying all data (or a subset of data) from the previous record, or copy data from the previous record automatically when a new record is created, using the form’s BeforeInsert event.
- Use a list box instead of an option group or a combo box for displaying a small number of options.
- If you need a combo box, to select a value from a long list, use its Dropdown method to display the list whenever the combo box receives the focus, as shown in this event procedure:
Private Sub cboCover_GotFocus() Me![cboCover].Dropdown End Sub
- Set the form’s Cycle property to All Records so that tabbing out of the last control on the form takes the user to a new record. This is the quickest way to start a new record, but it’s a good choice only for a quick data entry form—in other form modes, users generally want to stay in one record until they choose to go to another record.
- Avoid using subforms, if possible, because navigating between a subform and the main form is difficult without leaving the keyboard.
tip - Use a quick data entry form in partnership with a standard form
A quick data entry form designed specifically for adding new records can serve as an adjunct to a standard form, making it easier to add a complete new record. A quick data entry form to be used for this purpose has its DataEntry property set to Yes, so that only the new record being entered is visible. Code on the Click event of a New button on the standard form opens the quick data entry form, and code on the Close button of this form saves the new record and returns to the standard form, with the newly created record selected. (This technique is described in more detail in the "New Record Forms" section of this chapter.)
EAN: 2147483647
Pages: 172