Appendix A - Setup and Installation
3 4
Most users don’t need to install more than one version of Microsoft Office, but if you develop applications for other users, you probably need to have two or even three different versions of Office installed. The "Installing Office XP" section of this appendix deals with installing Office XP, and the "Working with Multiple Versions of Access" section describes some techniques you can use to make it easier to work in more than one version of Access, including the creation of multiple boot partitions so that each version of Office can be installed in its own partition.
Definitions of Terms
- Partition. A partition is a portion of a hard drive used to store programs or data. A partition has a letter designation (starting with C). You can create partitions with the old DOS FDISK utility, or with a utility such as PartitionMagic.
- Boot Partition. A boot partition is a partition with a bootable operating system installed. With a utility such as BootMagic or System Commander, you can select which operating system to use when you restart your computer.
Installing Office XP
Before you install Office XP you need to make sure you have the right operating system and enough RAM on your computer, and you also need to decide whether you are going to do a clean install of Office XP or install over an existing installation of Office. The following sections will guide you in these considerations.
System Requirements
To install Office XP, you need one of the following operating systems:
- Windows 98, Second Edition
- Windows Millennium Edition (Me)
- Windows NT 4.0 with Service Pack 6 or greater
- Windows 2000 (recommended)
- Windows XP
The RAM requirements for Office XP differ according to the operating system. The following requirements are for Office XP itself; add 8 MB of RAM for each Office application running simultaneously:
- Windows 98, Second Edition: 24 MB
- Windows Me: 32 MB
- Windows NT 4.0: 32 MB
- Windows 2000: 64 MB
- Windows XP: 128 MB
Clean Install vs. Installing over a Previous Version of Office
If you are installing Office XP on a new computer, or in a boot partition that has no version of Office installed, you are doing a clean install. You can do a clean installation of Office XP on a computer that has a previous version of Office if you are willing to reformat the computer (or the boot partition) before you install Office XP.
A clean installation prevents you from carrying over any possible problems from the previous installation of Office, and also ensures that all the supporting files for Office XP are the correct versions. However, if you have a previous version of Office installed, and everything is working fine (and you don’t need to preserve the older version as a separate installation), you are probably better off installing Office XP over your previous installation, as described in the next section.
If you are installing to a computer (or boot partition) on which a previous version of Office is installed, you will be prompted to remove the previous version during the Office XP setup. The removal will happen automatically, but your Office settings will be preserved, so you don’t have to reselect them.
Running Office XP Setup
Before you install Office XP, close down any running programs (including the Office Shortcut Bar), and move the shortcuts in the Startup group to the desktop to make the numerous restarts go faster. (To move the Startup shortcuts, right-click the taskbar and select Properties from the shortcut menu. In the Taskbar And Start Menu Properties dialog box, select the Advanced tab and click the Advanced button. In the Windows Explorer window that opens, navigate to the Startup folder under the Programs folder, select all items in the Startup folder and drag them to the desktop.)
The following steps explain specifically how to install Office XP over Office 97, SR-2 on a boot partition with Windows 98, Second Edition, but the process is similar for other combinations of operating system and Office versions.
- Insert the Office XP CD and run Setup. The first screen to appear is the Office Component Updates screen, shown in Figure A-1.
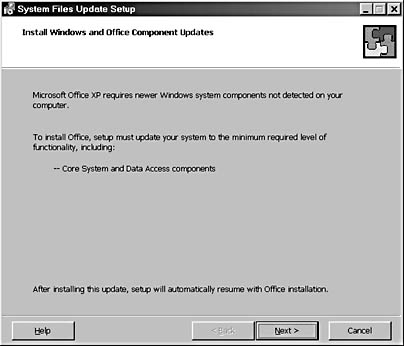
Figure A-1. Start your installation on the Office Component Updates screen.
- Click Next to install the updates.
- Select the I Accept The Terms In The License Agreement check box (see Figure A-2) to make the Install button available.
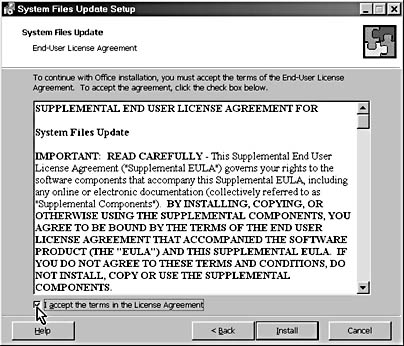
Figure A-2. You must agree to the terms in the end-user license to continue with the install.
A System Files Update screen appears next, showing progress as the system files are updated for the older operating system, as shown in Figure A-3.

Figure A-3. This screen shows the progress of the System Files Update installation.
A message box appears, advising that you need to restart your computer.
- Click Yes to restart your computer.
note
If you have a multiboot setup, select the same operating system partition after restarting Windows to resume setup where it left off. - When you are back in Windows, you will see another message advising you that the Windows installer was updated, and that you need to restart Windows again. Click OK to restart Windows a second time.
If Setup does not resume on its own, re-insert the Office XP CD or run Setup.exe from the CD.
- In the User Information screen that appears next (see Figure A-4), enter your name, initials, and (optionally) organization, and the Product Key from the back of the CD case. Click Next.
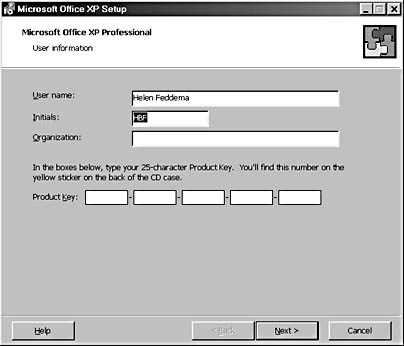
Figure A-4. Enter the requested information in the User Information screen.
- Select the I Accept The Terms In The License Agreement check box and click Next.
The main Setup screen appears. From here you have several options:
- Upgrade Now. Upgrades your current Office installation, installing the most commonly used Office XP components in the same folder as the older version of Office. This can be misleading if your old Office folder had a name that included the version. (See Figure A-5.)
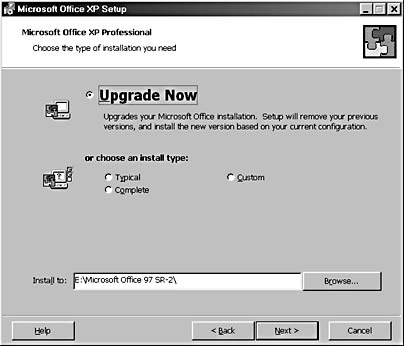
Figure A-5. The main Setup screen offers several installation options.
The other install type options let you select three types of installation:
- Custom. Allows you to select from a list of all the Office XP components, select a different location, and decide whether you want to keep your previous Office version.
- Complete. Installs all Office XP components. This is the recommended option if you have the space.
- Typical. This option, which is only available if there is an existing Office installation, ignores your current configuration and installs Office XP with the most commonly used files.
Independently of the install option, you can click Browse next to the Install To box to select (or create) the install folder for Office XP.
- Upgrade Now. Upgrades your current Office installation, installing the most commonly used Office XP components in the same folder as the older version of Office. This can be misleading if your old Office folder had a name that included the version. (See Figure A-5.)
- After you select the options you prefer (and browse to create a nondefault install folder if you want), click Next.
- Select which previous Office components to uninstall, as shown in Figure A-6. The default option is to remove all previous versions.
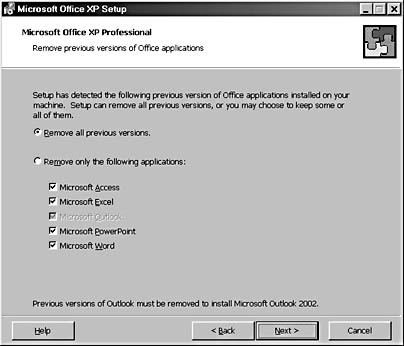
Figure A-6. You have several options for removing previous Office components.
InsideOut
Although I chose to remove the previous version of Office, after the installation was completed, I checked and found the Office 97 installation was still in its folder, with all of its files intact, as far as I could see. If you really want to remove the previous version of Office, it’s best to uninstall it, and then delete its folder before starting the installation of Office XP.
The next screen has a summary of the Office XP components to install, as shown in Figure A-7.
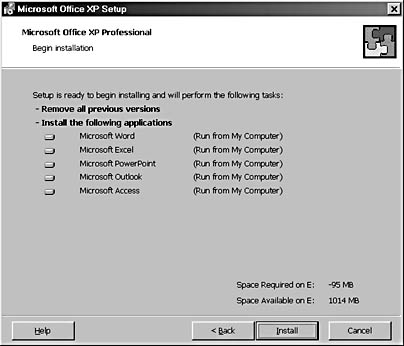
Figure A-7. The Begin Installation screen summarizes the Office XP components to install.
- Click Install to start installing Office XP. You will get a progress screen showing the progress of various phases of installation, as shown in Figure A-8.
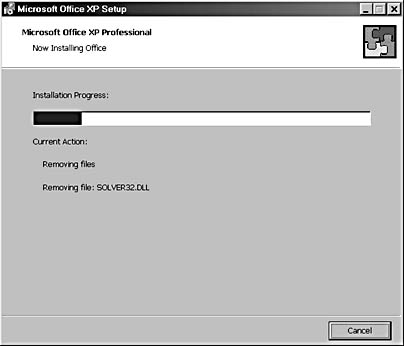
Figure A-8. The Installation Progress screen lets you know what stage the installation is in.
A final Restart message appears next. (See Figure A-9.)
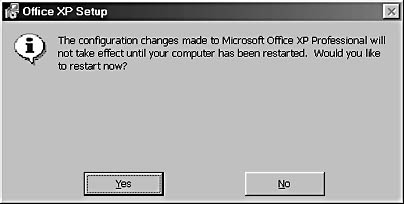
Figure A-9. The final Restart message looks like this.
You now have two new items on your Start menu—New Office Document and Open Office Document. You’ll find the main Office applications at the bottom of the Programs folder, as shown in Figure A-10.
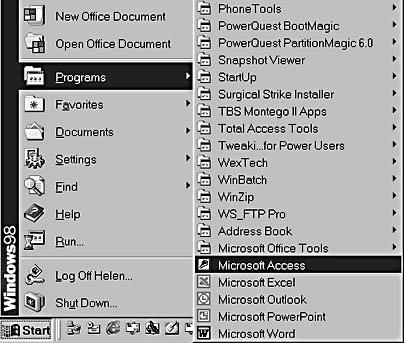
Figure A-10. Office XP shortcuts are conveniently located on the Start menu.
- If you moved shortcuts from the Startup folder to the desktop, move them back now, omitting shortcuts from the previous version of Office. (New ones will be created for Office XP.)
tip
To turn on the Office Shortcut Bar, double-click the Msoffice.exe file in the Microsoft Office\Office10 folder.
Activation
The first time you run an Office XP application (or at any rate, some time before the fiftieth use), you have to activate Office.
To activate Office, follow these steps:
- Open any Office application. The Activation Wizard opens, offering you a choice of activating Office XP by the Internet or by phone, as shown in Figure A-11.
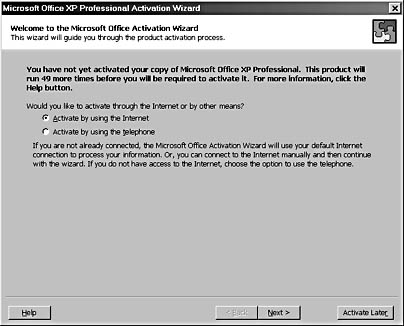
Figure A-11. The first screen of the Activation Wizard offers two options for activation.
If you select the Internet option, you will get the Dial-up Connection dialog box, unless you are already connected. After a connection is made, the Privacy Policy screen appears, as shown in Figure A-12.

Figure A-12. The Privacy Policy screen of the Activation Wizard looks like this.
- In the Customer Information screen that appears next (see Figure A-13), enter your personal information. If you don’t want to transmit personal data, you can simply select your Country/Region. Click Next.
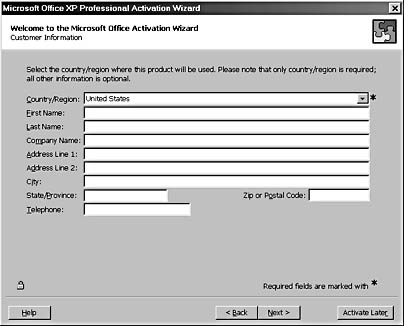
Figure A-13. Enter your personal information on the Customer Information screen of the Activation Wizard.
- On the Special Offers screen (shown in Figure A-14), you can select several check boxes if you want to receive information or newsletters. Enter your e-mail address if you select any of the check boxes.
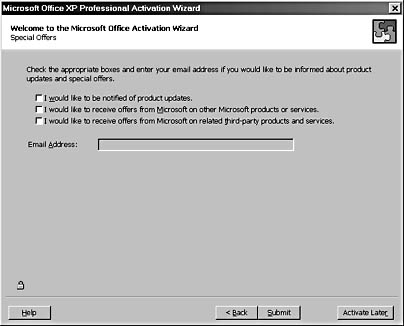
Figure A-14. The Special Offers screen of the Activation Wizard allows you to receive newsletters and other information that might be of interest.
- Click Submit to activate Office.
When activation is completed, the Activation Complete screen appears, as shown in Figure A-15.
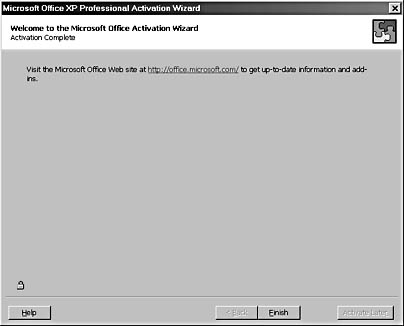
Figure A-15. The Activation Complete screen of the Activation Wizard lets you know you’ve successfully activated Office.
- Click Finish to quit the Activation Wizard.
Working with Multiple Versions of Access
Access 2002 offers users more flexibility than ever for working with Access databases in different versions. You can work with an Access 2000 database in Access 2002 without converting the database, and you can save an Access 2002 database in either Access 2000or Access 97 format. Additionally, you can connect an Access 2002 or Access 2000 front-end database to an Access 97 back-end database. You can even set up multiple front ends (say, in Access 2002, Access 2000, and Access 97) to allow users with different versions of Access to work with the same Access 97 back-end database.
The Two Native Formats of Access 2002
As Access has progressed from version to version, each version has had a new format, thereby requiring you to convert older databases to the new version of Access to get full read-write functionality. Conversion was a one-way trip: after you converted a database to the newer version, the older version of Access couldn’t read the converted database. Until Access 2000, Access (unlike Word and Excel) had no provision for saving an Access database in an older Access format.
Access 2002 has two native formats with full read-write functionality: Access 2002 and Access 2000. You can open an Access 2000 database in Access 2002, without getting a message asking if you want to convert it, and work with it much as you would in Access 2000. You can even select Access 2000 as the default file format for new databases, by choosing Tools, Options, Advanced, as shown in Figure A-16.
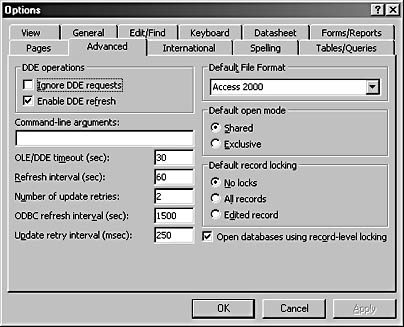
Figure A-16. You can select Access 2000 as the database format for new databases.
This option is handy if you are working in Access 2002 with databases intended for use by Access 2000 users. With Access 2000 selected as the default file format, every new database you create in Access 2002 will be an Access 2000 database.
If you are working with an Access 2002 database in Access 2000, you won’t be able to use the new features of Access 2002, such as PivotTables and PivotCharts, and you might have problems with data access pages, since data access pages have been greatly enhanced in Access 2002. However, if you need to maintain a database for use by persons working in multiple versions of Access, this is not a serious limitation.
Converting Databases to Other Versions of Access
Access 2000 for the first time included a utility for saving an Access 2000 database in Access 97 format. Access 2002 extended this utility—now you can save an Access 2002 database in either Access 2000 or Access 97 format, and you can save an Access 2000 database (opened in Access 2002) in Access 97 or Access 2002 format. Figure A-17 shows the Convert Database submenu for an Access 2002 database, with three selections. Depending on the database type, two selections of the three will be available.
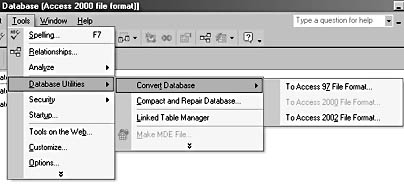
Figure A-17. You can save an Access database to other versions of Access.
If you open an Access 97 database in Access 2002, you will get the message shown in Figure A-18, with options to either convert the database to the currently selected database format (the one set in the Options dialog box’s Advanced tab), or to open the database in a mode that doesn’t allow design changes.
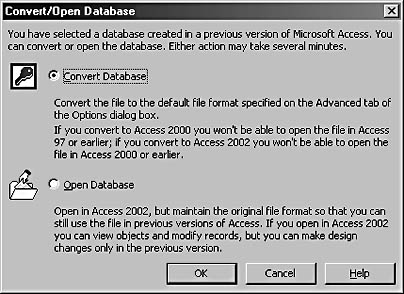
Figure A-18. The Convert/Open message appears when you open an Access 97 database in Access 2002.
If all you need to do is modify data, opening the Access 97 database is a reasonable option, but if you need to change the structure of any database objects, you will need to convert the database. After conversion, you won’t be able to open the database in Access 97.
Working with Access 97 and Access 2000 Databases in Access 2002
While Access 2002 allows you to work with databases in Access 2000 and (with some limitations) Access 97 formats, sometimes you might need more than this functionality. Suppose you have a situation in which Access 97, Access 2000, and Access 2002 users allneed to work with a specific Access database in its native format. You can accomplish this goal this by following these steps:
note
These instructions assume that you are starting with an Access 2000 single-file database and that you have Access 97, Access 2000, and Access 2002 installed separately. (This would be a requirement in any case, to support users of all three Access versions.)
See "Installing Multiple Versions of Access in Different Boot Partitions" later in this chapter for information on installing multiple versions of Access on the same computer.
- Split the database into a front-end database and a back-end database. You can either do this manually or by using the Database Splitter utility. (See Figure A-19.)
For more details on using the Database Splitter utility, see Chapter 15, "Using Add-ins to Expand Access Functionality."
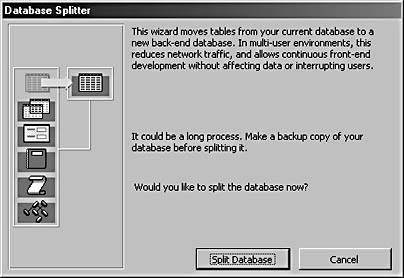
Figure A-19. Use the Database Splitter utility to split the database into a front end and a back end.
- Open the back-end database, and save it to Access 97 format by choosing Tools, Database Utilities, Convert Database, To Access 97 File Format.
- Open the front-end database, and (if necessary) remove any features that won’t work in Access 97, such as subdatasheets, use of the ADO object model in VBA code, and data access pages.
- Close the front-end database and rename it, including 2000 in the name to indicate that it is the Access 2000 front-end. This database will be used by Access 2000 and Access 2002 users.
- Convert the front-end database to Access 97 format, giving it a name that includes 97 to identify it as the Access 97 front end.
- Open the Access 2000 front end database in Access 2000, open the Visual Basic Editor (VBE) window, and compile and save the database. Check that its tables are correctly linked to the Access 97 back-end database; if they’re not, relink them.
- Open the Access 97 front-end database in Access 97, open the VBE window, and compile and save the database. Check that its tables are correctly linked to the Access 97 back-end database; if they’re not, relink them.
Now you have an Access 97 back-end database containing the data, and two front-end databases (one in Access 97 format and one in Access 2000 format). Access 97 users can use the Access 97 front-end database; Access 2000 and Access 2002 users can use the Access 2000 front-end database.
note
You can have a back-end database as old as Access 2.0, with front ends from Access 2.0 and up. However, so many changes have been made from Access version 2.0 to Access 2002 that you will have to sacrifice a lot of functionality to work with all versions from Access 2.0 to Access 2002.
Working with Access 97, Access 2000 and Access 2002
If you need to maintain separate installations of multiple versions of Access, such as Access 97, Access 2000, and Access 2002, you can install different versions of Office (or even just the Access component of Office) on the same computer. You can either install them in the same boot partition (or the only boot partition), or install them in separate boot partitions.
Installing Multiple Versions of Access In the Same Boot Partition
You can install multiple versions of Office (or Access) in the same boot partition, but if you do, you are likely to have some problems. Because different versions of Office use different versions of common controls and DLLs, installing two versions of Office on the same computer can lead to problems in the following areas (unless you install the Office versions in separate boot partitions, as described in the next section):
- Wizards
- Database Templates
- Add-ins
- Importing and Exporting
- Automation code
Installing Multiple Versions of Access In Different Boot Partitions
To avoid problems with wizards, database templates, add-ins, import/export, and Automation code, your best bet is to install each version of Office in a separate boot partition, using an application such as System Commander (see the V Communication’s, or the V-COM Web site, http://www.v-com.com, for information on this product), or BootMagic, which is included with PartitionMagic. (See the PowerQuest Web site, http://www.powerquest.com, for information on these products.) System Commander and BootMagic both allow you to set up multiple boot partitions and run different versions of Office in each partition. You can also take advantage of multiple boot partitions to install different operating systems in each boot partition, such as Windows 98, Second Edition, Windows Me, and Windows 2000. Office installations in different boot partitions can (and for convenience, should) share the same Documents folder located on the D (or higher) drive so it will be available to all operating system partitions.
Setting up A Boot Partition for Running Office XP on Windows Me
To set up a separate boot partition for installing Office XP, running on Windows Me, using PartitionMagic/BootMagic v. 6.0, follow these steps:
- Prepare a startup disk from an existing installation of Windows Me by choosing Start, Settings, Control Panel, Add/Remove Programs, selecting the Startup Disk tab in the Add/Remove Programs dialog box, and clicking the Create Disk button, as shown in Figure A-20.
note
At the time of writing, PowerQuest had just released PartitionMagic 7.0. If you are using this new version, some of the steps here might be different.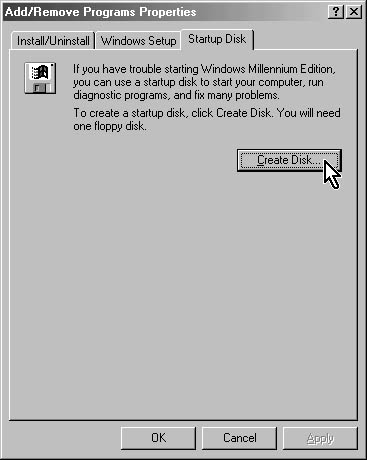
Figure A-20. Begin setting up a boot partition by preparing a Windows Me startup disk.
- When the Insert Disk dialog box appears, insert a disk and click OK to start copying files.
- Create a BootMagic rescue disk if you don’t already have one. (It should have been created during the installation of BootMagic.) Use the Create BootMagic Diskette selection in the PowerQuest BootMagic program group, as shown in Figure A-21, and follow the steps for creating a BootMagic rescue disk.
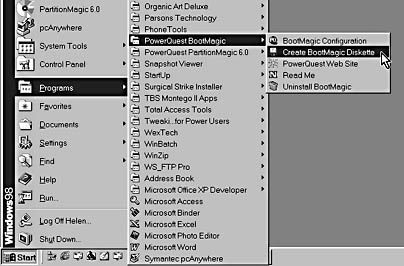
Figure A-21. Create a BootMagic rescue disk if you don’t already have one.
- Open PartitionMagic and click Create New Partition, as shown in Figure A-22. The Create New Partition Wizard opens.
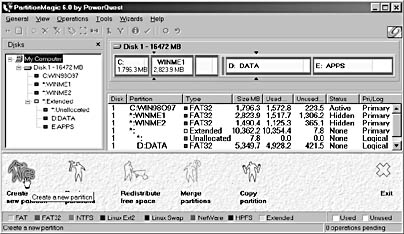
Figure A-22. Create a new partition by using PartitionMagic 6.0.
- Click Next, as shown in Figure A-23.
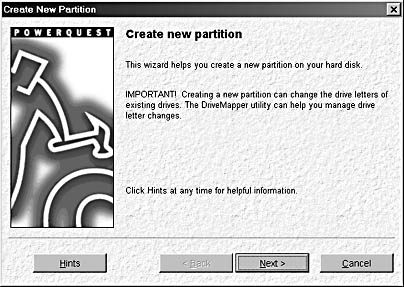
Figure A-23. The Create New Partition Wizard helps you create a boot partition.
- Proceed through the steps of the Create New Partition Wizard, selecting Disk 1 (if you have multiple disks), and selecting the option for using the new partition for an operating system.
- On the screen where you selected the operating system, select Windows 95/98 (because Windows Me is not an available option).
- After you complete the steps of the Create New Partition Wizard, select the new partition in the PartitionMagic window, right-click it to open its shortcut menu, select Advanced, and then select Set Active from the Advanced submenu.
- After you set the new partition as the active partition, restart the computer. Put the Windows Me startup disk in Drive A before doing so.
- After you reboot to Windows Me from the startup disk, the new, empty partition is active, and is labeled as Drive C. Place the Windows Me CD in the CD drive and install it to the new partition.
- After you install Windows Me, install Office XP to the new partition.
- After you install Office XP, insert the BootMagic rescue disk and restart Windows.
- When the BootMagic menu appears, click Add to add a new operating system. Select the new operating system. It will probably be labeled Windows 95/98, not Windows Me.
You now have two (or more) selections on your BootMagic menu, so you can select which partition to use every time you restart your computer.
InsideOut
I like to keep all my operating systems on Drive C, my data on Drive D, and my applications on Drive E (except for applications that are specific to an operating system). This prevents data and applications from being wiped out when I need to reformat a partition—for example, if I want to remove all traces of a beta application before installing a new version of Office.
Some Common Problems with using an Access Database in Multiple Versions of Access
Here are some of the most common problems you might encounter when working with an Access database across different versions of Access:
- Problem: You get a compile error when opening an Access 2000 database in Access 2002.
Solution. Compile and save the database in Access 2000. If there are any errors, you might need to modify the code so it will run in Access 2000.
- Problem: An Access 2000 database runs more slowly after you save the changes in Access 2002.
Solution: After you make changes to an Access 2000 database in Access 2002, the version of the Visual Basic project is incremented, which prevents Access 2000 from loading the compiled version of the project. Compile and save the database in Access 2000 to allow the compiled project to be loaded.
- Problem: A form, report, combo box, or list box shows the correct data in Access 2002, but incorrect data in Access 2000.
Solution: This might be the result of the higher length limit on SQL statements used as record sources and row sources in Access 2002 (32,750 characters, as opposed to 2,000 characters in Access 2000). You might need to replace the SQL statement with a saved query if you can’t make the SQL statement short enough.
- Problem: A macro that works in Access 2002 doesn’t work in Access 2000.
Solution: Several new macro actions were added in Access 2002. Check the macro in Access 2000 and remove any actions labeled as "Macro action from newer Access version" in the Comment column.
- Problem: After you open an Access 2000 file in Access 2002, data access pages aren’t usable in Access 2000.
Solution: When you open an Access 2000 database in Access 2002, data access pages are converted so that they can use the latest versions of the Office Web components (PivotTables, PivotCharts, and Office Spreadsheets). The original data access page is saved as a backup, which you can open in Access 2000.
- Problem: An Access 2000 database can’t be saved as an MDE or ADE file in Access 2002.
Solution: You must either save the Access 2000 file as an MDE or ADE file in Access 2000, or convert the file to Access 2002, and then save it as an MDE or ADE file in Access 2002.
Troubleshooting - I have an Access 2000 database that I use in Access2000 qnd Access 2002. When I open the database in Access 2000 after working on it in Access 2002, I get a compile error.
When you open an Access 2000 database in Access 2002, all references to Office 2000 (in the References dialog box, v.9.0) Office components are automatically upgraded to v. 10.0 for Office XP. However, when you later reopen the same database in Access 2000, some references (particularly those to the Word or Outlook object libraries) aren't downgraded to v. 9.0, which causes errors.
If you need to work with the Word or Outlook object model (say, to create Word documents or Outlook tasks from Access data), to prevent this problem, follow the steps below (thanks to Alan Taylor for this solution):
- Ensure that your Office 2000 object libraries are in a location available to you when you are working in Office XP. (This may involve copying them to a folder on the D or higher drive, if you have Office 2000 aqnd Office XP installed in different boot partitions). The v. 9.0 object libraries are located in the Microsoft Office\Office folder for Office 2000; the names of the major object libraries are listed below:
Excel Excel9.olb Outlook msoutl9.olb PowerPoint msppt9.olb Word msword9.olb
- Open the Access 2000 database in Access 2002, and press Alt+F11 to open the Visual Basic Editor; then choose Tools, References to open the References dialog box.
- Clear the checkmarks for any of the above-listed object libraries you need to use in your VBA code.
- Use the Browse button to select the Office 2000 versions of the object libraries you need to use.
- Figure A-24 shows the References dialog box for the Access 2000 database open in Access 2002, with the Word and Outlook v. 9.0 object libraries selected (among others). There is no need to select the Access 9.0 object library; it upgrades and downgrades between v.9.0 and v. 10.0 automatically.
- Choose Debug. Compile Databasename to compile the database's code, and then close the database.
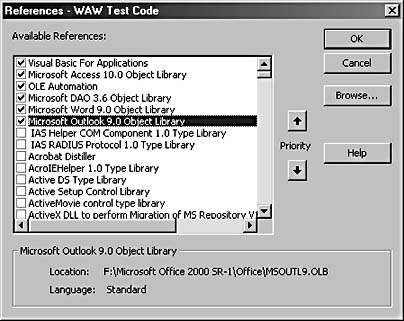
Figure A-24. Use this dialog box to select the object libraries you need.
The database will now work correctly (without reference errors) whether you open it in Access 2000 or Access 2002.
EAN: 2147483647
Pages: 172