Creating Access Add-Ins
3 4
Application-specific Access add-ins are simply Access library databases—databases saved with the MDA extension. You don’t need Microsoft Office XP Developer to create an Access add-in; you can create Access add-ins using core Access functionality. An Access add-in contains a special table with registry information, Microsoft Visual Basic for Applications (VBA) code to provide the add-in’s functionality, and possibly tables and/or interface objects such as forms. After creating an add-in, if you want to protect its code, you can save it as an MDE file, which contains only compiled VBA pseudocode, which can’t be read.
note
Technically, the MDA file that’s installed as an Access add-in is a library database, containing one or more add-ins of various types. However, the term add-in is commonly used to refer to the entire library database, as well as to the add-ins it contains.
Depending on your operating system, add-ins are stored in the C:\Documents and Settings\User Name \Application Data\Microsoft\AddIns folder (for Windows 2000 and Windows XP, replacing User Name with your user name) or in C:\Windows\Application Data\Microsoft\Addins (for Windows Me). You install Access add-ins using the Add-In Manager, which is available from the Tools, Add-Ins menu of a regular Access window.
Access add-ins come in three types, with several subtypes, as follows:
- Wizards. A series of forms that guide you through creating a new object. A wizard is invoked when a new object of that type is created. You can write table wizards, query wizards, form wizards, report wizards, and control wizards.
- Builders. A single form or dialog box that lets you set properties in Design view of forms and reports. You can write Property Builders and Expression Builders. (Builders are listed in the registry as wizards and are sometimes referred to as wizards.)
- Menu add-ins. Called from the Tools menu’s Add-Ins submenu; not context-specific.
Creating a Simple Add-In
Creating an add-in is a process that requires some creativity (like writing code in general), and thus it can’t easily be reduced to a simple set of steps. However, there are certain requirements and limitations and a number of techniques that will help you create a more useful add-in. This section first introduces some of the basic requirements and processes for creating an add-in and then leads you through the process of creating a simple Property Wizard add-in based on some code developed in a regular Access database. Subsequent sections will go into much greater detail about the more technical aspects of add-in creation. You’ll need this information for creating your own add-ins.
The first steps in creating an Access add-in are similar for all types of add-ins: You create a new Access database and save it with the MDA extension rather than the default MDB extension, as shown in Figure 21-1. You have to type in the extension, with the Save As Type All Files (*.*) selection selected, as the Save As Type drop-down list doesn’t offer an Add-In (MDA) option.
caution
Ifyou leave the default Microsoft Access Databases (*.mdb) selection selected and enter the MDA extension, your new database will actually be saved as Filename.mda.mdb, and it won’t work as an add-in.
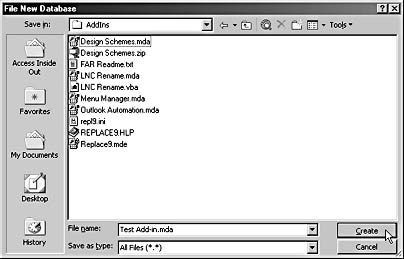
Figure 21-1. You save a new database as an add-in library database, with the .MDA extension.
Next you create (or import) the special USysRegInfo system table that stores information to be written to the Windows registry when the add-in is installed. Follow these steps to import a blank USysRegInfo table into a new library database:
- Choose Tools, Options to open the Options dialog box, and check the System Objects check box on the View tab, as shown in Figure 21-2. Then close the dialog box. (You need to set this option because otherwise the USysRegInfo table won’t be visible in the Database window.)
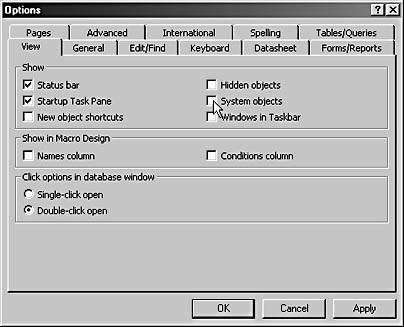
Figure 21-2. Select System Objects on the View tab of the Options dialog box.

- Choose File, Get External Data, and then click Import to open the Import dialog box. Navigate to the folder in which the Test Access 2002.mdb database is located.
- Select the Test Access 2002 database, and click Open to open the Import Objects dialog box. Select the USysRegInfo table on the Tables tab, and click OK to import the table into your database.
The USysRegInfo starter table has five rows, with some information filled in. (See Table 21-1 for more details on the meaning of the rows and columns in this table.) You’ll need to add specific information for your add-ins and probably more rows—at least if your library database contains more than one add-in. The USysRegInfo table fields are used to create registry entries for the add-in.
Table 21-1. USysRegInfo table fields
| Field | Data type | Description |
| Subkey | Text (255) | The name of the registry subkey where a specific Registry setting is stored. Can be either HKEY_CURRENT_ACCESS_PROFILE or HKEY_LOCAL_MACHINE (plus the path to Office 10). |
| Type | Number (Long Integer) | The type of entry to create. Can be key (0), string (1), or DWORD (4). |
| ValName | Text (255) | The name of the registry value. |
| Value | Text (255) | The value of the registry value. |
note
Office 10 in the registry corresponds to Office XP in the interface.
The starter USysRegInfo table contains the data shown in Table 21-2. |ACCDIR\ is a reference to the standard Add-Ins folder. If you put your add-ins in another folder (not recommended), you have to enter the full path to the add-in file. For add-ins in the standard folder, only the add-in database name needs to be entered, after the backslash.
Table 21-2. Starter USysRegInfo table
| Subkey | Type | ValName | Value |
| HKEY_CURRENT_ACCESS_PROFILE\ | 1 | Description | |
| HKEY_CURRENT_ACCESS_PROFILE\ | 4 | Can Edit | 1 |
| HKEY_CURRENT_ACCESS_PROFILE\ | 1 | Library | |ACCDIR\ |
| HKEY_CURRENT_ACCESS_PROFILE\ | 1 | Function | |
| HKEY_CURRENT_ACCESS_PROFILE\ | 0 |
It’s generally preferable to use the HKEY_CURRENT_ACCESS_PROFILE key for add-ins because it isn’t version-specific; the add-in will be installed in the key for whatever version of Access is in use. If Access user profiles are in use, the add-in’s registry keys will be created under that user profile. Otherwise, they’ll be created under the HKEY_LOCAL_MACHINE\Software\Microsoft\Office\10.0\Access\ key. If you need to install an add-in for a specific version of Access (say, because it uses a feature not available in other versions), use the HKEY_LOCAL_MACHINE key with the specific version of Access your add-in needs.
Different types of add-ins are stored in different registry keys, so they need different paths in the USysRegInfo table, which correspond to the different keys. Figure 21-3 shows the Registry Editor open to the HKEY_LOCAL_MACHINE_SOFTWARE \Microsoft\Office\10.0\Access\Menu Add-Ins key (where USysRegInfo information is stored when the table specifies the HKEY_CURRENT_ACCESS_PROFILE key, Access user profiles aren’t in use, and Office XP is the current version). The Rename &Form Controls menu add-in is selected; this is one of the add-ins that comprise my LNC Rename add-in, discussed in the "The LNC Rename Add-In" section. (This add-in renames Access database objects and controls on Access forms and reports according to the Leszynski Naming Convention [LNC]). The Expression and Library keys are filled with information from the USysRegInfo table’s Expression and Library columns.
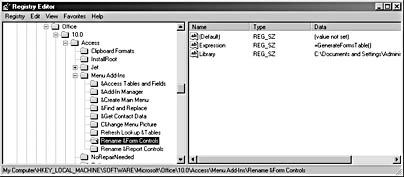
Figure 21-3. The Access Menu Add-Ins entries are shown in the Windows registry.
Wizards and builders are both listed under the various wizard keys in the registry. Notice the LNC Builder and LNC Builder All entries under the Property Wizards key in Figure 21-4.
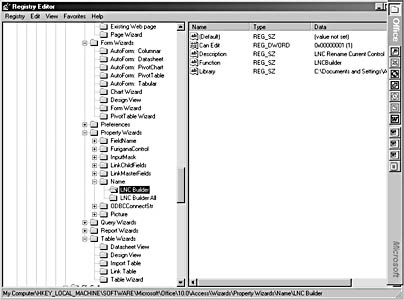
Figure 21-4. Wizards and builders are listed in the Windows registry.
The specific entries needed for each field in the USysRegInfo table will be discussed in the following sections. The requirements differ depending on what type of add-in you’re creating. All add-ins need at least three records: one to create the add-in’s main subkey, one to add the Library entry, and one to add the Function (or Expression) entry. There are also two optional rows, and you can add even more rows for custom requirements. The five standard USysRegInfo rows are described in Table 21-3, with an explanation of how you need to fill in the rows with specific information for your add-ins.
Table 21-3. Standard USysRegInfo rows
| Row number | Type field value | ValName field value | Value field value | Purpose |
| 1 | 0 | Indicates the start of a new add-in. | ||
| 2 | 1 | Library | \ACCDIR\ Add-In Database Name | \ACCDIR is a placeholder for the standard add-ins folder; you can use a literal path instead. Add-In Database Name is the name and exten sion of the add-in database. |
| 3 | 1 | Function | =FunctionName( ) | The name of the add-in’s main function. |
| 4 | 1 | Description | Add-in description | The text that appears on the Add-Ins menu or in the Choose Builder dialog box. |
| 5 | 4 | Can Edit | 0 or 1 | Indicates whether the wizard can be invoked for an existing object. |
The information that appears in the Add-In Manager dialog box when you install an add-in database comes from fields in the add-in database’s properties sheet. The add-in name is the Title field, the description is the Comments field, and the author is the Company field (not the Author field, as you might think). Figure 21-5 shows the LNC Rename add-in’s properties sheet, and Figure 21-6 shows the corresponding information for this add-in in the Add-In Manager dialog box.
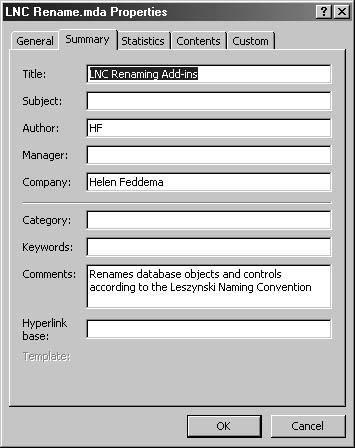
Figure 21-5. Several properties in the LNC Rename add-in database’s properties sheet appear when the add-in is selected in the Add-In Manager dialog box.
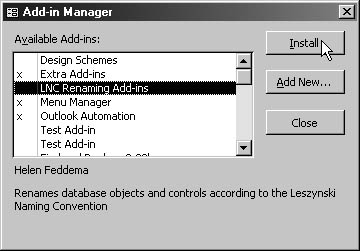
Figure 21-6. Information about the LNC Rename add-in is displayed in the Add-In Manager dialog box.
General Design Considerations
Whether you create a menu add-in, a wizard, or a builder, you need to keep in mind certain considerations while writing the add-in code. When you run an add-in from a regular Access database, the code runs from another database (the add-in library database), and you must take this into account when you reference database objects in code. You can use CodeDb to set a reference to the library database and CurrentDb to set a reference to the calling database to avoid confusion.
Forms in the add-in library database can be displayed in the calling database (typically as wizard pages). Most add-ins use at least one form, although this isn’t a requirement. You can reference tables in the add-in database using the CodeDb syntax; these tables are typically used to store standard data needed by the add-in.
Macros and queries shouldn’t be used in add-ins. Instead, all of the add-in’s functionality should be implemented in public functions that can be run directly from the add-in’s modules.
Creating a Simple Wizard
If you find yourself formatting controls, forms, or other database objects in a certain way over and over again and you can’t automate the process adequately using any of Access’ built-in functionality, this situation calls for an add-in. For example, I like to use locked text box controls to display read-only data (such as AutoNumber fields) or calculated expressions, and I make them light blue, with a flat special effect, to give users a visual cue that they’re not standard editable text boxes (which are white, with a sunken special effect).
Similarly, when I place an invisible control on a form or report, I color it yellow, so that I’ll know it’s an invisible control when I see it in Design view. Changing a standard text box to a locked or an invisible text box requires changing a number of properties and opening the Color Builder, which quickly becomes tedious, so this is a good candidate for creating an add-in.
Tips for Creating Access Wizards
The following tips will help you construct wizards that have a standard Access Wizard look, so users will find them familiar in appearance and easy to use:
- Set the AutoCenter property for the forms in your add-in to Yes.
- Turn record selectors off.
- Set scroll bars to Neither.
- Turn navigation buttons off.
- Place the controls used on more than one form in a series of wizard pages in the same position on each form (wizard page).
- Set the Modal property for forms to Yes, the PopUp property To Yes, and the BorderStyle property To Dialog. These settings will ensure that the user can’t move to the next page until the current one has been filled in and the Next button has been clicked.
Turning Code into an Add-In

This section describes how to create an add-in database that contains a single add-in, the Lock Wizard (a text box Property Builder, also known as a Control Wizard). You can find this example on the companion CD, in the Chap21 folder. This add-in needs only a dialog form to let you apply the desired formatting and a few functions to do the formatting.
The first step is to decide what you want the add-in to do: In this case, I needed to write code that would apply one of three sets of properties to a text box (Locked, Invisible, and Unlocked). Because it’s easier to debug code in a regular database, when creating an add-in, first write code in a regular Access database to do what you want the add-in to do, and then modify the code as needed until it’s working correctly. For this example, I wrote the three functions shown here. (The functions are run from cmdTestControl on frmTest in the Test Access 2002 sample database.)
Private Sub cmdTestControl_Click() Dim txt As Access.TextBox Set txt = Forms![frmEmployees]![txtFirstName] 'Call NormalControl(txt) Call LockControl(txt) 'Call InvisibleControl(txt) End Sub Function LockControl(txt As Access.TextBox) txt.Visible = True txt.Locked = True txt.TabStop = False txt.BackColor = vbLightBlue txt.BorderStyle = 1 txt.SpecialEffect = 0 End Function Function InvisibleControl(txt As Access.TextBox) txt.Visible = False txt.Locked = False txt.TabStop = False txt.BackColor = vbYellow txt.BorderStyle = 1 txt.SpecialEffect = 0 End Function Function NormalControl(txt As Access.TextBox) txt.Visible = True txt.Locked = False txt.TabStop = True txt.BackColor = vbWhite txt.SpecialEffect = 2 End Function
After running each of these functions in turn from the command button on frmEmployees and verifying that each function formats the text box correctly, the next step is to create a new database to use as the library database. You should save this database with the MDA extension in the Add-Ins folder.
Import the starter USysRegInfo table into the library database, as described earlier. Fill in the add-in specific data for the Control Wizard, as shown in Table 21-4.
(Add-in specific data is indicated by italics in the table.)
Table 21-4. The USysRegInfo table for the Lock Wizard add-in
| Subkey | Type | ValName | Value |
| HKEY_CURRENT_ACCESS_PROFILE \Wizards\Control Wizards\TextBox\Lock Wizard | 1 | Description | Lock/Unlock Wizard |
| HKEY_CURRENT_ACCESS_PROFILE \Wizards\Control Wizards\TextBox \Lock Wizard | 4 | Can Edit | 1 |
| HKEY_CURRENT_ACCESS_PROFILE \Wizards\Control Wizards\TextBox\Lock Wizard | 1 | Library | |ACCDIR\Lock Wizard.mda |
| HKEY_CURRENT_ACCESS_PROFILE \Wizards\Control Wizards\TextBox\Lock Wizard | 1 | Function | LockWizard |
| HKEY_CURRENT_ACCESS_PROFILE \Wizards\Control Wizards\TextBox \Lock Wizard | 0 |
The LockWizard function listed on the Function line of the USysRegInfo table is the main function of this add-in; it opens the dialog form that is the add-in’s interface. This function uses two standard arguments for a Control Wizard. (See the following sidebar for details.)
Add-In Function Arguments
The main function of a Control Wizard add-in has two required arguments, as follows:
- strObjectName. Object name (the form or report that contains the control the Wizard acts on).
- strCtlName. Control name (the control the Wizard acts on).
Property Builders use the same two arguments as Control Wizards, plus one additional argument:
- strCurrentValue. Current value of the property being modified.
The code module for LockWizard declares a number of variables (most of them global variables) in its Declaration section. It also declares some constants for color values that don’t have their own named color constants:
Option Compare Database Option Explicit Dim ctlLabel As Access.Label Dim ctlTextBox As Access.TextBox Dim intBackStyle As Integer Dim intBorderStyle As Integer 'General variables Global gblnVisible As Boolean Global gblnLocked As Boolean Global gblnTabStop As Boolean Global gfrm As Access.Form 'TextBox variables Global gintTBSpecialEffect As Integer Global glngTBBackColor As Long 'Label variables Global gintLASpecialEffect As Integer Global gintLATextAlign As Integer Global glngLABackColor As Long 'Color constants Public Const vbDarkCyan = 8421376 Public Const vbDarkNavy = 8388608 Public Const vbLightBlue = 16777164 Public Const vbLightGreen = 12639424 Public Const vbLightGrey = 12632256 Public Const vbNavy = 8404992
The LockWizard function is shown below. (All the variables used in this function are declared in the module’s Declarations section.) The gfrm global variable is used to reference the active form in the calling database, and the ctlLabel and ctlTextBox variables are set to the text box with its attached label. (These are the controls whose properties will be changed.) The properties are set in this function, but they won’t take effect until the dialog form is closed.
Public Function LockWizard(strObjName As String, _ strCtlName As String) 'Selects a color/special effect scheme for a locked or 'unlocked text box control and its attached label 'Called from a text box's Build dialog box On Error GoTo LockWizardError DoCmd.OpenForm FormName:="fdlgLockWizard", _ windowmode:=acDialog Set gfrm = Screen.ActiveForm Set ctlLabel = gfrm(strCtlName) Set ctlTextBox = ctlLabel.Parent ctlTextBox.Visible = gblnVisible ctlTextBox.Locked = gblnLocked ctlTextBox.Enabled = True ctlTextBox.TabStop = gblnTabStop ctlTextBox.BackColor = glngTBBackColor ctlTextBox.BackStyle = 1 ctlTextBox.SpecialEffect = gintTBSpecialEffect ctlTextBox.BorderStyle = intBorderStyle ctlLabel.BackStyle = intBackStyle ctlLabel.BackColor = glngLABackColor ctlLabel.SpecialEffect = gintLASpecialEffect ctlLabel.TextAlign = gintLATextAlign LockWizardExit: Exit Function LockWizardError: MsgBox "Error No: " & Err.Number & "; Description: " _ & Err.Description Resume LockWizardExit End Function
All the properties in the LockWizard function are set by variables, which were set by the InitialLockStatus function, which is called from the dialog form’s Open event. These properties need to be set so that the function can apply the default properties in case the user closes the dialog box without making a selection.
Public Function InitialLockStatus() As Integer 'Sets global variables for Unlocked selection, in case 'no option button is clicked 'Called from Form_Open on fdlgLockWizard On Error GoTo InitialLockStatusError gblnVisible = True gblnLocked = True gblnTabStop = False glngTBBackColor = vbLightBlue gintTBSpecialEffect = 0 intBackStyle = 0 glngLABackColor = vbLightGrey gintLASpecialEffect = 0 gintLATextAlign = 3 intBorderStyle = 1 InitialLockStatusExit: Exit Function InitialLockStatusError: MsgBox "Error No: " & Err.Number & "; Description: " _ & Err.Description Resume InitialLockStatusExit End Function
The third and final function in this simple add-in performs the actual formatting changes. The three separate functions that were tested in the regular Access database are used in a an If...ElseIf...End If statement, with the control variable replaced by global variables that are used to set the text box properties when the dialog form is closed. The intLockStatus variable is the value of the option group on the add-in’s dialog form.
Public Function ChangeLockStatus() 'Applies appropriate properties to selected text box 'Called from fraLockStatus_AfterUpdate on fdlgLockWizard On Error GoTo ChangeLockStatusError Dim intLockStatus As Integer Set gfrm = Forms![fdlgLockWizard] intLockStatus = gfrm![fraLockStatus] Debug.Print "Lock status: " & intLockStatus If intLockStatus = 1 Then 'Locked gblnVisible = True gblnLocked = True gblnTabStop = False glngTBBackColor = vbLightBlue gintTBSpecialEffect = 0 ElseIf intLockStatus = 2 Then 'Unlocked gblnVisible = True gblnLocked = False gblnTabStop = True glngTBBackColor = vbWhite gintTBSpecialEffect = 2 ElseIf intLockStatus = 3 Then 'Invisible gblnVisible = False gblnLocked = False gblnTabStop = False glngTBBackColor = vbYellow gintTBSpecialEffect = 0 End If ChangeLockStatusExit: Exit Function ChangeLockStatusError: MsgBox "Error No: " & Err.Number & "; Description: " _ & Err.Description Resume ChangeLockStatusExit End Function
The final step is to create a form to use as the Property Builder’s user interface. I created a small dialog form with an option group for selecting one of the three formatting options. This form is shown in Figure 21-7.
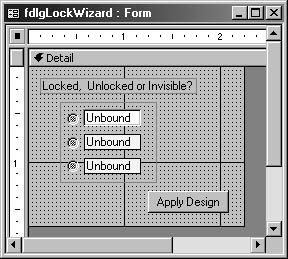
Figure 21-7. The Lock Wizard user interface consists of a simple dialog form.
The code for the dialog form is listed below. Basically, the form events are used to call the code located in the add-in database and to write descriptive text to the unbound text boxes on the form. The event procedures don’t handle errors, since all error handling is done in the add-in’s functions.
Option Compare Database Option Explicit Dim ctlTextBox As Access.TextBox Dim ctlLabel As Access.Label Private Sub cmdApplyDesign_Click() DoCmd.Close acForm, Me.Name, acSaveNo End Sub Private Sub Form_Open(Cancel As Integer) Me![txtLocked].Value = "Locked" Me![txtUnLocked].Value = "Unlocked" Me![txtInvisible].Value = "Invisible" Call InitialLockStatus End Sub Private Sub fraLockStatus_AfterUpdate() Call ChangeLockStatus End Sub
tip - Import add-in objects
Putting the Add-In Together
With the USysRegInfo table and the dialog form created and the functions written, all that’ left is to enter the add-in’s identifying information. To do this, choose File, Database Properties. Enter the add-in’s title in the Title field, the author in the Company field (it can be in the Author field too, but the add-in needs it in the Company field), and the description in the Comments field, as shown in Figure 21-8.
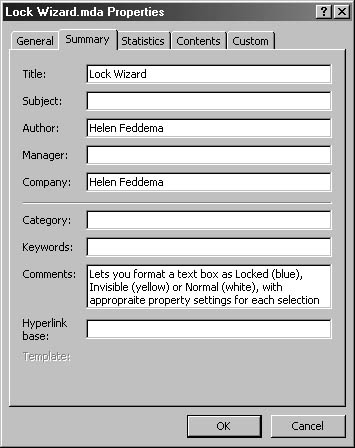
Figure 21-8. Enter the add-in’s title, author, and description in its properties sheet.
Open the basLockWizard code module and compile it by selecting Compile from the Debug menu in the Visual Basic Editor (VBE). Close the library database after it has compiled successfully.
Finally, you can install and test the add-in. To install this (or any) add-in, follow these steps:
- Open a regular Access database.
- Choose Tools, Add-Ins, and click Add-In Manager to open the Add-In Manager dialog box. You should see the Lock Wizard listed as one of the available add-ins.
Troubleshooting - I can’t see my add-in in the list of available add-ins in the Add-In Manager dialog box
The most likely reason for this is that the add-in isn’t in the standard add-ins folder. You can either move the add-in library database to the standard add-ins folder (C:\Documents and Settings\User Name \Application Data\Microsoft\AddIns folder for Windows 2000, or C:\Windows\Application Data\Microsoft\Addins for Windows Me) or click the Add button to navigate to its location in another folder.
- Select the Lock Wizard add-in, and click the Install button, as shown in Figure 21-9. An X should appear next to the add-in.
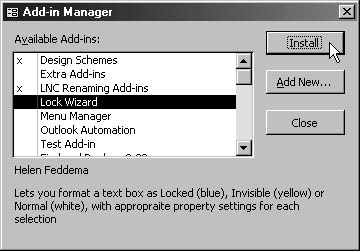
Figure 21-9. Select the add-in and click the Install button to install it in the Add-In Manager dialog box.
- Click the Close button; the add-in should now be installed.
To test the add-in, follow these steps:
- Open a form in Design view, and right-click a text box control.
- Select Build from the text box’s shortcut menu. The Lock Wizard dialog box appears, as shown in Figure 21-10.
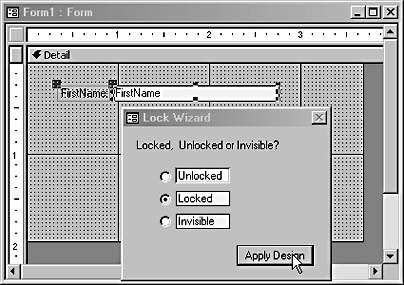
Figure 21-10. Select a formatting option to apply to a text box in the Lock Wizard dialog form.
- Select the option you want to apply to the control, and click Apply Design.
The text box should now have the appropriate formatting.
Troubleshooting - I get a This feature is not installed error message when I try to run the add-in
This none-too-informative error message can result from any number of errors in the add-in’s code. Check for problems in the following areas:
- Incorrect syntax (for example, the wrong number or type of arguments) in the main add-in function
- General syntax errors in the add-in code
- Add-in code that isn’t compiled
First uninstall the add-in in the Add-in Manager and close Access. Open the library database, fix any errors, and compile the add-in database. After you reinstall the add-in, it should run properly.
Examining the Text Box Design Wizard
In this section, we’ll take an in-depth look at a somewhat more complex add-in. The Extra Add-Ins library database contains two add-ins: a Text Box Control Wizard, and a Picture Property Builder.
The Text Box Design Wizard lets you select a design scheme (colors, fonts, and special effects) for a newly inserted text box control to match the color schemes of four of the built-in Access Form Wizard color schemes. I originally wrote this add-in for Access 95; the color schemes have changed in subsequent versions, so some of the schemes in this add-in don’t match standard color schemes in Access 2002.
A Control Wizard needs five rows in the USysRegInfo table: the three standard rows, plus a row that contains the add-in’s description (the text that appears in the Add-In Manager dialog box) and a Can Edit row where you can specify whether the add-in can be invoked to edit an existing object (in this case, a text box control). If the Value property of the CanEdit row is 0, the add-in can be used only with a new control; if it’s 1, the add-in can be invoked for an existing control.
The Text Box Design Wizard’s rows are listed in Table 21-5. Extra Add-ins.mda is the name of the add-in database containing the sample Text Box Wizard and Picture Picker Property Builder.
Table 21-5. USysRegInfo rows for the Text Box Design Wizard
| Subkey | Type | ValName | Value |
| HKEY_CURRENT_ACCESS_PROFILE \Wizards\Control Wizards\TextBox\Design Wizard | 0 | ||
| HKEY_CURRENT_ACCESS_PROFILE \Wizards\Control Wizards\TextBox\Design Wizard | 1 | Description | Text Box Design Wizard |
| HKEY_CURRENT_ACCESS_PROFILE \Wizards\Control Wizards\TextBox\Design Wizard | 4 | Can Edit | 0 |
| HKEY_CURRENT_ACCESS_PROFILE \Wizards\Control Wizards\TextBox\Design Wizard | 1 | Library | |ACCDIR\Extra Add-ins.mda |
| HKEY_CURRENT_ACCESS_PROFILE \Wizards\Control Wizards\TextBox\Design Wizard | 1 | Function | TextBox DesignWizard |
The italicized text in certain fields is specific to this wizard:
- The Subkey on each row lists the wizard’s registry key and subkeys and its name (Design Wizard).
- The Value (in the row with the ValName Description) is the description of the wizard.
- The Can Edit value indicates whether existing text boxes can be edited using the add-in; 1 means they can be edited; 0 means they can’t.
- The right side of the Value field (in the row with the Library ValName entry) is the add-in database name (Extra Add-ins.mda). |ACCDIR\ indicates that the library database is located in the default add-ins path (typically C:\Documents and Settings\Administrator\Application Data\Microsoft\AddIns).
- The last row (corresponding to the Function ValName field) is the name of the function that invokes the wizard.
To install the Text Box Design Wizard and the Form Picture Property Builder Wizard, copy the Extra Add-ins.mda database to your add-ins folder, open the Add-In Manager, and select Extra Add-Ins from the list of available add-ins, and click the Install button, as shown in Figure 21-11.
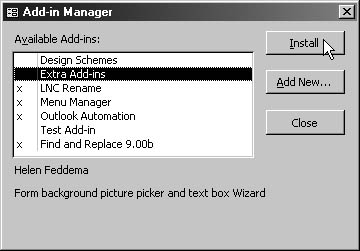
Figure 21-11. You install the Text Box Design Wizard and Form Picture Property Builder using the Add-In Manager dialog box.
See Chapter 15, "Using Add-Ins to Expand Access Functionality," for more details on installing and troubleshooting add-ins.
To use the Text Box Design Wizard, open a form in Design view, and make sure the Wizards button in the Toolbox is selected. Click the Text Box tool, and then click the form to insert a new text box on the form. The Text Box Design Wizard form appears, as shown in Figure 21-12.
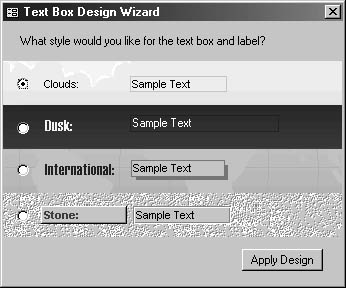
Figure 21-12. The Text Box Design Wizard form offers four design scheme selections.
Each text box design scheme is displayed against the background of the matching form design scheme. (The wizard doesn’t change the form’s background color.) Selecting the International design scheme applies the appropriate properties to the text box, as shown in Figure 21-13.
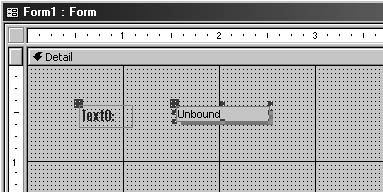
Figure 21-13. A text box formatted with the International design scheme.
VBA Code
The fifth row in Table 21-5 specifies the function to be run when the Text Box Design Wizard is invoked. The TextBoxDesignWizard function has the two required arguments for Control Wizards, which represent the form and control. The function opens the wizard form, and the form’s Open event calls the InitialColors function, which saves the default design scheme’s values to global variables. These global variables are used in applying the default design scheme to the text box (in case the user simply accepts the default design scheme, thus not triggering the option group’s AfterUpdate event). If the user selects a design scheme on the form, the option group’s AfterUpdate event procedure calls the ChangeDesign function, which saves the selected design scheme’s values to the global variables.
Public Function TextBoxDesignWizard(strObjName As String, _ strCtlName As String) As Variant 'Selects a color/special effect scheme for 'a text box control and its attached label 'The schemes match styles in the Form Wizard. On Error GoTo TextBoxDesignWizardError DoCmd.OpenForm FormName:="fdlgTextBoxDesignWizard", _ windowmode:=acDialog Set frm = Screen.ActiveForm Set ctlLabel = frm(strCtlName) Set ctlTextBox = ctlLabel.Parent 'Set the text box design properties. With ctlTextBox .BackStyle = intTBBackStyle .BackColor = lngTBBackColor .SpecialEffect = intTBSpecialEffect .BorderStyle = intTBBorderStyle .BorderColor = lngTBBorderColor .BorderWidth = intTBBorderWidth .ForeColor = lngTBForeColor .FontName = strTBFontName .FontSize = lngTBFontSize .FontWeight = intTBFontWeight .FontItalic = blnTBFontItalic .FontUnderline = blnTBFontUnderline .TextAlign = intTBTextAlign .Height = intTBHeight .Width = 1440 End With 'Set the label design properties. With ctlLabel .BackStyle = intLBBackStyle .BackColor = lngLBBackColor .SpecialEffect = intLBSpecialEffect .BorderStyle = intLBBorderStyle .BorderColor = lngLBBorderColor .BorderWidth = intLBBorderWidth .ForeColor = lngLBForeColor .FontName = strLBFontName .FontSize = lngLBFontSize .FontWeight = intLBFontWeight .FontItalic = blnLBFontItalic .FontUnderline = blnLBFontUnderline .TextAlign = intLBTextAlign .Height = intLBHeight .Width = 800 End With TextBoxDesignWizardExit: Exit Function TextBoxDesignWizardError: MsgBox "Error No: " & Err.Number & "; error message: " _ & Err.Description Resume TextBoxDesignWizardExit End Function
When the form is closed, the selected design scheme is applied to the text box using the global variables set by either the InitialColors function or the ChangeDesign function. These functions are shown below.
Public Function InitialColors() As Integer On Error GoTo InitialColorsError Set frm = Forms![fdlgTextBoxDesignWizard] Set ctlTextBox = frm![txtClouds] Set ctlLabel = frm![lblClouds] intTBBackStyle = ctlTextBox.BackStyle lngTBBackColor = ctlTextBox.BackColor intTBSpecialEffect = ctlTextBox.SpecialEffect intTBBorderStyle = ctlTextBox.BorderStyle lngTBBorderColor = ctlTextBox.BorderColor intTBBorderWidth = ctlTextBox.BorderWidth lngTBForeColor = ctlTextBox.ForeColor strTBFontName = ctlTextBox.FontName lngTBFontSize = ctlTextBox.FontSize intTBFontWeight = ctlTextBox.FontWeight blnTBFontItalic = ctlTextBox.FontItalic blnTBFontUnderline = ctlTextBox.FontUnderline intTBTextAlign = ctlTextBox.TextAlign intTBHeight = 228 intLBBackStyle = ctlLabel.BackStyle lngLBBackColor = ctlLabel.BackColor intLBSpecialEffect = ctlLabel.SpecialEffect intLBBorderStyle = ctlLabel.BorderStyle lngLBBorderColor = ctlLabel.BorderColor intLBBorderWidth = ctlLabel.BorderWidth lngLBForeColor = ctlLabel.ForeColor strLBFontName = ctlLabel.FontName lngLBFontSize = ctlLabel.FontSize intLBFontWeight = ctlLabel.FontWeight blnLBFontItalic = ctlLabel.FontItalic blnLBFontUnderline = ctlLabel.FontUnderline intLBTextAlign = ctlLabel.TextAlign intLBHeight = 240 InitialColorsExit: Exit Function InitialColorsError: MsgBox "Error No: " & Err.Number & "; Description: " _ & Err.Description Resume InitialColorsExit End Function Public Function ChangeDesign() On Error GoTo ChangeDesignError Dim intDesign As Integer Set frm = Forms![fdlgTextBoxDesignWizard] intDesign = frm![grpPicture] Select Case intDesign Case 1 Set ctlTextBox = frm![txtClouds] Set ctlLabel = frm![lblClouds] intTBBackStyle = ctlTextBox.BackStyle lngTBBackColor = ctlTextBox.BackColor intTBSpecialEffect = ctlTextBox.SpecialEffect intTBBorderStyle = ctlTextBox.BorderStyle lngTBBorderColor = ctlTextBox.BorderColor intTBBorderWidth = ctlTextBox.BorderWidth lngTBForeColor = ctlTextBox.ForeColor strTBFontName = ctlTextBox.FontName lngTBFontSize = ctlTextBox.FontSize intTBFontWeight = ctlTextBox.FontWeight blnTBFontItalic = ctlTextBox.FontItalic blnTBFontUnderline = ctlTextBox.FontUnderline intTBTextAlign = ctlTextBox.TextAlign intTBHeight = 228 intLBBackStyle = ctlLabel.BackStyle lngLBBackColor = ctlLabel.BackColor intLBSpecialEffect = ctlLabel.SpecialEffect intLBBorderStyle = ctlLabel.BorderStyle lngLBBorderColor = ctlLabel.BorderColor intLBBorderWidth = ctlLabel.BorderWidth lngLBForeColor = ctlLabel.ForeColor strLBFontName = ctlLabel.FontName lngLBFontSize = ctlLabel.FontSize intLBFontWeight = ctlLabel.FontWeight blnLBFontItalic = ctlLabel.FontItalic blnLBFontUnderline = ctlLabel.FontUnderline intLBTextAlign = ctlLabel.TextAlign intLBHeight = 240 Case 2 Set ctlTextBox = frm![txtDusk] Set ctlLabel = frm![lblDusk] intTBBackStyle = ctlTextBox.BackStyle lngTBBackColor = ctlTextBox.BackColor intTBSpecialEffect = ctlTextBox.SpecialEffect intTBBorderStyle = ctlTextBox.BorderStyle lngTBBorderColor = ctlTextBox.BorderColor intTBBorderWidth = ctlTextBox.BorderWidth lngTBForeColor = ctlTextBox.ForeColor strTBFontName = ctlTextBox.FontName lngTBFontSize = ctlTextBox.FontSize intTBFontWeight = ctlTextBox.FontWeight blnTBFontItalic = ctlTextBox.FontItalic blnTBFontUnderline = ctlTextBox.FontUnderline intTBTextAlign = ctlTextBox.TextAlign intTBHeight = 228 intLBBackStyle = ctlLabel.BackStyle lngLBBackColor = ctlLabel.BackColor intLBSpecialEffect = ctlLabel.SpecialEffect intLBBorderStyle = ctlLabel.BorderStyle lngLBBorderColor = ctlLabel.BorderColor intLBBorderWidth = ctlLabel.BorderWidth lngLBForeColor = ctlLabel.ForeColor strLBFontName = ctlLabel.FontName lngLBFontSize = ctlLabel.FontSize intLBFontWeight = ctlLabel.FontWeight blnLBFontItalic = ctlLabel.FontItalic blnLBFontUnderline = ctlLabel.FontUnderline intLBTextAlign = ctlLabel.TextAlign intLBHeight = 324 Case 3 Set ctlTextBox = frm![txtInternational] Set ctlLabel = frm![lblInternational] intTBBackStyle = ctlTextBox.BackStyle lngTBBackColor = ctlTextBox.BackColor intTBSpecialEffect = ctlTextBox.SpecialEffect intTBBorderStyle = ctlTextBox.BorderStyle lngTBBorderColor = ctlTextBox.BorderColor intTBBorderWidth = ctlTextBox.BorderWidth lngTBForeColor = ctlTextBox.ForeColor strTBFontName = ctlTextBox.FontName lngTBFontSize = ctlTextBox.FontSize intTBFontWeight = ctlTextBox.FontWeight blnTBFontItalic = ctlTextBox.FontItalic blnTBFontUnderline = ctlTextBox.FontUnderline intTBTextAlign = ctlTextBox.TextAlign intTBHeight = 264 intLBBackStyle = ctlLabel.BackStyle lngLBBackColor = ctlLabel.BackColor intLBSpecialEffect = ctlLabel.SpecialEffect intLBBorderStyle = ctlLabel.BorderStyle lngLBBorderColor = ctlLabel.BorderColor intLBBorderWidth = ctlLabel.BorderWidth lngLBForeColor = ctlLabel.ForeColor strLBFontName = ctlLabel.FontName lngLBFontSize = ctlLabel.FontSize intLBFontWeight = ctlLabel.FontWeight blnLBFontItalic = ctlLabel.FontItalic blnLBFontUnderline = ctlLabel.FontUnderline intLBTextAlign = ctlLabel.TextAlign intLBHeight = 324 Case 4 Set ctlTextBox = frm![txtStone] Set ctlLabel = frm![lblStone] intTBBackStyle = ctlTextBox.BackStyle lngTBBackColor = ctlTextBox.BackColor intTBSpecialEffect = ctlTextBox.SpecialEffect intTBBorderStyle = ctlTextBox.BorderStyle lngTBBorderColor = ctlTextBox.BorderColor intTBBorderWidth = ctlTextBox.BorderWidth lngTBForeColor = ctlTextBox.ForeColor strTBFontName = ctlTextBox.FontName lngTBFontSize = ctlTextBox.FontSize intTBFontWeight = ctlTextBox.FontWeight blnTBFontItalic = ctlTextBox.FontItalic blnTBFontUnderline = ctlTextBox.FontUnderline intTBTextAlign = ctlTextBox.TextAlign intTBHeight = 240 intLBBackStyle = ctlLabel.BackStyle lngLBBackColor = ctlLabel.BackColor intLBSpecialEffect = ctlLabel.SpecialEffect intLBBorderStyle = ctlLabel.BorderStyle lngLBBorderColor = ctlLabel.BorderColor intLBBorderWidth = ctlLabel.BorderWidth lngLBForeColor = ctlLabel.ForeColor strLBFontName = ctlLabel.FontName lngLBFontSize = ctlLabel.FontSize intLBFontWeight = ctlLabel.FontWeight blnLBFontItalic = ctlLabel.FontItalic blnLBFontUnderline = ctlLabel.FontUnderline intLBTextAlign = ctlLabel.TextAlign intLBHeight = 240 End Select ChangeDesignExit: Exit Function ChangeDesignError: MsgBox "Error No: " & Err.Number & "; Description: " _ & Err.Description Resume ChangeDesignExit End Function
Both functions use a set of global variables, which are declared in the code module’s Declarations section.
Creating the Picture Picker Property Builder
The Picture Picker Property Builder lets you select an image file to use as a form background picture. This add-in is easier to use than the built-in MS Picture Builder, since you don’t have to hunt for the image in the file system, and you can see the image before selecting it. The USysRegInfo table records needed to install this builder are listed in Table 21-6.
Table 21-6. USysRegInfo rows for the Picture Picker Property Builder
| Subkey | Type | ValName | Value |
| HKEY_CURRENT_ACCESS_PROFILE\Wizards\Property Wizards\Picture\Picture Picker | 0 | ||
| HKEY_CURRENT_ACCESS_PROFILE\Wizards\Property Wizards\Picture\Picture Picker | 1 | Description | Picture Picker |
| HKEY_CURRENT_ACCESS_PROFILE\Wizards\Property Wizards\Picture\Picture Picker | 4 | Can Edit | 1 |
| HKEY_CURRENT_ACCESS_PROFILE\Wizards\Property Wizards\Picture\Picture Picker | 1 | Library | |ACCDIR\Extra Add-ins.mda |
| HKEY_CURRENT_ACCESS_PROFILE\Wizards\Property Wizards\Picture\Picture Picker | 1 | Function | PicturePicker |
You select the Picture Picker by clicking the Build button next to the Picture property of a form’s properties sheet. Because the Picture property has a built-in Property Builder, you’ll see a Choose Builder dialog box (shown in Figure 21-14).
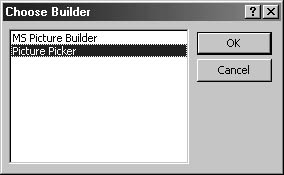
Figure 21-14. The Choose Builder dialog box lets you select a builder.
Select the Picture Picker item to open the wizard form, as shown in Figure 21-15.
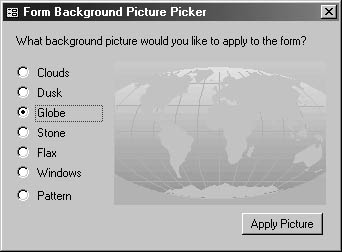
Figure 21-15. The Picture Picker wizard form gives you a choice of background images for a form.
note
Some of the background images might not be available in Office XP; they were default selections in Office 95. If you want to substitute your own selections, just modify the image names in the Select Case intPicture structure in the PicturePicker function.
Figure 21-16 shows a new form with the Globe background image applied using the Picture Picker Property Builder.
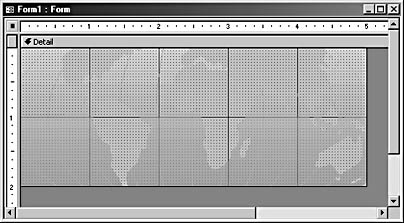
Figure 21-16. A form shows the Globe background image.
VBA Code
The Picture Picker Property Builder, like the Text Box Design Wizard, uses a set of global variables. Its main function is the PicturePicker function, which has three required arguments; the form name, the control name, and the current property value. The function initializes the strPicture global variable with the current value of the Picture property and then opens the wizard form. When the user selects an image in the wizard, the form’s Picture property is stored in the strPicture variable and then the form’s picture is set to the picture value stored in the variable. The PicturePicker function is shown below.
Public Function PicturePicker(strFormName As String, _ strCtlName As String, strCurrentValue As String) As Variant 'Selects a background picture for a form On Error GoTo PicturePickerError strPicture = strCurrentValue DoCmd.OpenForm FormName:="fdlgPicturePicker", windowmode:=acDialog PicturePicker = strPicture PicturePickerExit: Exit Function PicturePickerError: MsgBox "Error No: " & Err.Number & "; error message: " _ & Err.Description Resume PicturePickerExit End Function Public Function ChangePicture() As String On Error GoTo ChangePictureError Dim strWinDir As String Dim strBitmapsDir As String Dim intPicture As Integer Dim strPicture As String Dim ctlPicture As Control Dim objWord As Object Set objWord = CreateObject("Word.Application") Set frm = Screen.ActiveForm intPicture = frm![grpPicture] Set ctlPicture = frm![imgBackground] 'Get Windows directory from the registry. strWinDir = objWord.System.PrivateProfileString("", _ "HKEY_LOCAL_MACHINE\SOFTWARE\Microsoft\Windows\CurrentVersion\Setup", _ "WinDir") & "\" 'Get Access directory from the SysCmd function. strBitmapsDir = SysCmd(acSysCmdAccessDir) & _ "Bitmaps\Styles\" Select Case intPicture Case 1 strPicture = strBitmapsDir & "Clouds.wmf" Case 2 strPicture = strBitmapsDir & "Sea_dusk.wmf" Case 3 strPicture = strBitmapsDir & "Globe.wmf" Case 4 strPicture = strBitmapsDir & "Stone.bmp" Case 5 strPicture = strBitmapsDir & "Flax.bmp" Case 6 strPicture = strWinDir & "Setup.bmp" Case 7 strPicture = strBitmapsDir & "Pattern.bmp" End Select ctlPicture.Picture = strPicture ChangePicture = strPicture ChangePictureExit: Exit Function ChangePictureError: MsgBox "Error No: " & Err.Number & "; Description: " _ & Err.Description Resume ChangePictureExit End Function The LNC Rename Add-In
The LNC Rename add-in (a library database containing several menu add-ins and property builders) was a much more ambitious project than the three small add-ins discussed earlier. This add-in applies the Leszynski Naming Convention (LNC) to database objects and controls on forms and reports and corrects all references to renameddatabase objects. An excellent Access add-in named Find And Replace (FAR) is already available. The FAR add-in does find-and-replace in properties, SQL statements, VBA code, and other places where references might need to be changed, as well as in VBA code. To avoid extra work (and with the permission of that add-in’s author, Rick Fisher), my LNC Rename add-in calls certain functions in the FAR add-in to do the work of fixing references to database objects with changed names.
InsideOut
An Access 2000 add-in will work with both Access 2000 and Access 2002 databases, whereas an Access 2002 add-in (that is, an MDA database created as an Access 2002 database) will work only with Access 2002 databases. Therefore, so that the same add-in can be used with both Access 2000 and Access 2002, I recommend creating the MDA database as an Access 2000 database. (To do this, choose Tools, Options, and select Access 2000 as the Default File Format on the Advanced tab of the Options dialog box before creating the database).
The LNC Rename add-in includes three menu add-ins for renaming database objects, form controls, and report controls, as well as two property builders, one for renaming the current control and one for renaming all controls on the current form or report. The USysRegInfo table rows needed for these add-ins are shown in Table 21-7.
Table 21-7. USysRegInfo rows for the LNC Rename add-in
| Subkey | Type | ValName | Value |
| HKEY_CURRENT_ACCESS_PROFILE Menu Add-ins\Rename &Form Controls | 0 | ||
| HKEY_CURRENT_ACCESS_PROFILE \Menu Add-ins\Rename &Form Controls | 1 | Library | |ACCDIR\LNC Rename.mda |
| HKEY_CURRENT_ACCESS_PROFILE \Menu Add-ins\Rename &Form Controls | 1 | Expression | =GenerateForms Table( ) |
| HKEY_CURRENT_ACCESS_PROFILE \Menu Add-ins\Rename &Report Controls | 0 | ||
| HKEY_CURRENT_ACCESS_PROFILE \Menu Add-ins\Rename &Report Controls | 1 | Library | |ACCDIR\LNC Rename.mda |
| HKEY_CURRENT_ACCESS_PROFILE \Menu Add-ins\Rename &Report Controls | 1 | Expression | =GenerateReports Table( ) |
| HKEY_CURRENT_ACCESS_PROFILE \Menu Add-ins\Rename Database &Objects | 0 | ||
| HKEY_CURRENT_ACCESS_PROFILE \Menu Add-ins\Rename Database &Objects | 1 | Library | |ACCDIR\LNC Rename.mda |
| HKEY_CURRENT_ACCESS_PROFILE\Menu Add-ins\Rename Database &Objects | 1 | Expression | =Rename DatabaseObjects( ) |
| HKEY_CURRENT_ACCESS_PROFILE \Wizards\Property Wizards\Name\ LNC Builder | 0 | ||
| HKEY_CURRENT_ACCESS_PROFILE \Wizards\Property Wizards\Name\ LNC Builder | 1 | Description | LNC Rename Current Control |
| HKEY_CURRENT_ACCESS_PROFILE \Wizards\Property Wizards\Name \LNC Builder | 4 | Can Edit | 1 |
| HKEY_CURRENT_ACCESS_PROFILE \Wizards\Property Wizards\Name \LNC Builder | 1 | Library | |ACCDIR\LNC Rename.mda |
| HKEY_CURRENT_ACCESS_PROFILE \Wizards\Property Wizards\Name \LNC Builder | 1 | Function | LNCBuilder |
| HKEY_CURRENT_ACCESS_PROFILE \Wizards\Property Wizards\Name \LNC Builder All | 0 | ||
| HKEY_CURRENT_ACCESS_PROFILE \Wizards\Property Wizards\Name \LNC Builder All | 1 | Description | LNC Rename All Controls |
| HKEY_CURRENT_ACCESS_PROFILE \Wizards\Property Wizards\Name \LNC Builder All | 4 | Can Edit | 1 |
| HKEY_CURRENT_ACCESS_PROFILE \Wizards\Property Wizards\Name \LNC Builder All | 1 | Library | |ACCDIR\LNC Rename.mda |
| HKEY_CURRENT_ACCESS_PROFILE \Wizards\Property Wizards\Name \LNC Builder All | 1 | Function | LNCBuilderAll |
Figure 21-17 shows the Add-Ins menu with the three LNC Rename menu add-ins.
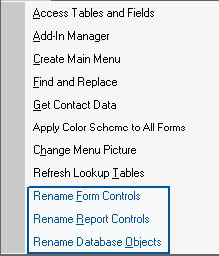
Figure 21-17. The Add-Ins menu in an Access database lists the three LNC Rename menu add-ins.
A brief description of these add-ins follows; for a more detailed discussion of how to use the LNC Rename add-in to rename database objects, see Chapter 15, "Using Add-Ins to Expand Access Functionality."
Rename Database Objects Menu Add-In
The Rename Database Objects menu add-in renames top-level database objects: tables, queries, forms, reports, macros, and modules. It uses an option group on a form for selecting one type of database object to rename rather than renaming all database objects in one pass. The first reason for this is that sometimes (usually, in fact) it isn’t necessary to rename all types of database objects. You might have only one macro, AutoKeys, and a few modules that already have the bas tag. In that case, you don’t need to process macros or modules.
note
You must have the Find And Replace Add-in installed before you can use the Rename Database Objects menu add-in. See Chapter 15, "Using Add-Ins to Expand Functionality" for instruction on installing this add-in.
Another reason for selecting database object types for separate processing is that it’s helpful to break up the renaming task into segments, especially if you’re renaming database objects in a large database. The process of renaming objects can be mind numbing. Taking a break between object types can help clear your mind.
Finally, processing each type of database object separately allows the use of different criteria for each type of object that’s renamed. Access creates temporary filters and other objects behind the scenes, which should be screened out of the list of objects to be renamed. (See Figure 21-18, which shows some of these objects as they appear in the MSysObjects system table.)
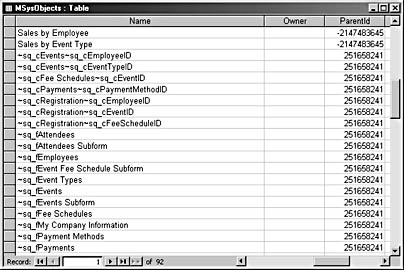
Figure 21-18. Temporary objects are listed in the MSysObjects table.
Also, some database objects might already have appropriate tags. They should also be excluded from the list of objects to rename.
Figure 21-19 shows a diagram of the functions called and forms opened by the Rename Database Objects menu add-in.
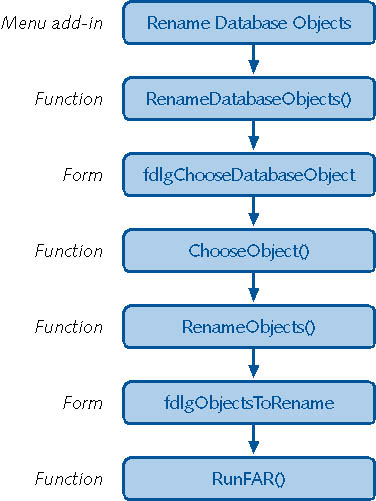
Figure 21-19. The Rename Database Objects menu add-in uses various functions and forms.
When you select the Rename Database Objects add-in, it calls the RenameDatabaseObjects function, which opens the fdlgChooseDatabaseObject wizard form.
Public Function RenameDatabaseObjects() 'Called from USysRegInfo (menu add-in) On Error GoTo RenameDatabaseObjectsError strForm = "fdlgChooseDatabaseObject" DoCmd.OpenForm FormName:=strForm, view:=acNormal, _ windowmode:=acDialog RenameDatabaseObjectsExit: Exit Function RenameDatabaseObjectsError: MsgBox "Error No: " & Err.Number & "; Description: " _ & Err.Description Resume RenameDatabaseObjectsExit End Function
The wizard form for renaming database objects is shown in Figure 21-20. This form lets the user select the type of database object to rename (only one at a time, for the reasons discussed earlier).
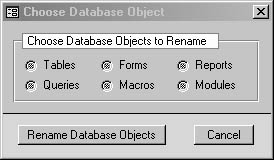
Figure 21-20. The Choose Database Object wizard form lets you select the type of database object to rename.
The Click event procedure of the cmdRename button on the fdlgChooseDatabaseObject form calls the ChooseObject function, which in turn calls the RenameObjects function with the appropriate object name as a String argument. These functions are shown below.
Public Function ChooseObject() 'Called from cmdRename on fdlgChooseDatabaseObject On Error GoTo ChooseObjectError Dim intChoice As Integer intChoice = _ Nz(Forms![fdlgChooseDatabaseObject]![fraChooseDBObject]) Select Case intChoice Case 1 Call RenameObjects("Table") Exit Function Case 2 Call RenameObjects("Query") Exit Function Case 3 Call RenameObjects("Form") Exit Function Case 4 Call RenameObjects("Report") Exit Function Case 5 Call RenameObjects("Macro") Exit Function Case 6 Call RenameObjects("Module") Exit Function Case Else MsgBox "Please select an option" Exit Function End Select DoCmd.Close ChooseObjectExit: Exit Function ChooseObjectError: MsgBox "Error No: " & Err.Number & "; Description: " _ & Err.Description Resume ChooseObjectExit End Function Public Function RenameObjects(strObjectType) 'Called from ChooseObjects function in this module On Error GoTo RenameObjectsError Dim strCallingSystemTable As String Dim strSystemTable As String Dim strChooseForm As String Dim strChooseObject As String strCallingSystemTable = "MSysObjects" strSystemTable = "zLNCtblSysObjects" strObjectsTable = "zLNCtblObjectsToRename" strForm = "fdlgObjectsToRename" strSubform = "fsubObjectsToRename" strChooseForm = "fdlgChooseDatabaseObject" strCodeDB = CodeDb.Name strCallingDB = CurrentDb.Name strQuery = "zLNCqappCheck" & strObjectType strChooseObject = "fdlgChooseDatabaseObject" DoCmd.SetWarnings False 'Delete old tables. ClearCodeSystemTable ClearCodeObjectsTable ClearCurrentSystemTable ClearCurrentObjectsTable 'Create system objects table in calling database. strSQL = "CREATE TABLE " & strSystemTable & " _ (Name TEXT (255), Type INTEGER);" DoCmd.RunSQL strSQL 'Fill system table from MSysObjects table. strSQL = "INSERT INTO " & strSystemTable & _ "(Name, Type) SELECT MSysObjects.Name, " & _ "MSysObjects.Type FROM MSysObjects;" DoCmd.RunSQL strSQL 'Copy filled system table to code database. DoCmd.CopyObject strCodeDB, , acTable, strSystemTable 'Generate table of objects to rename in calling database. strSQL = "CREATE TABLE " & strObjectsTable & _ "(ObjectName TEXT (100), NewName TEXT (100), Use YESNO);" DoCmd.SetWarnings False DoCmd.RunSQL strSQL 'Copy blank objects table in calling 'database to code database 'so that it will be available as the form's record source. DoCmd.CopyObject strCodeDB, , acTable, strObjectsTable 'Run query to append rows from system table to objects table 'in code database. DoCmd.OpenQuery strQuery 'Count number of objects to rename. Set dbs = CodeDb Set rst = dbs.OpenRecordset(strObjectsTable) intCount = rst.RecordCount rst.Close If intCount = 0 Then MsgBox "No " & Plural(strObjectType) & " to rename" DoCmd.Close acForm, strChooseForm Call RenameDatabaseObjects Else 'Open dialog box where user can select objects to 'rename, and modify the suggested name if desired. DoCmd.OpenForm strSubform, acDesign Set frmSub = Forms(strSubform) frmSub![lblObjectName].Caption = "Old " & _ strObjectType & " Name" frmSub![lblNewName].Caption = "New " & _ strObjectType & " Name" DoCmd.Close acForm, frmSub.Name, acSaveYes DoCmd.OpenForm strForm, acDesign Set frm = Forms(strForm) frm.Caption = Plural(strObjectType) & " to Rename" frm![cmdRename].Caption = "Rename Checked " & _ Plural(strObjectType) DoCmd.OpenForm FormName:=strForm, _ view:=acNormal, windowmode:=acDialog End If RenameObjectsExit: Exit Function RenameObjectsError: MsgBox "Error No: " & Err.Number & "; Description: " & _ Err.Description 'Delete or clear old tables ClearCodeSystemTable ClearCodeObjectsTable ClearCurrentSystemTable ClearCurrentObjectsTable Resume RenameObjectsExit End Function The RenameObjects function clears old tables of object names and creates new ones in the calling database, filling them from the MSysObjects table in the calling database. After the tables have been created, they’re copied to the code database so that they can be used as record sources for the next wizard form to be displayed. Finally, the fdlgObjectsToRename form is opened, with its subform bound to the table of objects just created. The form’s caption (and the command button’s caption) are set to the appropriate form type, so the same generic form can be used for all types of database objects. Figure 21-21 shows the fdlgObjectsToRename form as it appears if the user has selected Forms To Rename on the fdlgChooseDatabaseObject form.
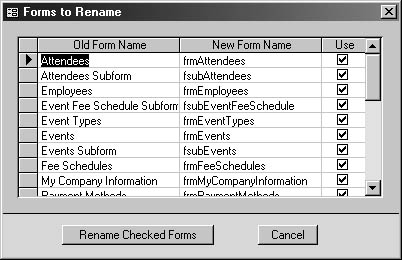
Figure 21-21. The Forms To Rename dialog box suggests new names using LNC tags.
This form displays the suggested new names for the database objects, with a Use column for unchecking selected forms. When cmdRename on the form is clicked, its Click event procedure calls the RunFAR function, which opens the FAR add-in dialog box, prepopulated with information about old and new form names from the wizard form. FAR then proceeds to locate all the references to the old object names in the database so that you can accept or reject the proposed changes.
Rename Form Controls Menu Add-In
After all the database objects have been renamed, the next step is to rename controls on forms and reports. Figure 21-22 shows a flow chart of the functions and forms called by the Rename Form Controls menu add-in.

Figure 21-22. The Rename Form Controls menu add-in uses various functions and forms.
The Rename Form Controls menu add-in, which renames controls on forms, runs the GenerateFormsTable function, shown here.
Public Function GenerateFormsTable() 'Called from USysRegInfo (menu add-in) On Error GoTo GenerateFormsTableError strObjectType = "Form" strObjectsTable = "zLNCtblObjectsToRename" strForm = "fdlgObjectsToRenameControls" strSubform = "fsubObjectsToRenameControls" strCodeDB = CodeDb.Name 'Delete or clear old tables. ClearCodeSystemTable ClearCodeObjectsTable ClearCurrentSystemTable ClearCurrentObjectsTable 'Generate table of forms to rename in calling database. strSQL = "CREATE TABLE " & strObjectsTable & _ "(ObjectName TEXT (100), Use YESNO);" DoCmd.SetWarnings False DoCmd.RunSQL strSQL 'Fill table with form names. strSQL = "INSERT INTO " & strObjectsTable _ & "(ObjectName, Use) " _ & "SELECT MSysObjects.Name, -1 AS " _ & UseIt FROM MSysObjects " _ & "WHERE MSysObjects.Type=-32768 " _ & "ORDER BY MSysObjects.Name;" DoCmd.RunSQL strSQL 'Copy table in calling database to code database 'so that it will be available as the form's record source. DoCmd.CopyObject strCodeDB, , acTable, strObjectsTable 'Generate table of control types to use in renaming controls '(if it doesn't already exist). CreateCTTable 'Open form displaying data from table just created for 'user selection of forms to rename. DoCmd.OpenForm strSubform, acDesign Set frmSub = Forms(strSubform) frmSub![lblObjectName].Caption = strObjectType & " Name" DoCmd.Close acForm, frmSub.Name, acSaveYes DoCmd.OpenForm strForm, acDesign Set frm = Forms(strForm) frm.Tag = strObjectType frm.Caption = strObjectType & "s to Rename" frm![cmdRename].Caption = "Rename Controls on Checked " _ & strObjectType & "s" DoCmd.OpenForm strForm, acNormal GenerateFormsTableExit: Exit Function GenerateFormsTableError: MsgBox "Error No: " & Err.Number & "; Description: " _ & Err.Description Resume GenerateFormsTableExit End Function
This function starts by calling functions (ClearCodeSystemTable, ClearCodeObjectsTable, ClearCurrentSystemTable, and ClearCurrentObjectsTable) that delete several tables used in the add-in (if they exist in the calling database). Next the function creates a SQL statement and then runs it to create the table of form names.
note
Curiously (and inconsistently), the RunSQL method of the DoCmd object, when run from a library database, works on tables in the calling database, whereas the OpenQuery method works on tables in the code database.
The SQL statement includes the Data Definition Language (DDL) CREATE TABLE statement to create an initial blank table to be filled with form names.
tip
The CREATE TABLE statement creates a table in the current database. If you need to create a table in the code database, use the Data Access Objects (DAO) CreateTableDef method, specifying CodeDb as the database in which to create the table.
The second SQL statement in the function appends the name of all forms from the MSysObjects system table to the newly created table. The table is then copied to the code database so that it will be available as the wizard form’s data source. Next the CreateCTTable function is called to create a table of standard control types, which is filled with the numeric codes and descriptions of the control types most commonly used in Access forms and reports. This table is used in determining the control type for renaming in later functions.
Finally, the function opens the wizard form fdlgObjectsToRenameControls with its form and command button captions set with appropriate text. This form is also used for renaming reports with appropriate captions. The form allows the user to select the forms whose controls should be renamed. It has the newly created table of form names as its subform’s record source.
When the cmdRename button on fdlgObjectsToRenameControls is clicked, the RenameForms function is run.
Public Function RenameForms() 'Called from cmdRename on fdlgObjectsToRenameControls On Error GoTo RenameFormsError 'Set reference to add-in library database. Set dbs = CodeDb Set rst = dbs.OpenRecordset _ ("zLNCtblObjectsToRename", dbOpenTable) Set frm = Forms![fdlgObjectsToRenameControls] intCount = rst.RecordCount rst.Close If intCount = 0 Then intReturn = MsgBox("Do you want to select any forms " _ & "for control renaming?", vbYesNo + vbQuestion _ + vbDefaultButton1, "No forms selected") If intReturn = vbYes Then frm![subObjectsToRename].SetFocus ElseIf intReturn = vbNo Then DoCmd.Close acForm, frm.Name Exit Function End If ElseIf intCount > 0 Then DoCmd.Close acForm, frm.Name intReturn = RenameFormControls() End If RenameFormsExit: Exit Function RenameFormsError: MsgBox "Error No: " & Err.Number & "; Description: " _ & Err.Description Resume RenameFormsExit End Function The RenameForms function checks whether any forms have been selected. If none have been selected, the function displays a message box asking whether the user wants to select any forms; a negative answer closes the dialog box, and a positive answer returns the user to the wizard form, where he or she can select some forms. After at least one form has been selected, the function calls the RenameFormControls function.
Public Function RenameFormControls() As Integer 'Called from RenameForms in this module On Error GoTo RenameFormControlsError Dim fTag As Integer Dim fUnbound As Integer Dim intTag As Integer Dim strFormName As String Dim strPrefix As String Dim strControlName As String Dim strControlSource As String Dim strCaption As String Dim i As Integer 'Determine whether original control names should be 'stored in Tag property. strMessage = "When processing forms, should the " _ & "original control name be saved to the " _ & "control's Tag property?" intTag = MsgBox(strMessage, vbYesNo + vbQuestion + _ vbDefaultButton2, "Control Name Backup") If intTag = vbYes Then fTag = True Else fTag = False End If 'Pick up form name from table just created '(using CodeDb to get table from add-in library database). Set dbs = CodeDb Set rst = dbs.OpenRecordset("zLNCtblObjectsToRename", _ dbOpenDynaset) Do Until rst.EOF strFormName = rst![ObjectName] If rst![Use] = True Then 'Process this form. DoCmd.OpenForm strFormName, acDesign Set frm = Forms(strFormName) For Each ctl In frm.Controls strControlName = ctl.Name lngControlType = ctl.ControlType fUnbound = False Select Case lngControlType 'Controls with control source Case acTextBox strPrefix = "txt" Call ControlCS(ctl, strPrefix, fTag) Case acComboBox strPrefix = "cbo" Call ControlCS(ctl, strPrefix, fTag) Case acCheckBox strPrefix = "chk" strControlSource = ctl.ControlSource If fUnbound = False Then Call ControlCS(ctl, strPrefix, fTag) Else Call ControlNA(ctl, strPrefix, fTag) End If Case acBoundObjectFrame strPrefix = "frb" Call ControlCS(ctl, strPrefix, fTag) Case acListBox strPrefix = "lst" Call ControlCS(ctl, strPrefix, fTag) Case acOptionGroup strPrefix = "fra" Call ControlCS(ctl, strPrefix, fTag) Case acOptionButton strPrefix = "opt" strControlSource = ctl.ControlSource If fUnbound = False Then Call ControlCS(ctl, strPrefix, fTag) Else Call ControlNA(ctl, strPrefix, fTag) End If 'Controls with caption only Case acToggleButton strPrefix = "tgl" Call ControlCA(ctl, strPrefix, fTag) Case acLabel strPrefix = "lbl" Call ControlCA(ctl, strPrefix, fTag) Case acCommandButton strPrefix = "cmd" Call ControlCA(ctl, strPrefix, fTag) 'Controls with source object only Case acSubform strPrefix = "sub" Call ControlSO(ctl, strPrefix, fTag) 'Controls with none of the above Case acObjectFrame strPrefix = "fru" Call ControlNA(ctl, strPrefix, fTag) Case acImage strPrefix = "img" Call ControlNA(ctl, strPrefix, fTag) Case acTabCtl strPrefix = "tab" Call ControlNA(ctl, strPrefix, fTag) Case acLine strPrefix = "lin" Call ControlNA(ctl, strPrefix, fTag) Case acPage strPrefix = "pge" Call ControlNA(ctl, strPrefix, fTag) Case acPageBreak strPrefix = "brk" Call ControlNA(ctl, strPrefix, fTag) Case acRectangle strPrefix = "shp" Call ControlNA(ctl, strPrefix, fTag) End Select SkipToHere: Next ctl intReturn = MsgBox("Save and close this form?", _ vbYesNoCancel + vbQuestion + vbDefaultButton1, _ "Form Controls Renamed") If intReturn = vbYes Then DoCmd.Close acForm, strFormName, acSaveYes ElseIf intReturn = vbNo Then 'Leave this form open in Design view without saving it. ElseIf intReturn = vbCancel Then Exit Function End If End If rst.MoveNext Loop rst.Close MsgBox "All forms processed!" RenameFormControlsExit: 'Delete old tables (no longer needed). ClearCodeSystemTable ClearCodeObjectsTable ClearCurrentSystemTable ClearCurrentObjectsTable Exit Function RenameFormControlsError: 'If an option button or check box is unbound, set 'fUnbound to True so that the code uses the NA function instead of CS. If Err.Number = 2455 Then fUnbound = True Resume Next Else MsgBox "Error No: " & Err.Number & "; Description: " _ & Err.Description Resume RenameFormControlsExit End If End Function The RenameFormControls function first displays a message box asking whether the original control name should be stored in the control’s Tag property. It then cycles through the forms in the zLNCtblObjectsToRename table (the record source of the fdlgObjectsToRenameControls form’s subform) using a DAO recordset. If the form has its Use property set to True (indicating that it was selected on the wizard form), the form opens and the code cycles through its Controls collection. For each control, the control name and control type are saved to variables; a Select Case statement processes each control type in turn, using Access named constants from the AcControlType enum to identify the control type.
Instead of writing a separate function to handle each control type, I streamlined the code by writing several functions to process groups of controls with similar characteristics. These functions (and the control types they handle) are listed in Table 21-8.
Table 21-8. Functions for renaming controls
| Function | Description | Control types |
| ControlCS | Renames controls with control sources | Text Box Combo Box Bound Check Box Bound Object Frame ListBox Option Group Bound Option Button |
| ControlCA | Renames controls with captions | Toggle Button Label Command Button |
| ControlSO | Renames controls with source objects | Subform/Subreport |
| ControlNA | Renames controls with none of the above characteristics | Object Frame Image Tab Line Page Page Break Rectangle |
The ControlCS function takes the control, the standard LNC tag, and a flag variable as arguments. First it stores the control’s control source and name to variables, and then it checks whether the control already has the correct tag and handles a few special cases. If the control source isn’t empty, it’s used as the new control name’s base name component (stripped of spaces and other characters by the StripNonAlphaNumericChars function). The proposed new control name consists of the LNC tag plus the base name.
If the control source is empty, the old control name is used as the base name. Another special case takes care of a control on reports created by the Database Wizard. Finally, a message box is displayed to show the user the original control name, the control type, the control source, and the proposed new control name. A Do While…Loop structure is set up to suggest a new name until the user accepts the proposed name, and it meets the LNC specifications for that control type.
The function’s error handler takes care of the common case (especially on reports) of several controls having the same control source or caption. When this occurs, a 1 is added to the end of the proposed control name, with an explanatory message.
Public Function ControlCS(ctl As Control, _ strPrefix As String, fTag As Integer) As Integer 'Called from RenameFormControls and RenameReportControls in this module 'Does group renaming of all controls with control sources 'on a form or report On Error GoTo ControlCSError Dim strControlSource As String strControlSource = Nz(ctl.ControlSource) strOldCtlName = ctl.ControlName 'Check whether control is already correctly named and also special case 'for controls whose original name starts with "Option" or "Frame" '(same first three letters as prefix). If left(strOldCtlName, 3) = strPrefix And _ left(strOldCtlName, 6) _ <> "Option" And left(strOldCtlName, 3) = strPrefix And _ left(strOldCtlName, 5) <> "Frame" Then Exit Function 'If the control source isn't empty, use it. ElseIf strControlSource <> "" Then strNewCtlName = strPrefix & _ StripNonAlphaNumericChars(strControlSource) 'Otherwise, use the original control name. Else strNewCtlName = strPrefix & _ StripNonAlphaNumericChars(strOldCtlName) End If 'Fix name of "Page x of y" text box controls 'on Database Wizard reports. If strNewCtlName = "txtPagePageofPages" Then strNewCtlName = "txtPages" End If 'Show the user ' - the original control name ' - the control type ' - the control source ' - the proposed new name 'and ask whether the new name is acceptable. intRenameFail = True Do While intRenameFail intRenameFail = False intReturn = MsgBox( _ "Rename " & _ DLookup("[ControlTypeName]", "zLNCtblControlType", _ "[ControlType] = " & ctl.ControlType) _ & " control currently named " _ & strOldCtlName & vbCrLf & _ "(control source: " & strControlSource & ") " & _ "to" & vbCrLf & strNewCtlName & "?", _ vbYesNo + vbQuestion + vbDefaultButton1, _ "Rename control") 'If the user clicks the Yes button, rename the control. If intReturn = vbYes Then If fTag = True Then ctl.Tag = ctl.ControlName End If ctl.ControlName = strNewCtlName 'Otherwise, display an input box for editing the name. ElseIf intReturn = vbNo Then strNewCtlName = _ InputBox("Modify new control name", _ "Rename control", strNewCtlName) ctl.ControlName = strNewCtlName End If Loop ControlCSExit: Exit Function ControlCSError: 'If the proposed control name is already in use, 'return to the renaming dialog box. intRenameFail = True If Err.Number = 2104 Then MsgBox "There is another control named " & _ strNewCtlName & "; please try again", , _ "Control Name Used" strNewCtlName = strNewCtlName & "1" Else MsgBox ("Error No: " & Err & "; error message: " & Error(Err)) End If Resume Next End Function The ControlCA function differs only in a few respects from the ControlCS function: It stores the control’s caption rather than its control source, and it uses the caption to create the new control’s base name.
Public Function ControlCA(ctl As Control, _ strPrefix As String, fTag As Integer) As Integer 'Called from RenameFormControls and 'RenameReportControls in this module 'Does group renaming of all controls with 'captions on a form or report On Error GoTo ControlCAError Dim strCaption As String strOldCtlName = ctl.ControlName strCaption = ctl.Caption If left(strOldCtlName, 3) = strPrefix Then Exit Function ElseIf strCaption <> "" Then If left(strCaption, 3) = "frm" Then strNewCtlName = strPrefix & _ Mid(StripNonAlphaNumericChars(strCaption), 4) ElseIf left(strCaption, 4) = "fsub" Then strNewCtlName = strPrefix & _ Mid(StripNonAlphaNumericChars(strCaption), 5) Else strNewCtlName = strPrefix & _ StripNonAlphaNumericChars(strCaption) End If ElseIf strCaption = "" Then If left(strOldCtlName, 3) = "frm" Then strNewCtlName = strPrefix & _ Mid(StripNonAlphaNumericChars(strOldCtlName), 4) ElseIf left(strOldCtlName, 4) = "fsub" Then strNewCtlName = strPrefix & _ Mid(StripNonAlphaNumericChars(strOldCtlName), 5) Else strNewCtlName = strPrefix & _ StripNonAlphaNumericChars(strOldCtlName) End If End If If Right(strNewCtlName, 12) = "SubformLabel" Then strNewCtlName = left(strNewCtlName, _ Len(strNewCtlName) - 12) ElseIf Right(strNewCtlName, 5) = "Label" Then strNewCtlName = left(strNewCtlName, _ Len(strNewCtlName) - 5) End If intRenameFail = True Do While intRenameFail intRenameFail = False intReturn = MsgBox("Rename " _ & DLookup("[ControlTypeName]", _ "zLNCtblControlType", "[ControlType] = " _ & ctl.ControlType) _ & " control currently named " & strOldCtlName _ & vbCrLf & _ "(caption: " & strCaption & ") to" & vbCrLf & _ strNewCtlName & "?", vbYesNo + vbQuestion + _ vbDefaultButton1, "Rename control") If intReturn = vbYes Then If fTag = True Then ctl.Tag = ctl.ControlName ctl.ControlName = strNewCtlName ElseIf intReturn = vbNo Then strNewCtlName = InputBox("Modify new control name", _ "Rename control", strNewCtlName) ctl.ControlName = strNewCtlName End If Loop ControlCAExit: Exit Function ControlCAError: 'If the proposed control name is already in use, 'return to the renaming dialog box. intRenameFail = True If Err.Number = 2104 Then MsgBox "There is another control named " & _ strNewCtlName & "; please try again", , _ "Control Name Used" strNewCtlName = strNewCtlName & "1" Else MsgBox ("Error No: " & Err & "; error message: " _ & Error(Err)) End If Resume Next End Function The ControlSO function stores the SourceObject property of the control and uses it to create the new control base name. It has a number of special cases to deal with subform/subreport names created by various Access wizards.
Public Function ControlSO(ctl As Control, _ strPrefix As String, fTag As Integer) As Integer 'Called from RenameFormControls and RenameReportControls in this module 'Does group renaming of all controls with source objects on a form or report On Error GoTo ControlSOError strOldCtlName = ctl.ControlName strSourceObject = Nz(ctl.SourceObject) If left(strOldCtlName, 3) = strPrefix Then Exit Function ElseIf strSourceObject <> "" Then If left(strSourceObject, 3) = "frm" Then strNewCtlName = strPrefix & _ Mid(StripNonAlphaNumericChars(strSourceObject), 4) ElseIf left(strSourceObject, 4) = "fsub" Then strNewCtlName = strPrefix & _ Mid(StripNonAlphaNumericChars(strSourceObject), 5) Else strNewCtlName = strPrefix & _ StripNonAlphaNumericChars(strSourceObject) End If ElseIf strSourceObject = "" Then If left(strOldCtlName, 3) = "frm" Then strNewCtlName = strPrefix & _ Mid(StripNonAlphaNumericChars(strOldCtlName), 4) ElseIf left(strOldCtlName, 4) = "fsub" Then strNewCtlName = strPrefix & _ Mid(StripNonAlphaNumericChars(strOldCtlName), 5) Else strNewCtlName = strPrefix & _ StripNonAlphaNumericChars(strOldCtlName) End If Else strNewCtlName = strPrefix & _ StripNonAlphaNumericChars(strOldCtlName) End If If Right(strNewCtlName, 7) = "Subform" Then strNewCtlName = left(strNewCtlName, _ Len(strNewCtlName) - 7) End If intRenameFail = True Do While intRenameFail intRenameFail = False intReturn = MsgBox("Rename " _ & DLookup("[ControlTypeName]", _ "zLNCtblControlType", "[ControlType] = " _ & ctl.ControlType) _ & " control currently named " & strOldCtlName _ & vbCrLf & _ "(source object: " & strSourceObject & ") to" _ & vbCrLf & _ strNewCtlName & "?", vbYesNo + vbQuestion _ + vbDefaultButton1, _ "Rename control") If intReturn = vbYes Then If fTag = True Then ctl.Tag = ctl.ControlName ctl.ControlName = strNewCtlName ElseIf intReturn = vbNo Then strNewCtlName = InputBox("Modify new control name", _ "Rename control", strNewCtlName) ctl.ControlName = strNewCtlName End If Loop ControlSOExit: Exit Function ControlSOError: 'If the proposed control name is already in use, 'return to the renaming dialog box. intRenameFail = True If Err.Number = 2104 Then MsgBox "There is another control named " & _ strNewCtlName & "; please try again", , _ "Control Name Used" strNewCtlName = strNewCtlName & "1" Else MsgBox ("Error No: " & Err & "; error message: " _ & Error(Err)) End If Resume ControlSOExit End Function The catch-all ControlNA function, after dealing with some special cases, proposes a new control name composed of the LNC tag and the old control name (stripped of nonalphanumeric characters).
Public Function ControlNA(ctl As Control, _ strPrefix As String, fTag As Integer) As Integer 'Called from RenameFormControls and RenameReportControls 'in this module 'Does group renaming of all controls that do not fit the 'other categories on a form or report On Error GoTo ControlNAError strOldCtlName = ctl.ControlName 'Special case for lines whose default name is "Line" 'or "Option" (same first three letters as the 'standard prefix) If left(strOldCtlName, 3) = strPrefix And _ left(strOldCtlName, 6) <> "Option" And _ left(strOldCtlName, 4) <> "Line" Then Exit Function Else strNewCtlName = strPrefix & _ StripNonAlphaNumericChars(strOldCtlName) End If intRenameFail = True Do While intRenameFail intRenameFail = False intReturn = MsgBox("Rename " _ & DLookup("[ControlTypeName]", _ "zLNCtblControlType", "[ControlType] = " _ & ctl.ControlType) & _ " control currently named " & strOldCtlName & " to" _ & vbCrLf _ & strNewCtlName & "?", vbYesNo + vbQuestion + _ vbDefaultButton1, _ "Rename control") If intReturn = vbYes Then If fTag = True Then ctl.Tag = ctl.ControlName ctl.ControlName = strNewCtlName ElseIf intReturn = vbNo Then strNewCtlName = InputBox("Modify new control name", _ "Rename control", strNewCtlName) ctl.ControlName = strNewCtlName End If Loop ControlNAExit: Exit Function ControlNAError: 'If the proposed control name is already in use, 'return to the renaming dialog box. intRenameFail = True If Err.Number = 2104 Then MsgBox "There is another control named " & _ strNewCtlName & "; please try again", , _ "Control Name Used" strNewCtlName = strNewCtlName & "1" Else MsgBox ("Error No: " & Err & "; error message: " _ & Error(Err)) End If Resume ControlNAExit End Function
The StripNonAlphaNumericChars function is shown in the section "Creating COM Add-Ins."
After all the controls on a form have been processed, the RenameFormControls function proceeds to the next form, and so on, until all the forms in the database have had their controls renamed.
Rename Report Controls Menu Add-In
The third menu add-in, Rename Report Controls, works the same as Rename Form Controls except it processes controls on reports rather than on forms. (See Figure 21-23.) A different add-in is required because opening reports requires a different syntax than opening forms.
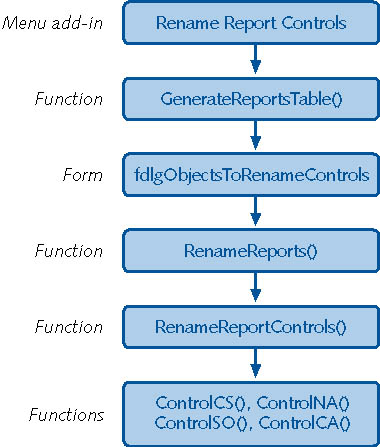
Figure 21-23. The Rename Report Controls menu add-in uses various functions and forms.
LNC Builder
The LNC Builder is a Property Wizard; it hooks on to the Name property of a control and is used to rename an individual control in design view. A function called from a Property Builder has three required arguments, which represent the object name (the form or report name for the LNC Builders), the control name, and the current value of the property (the Name property for these builders).
Clicking the Build button to the right of the Name property in a control’s properties sheet (as shown in Figure 21-24) opens a Choose Builder dialog box, which lists the two LNC builders.
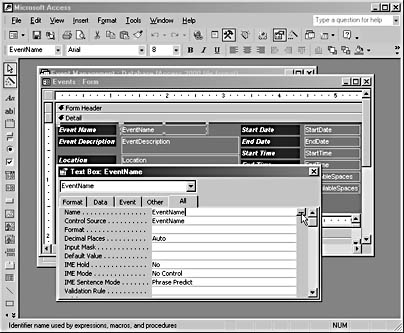
Figure 21-24. You click the Build button to open the LNC Builder for renaming a control.
The LNC Rename Current Control option is selected by default in the dialog box (as shown in Figure 21-25).
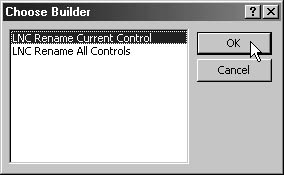
Figure 21-25. The LNC Rename Current Control item is selected by default.
When you select this builder, it runs the LNCBuilder function, shown below. The LNCBuilder function picks up the name of the current form or report, the name of the control, and the Name property’s current value from the control that invokes it. These arguments are then used in the function’s code. The function clears old tables in the calling database, runs CreateCTTable to create a table of control types, determines whether the current object is a form or report, and then goes to the appropriate segment of code to set a reference to either a form control or a report control. Next the code jumps to the DetermineControlType label, where a message box appears asking whether the old control name should be saved to the Tag property, and then a Select Case statement (similar to the one in the RenameFormControls function) is set up to rename the control according to its type.
Public Function LNCBuilder(strObjectName As String, _ strCtlName As String, strCurrentValue As String) As Variant 'Called from USysRegInfo (Property Wizard) 'A Property Builder that renames an individual control 'on a form or report On Error GoTo LNCBuilderError Dim fTag As Integer Dim strPrefix As String Dim fUnbound As Boolean Dim strControlSource As String Dim strCaption As String 'Delete old tables in calling database. ClearCurrentSystemTable ClearCurrentObjectsTable 'Generate table of control types to use in renaming controls '(if it doesn't already exist). CreateCTTable strOldCtlName = strCurrentValue 'Determine whether current object is a form or a report. For Each frm In Forms If frm.Name = strObjectName Then GoTo ObjectIsForm End If Next frm 'strObjectName not found in forms; check whether 'it is a report. For Each rpt In Reports If rpt.Name = strObjectName Then GoTo ObjectIsReport End If Next rpt MsgBox "Current object isn't a form or a report; exiting" Exit Function ObjectIsForm: Set frm = Forms(strObjectName) Set ctl = frm(strCtlName) GoTo DetermineControlType ObjectIsReport: Set rpt = Reports(strObjectName) Set ctl = rpt(strCtlName) DetermineControlType: lngControlType = ctl.ControlType 'Determine whether the Tag property has a value. strMessage = "Save the original control name to " _ & "the control's Tag property?" 'Set fTag to save control name to Tag only if Tag is empty. If IsNull(ctl.Tag) = True Or ctl.Tag = "" Then fTag = True Else fTag = False End If 'Run code to create suggested control name 'based on control type. fUnbound = False Select Case lngControlType 'Control with control source Case acTextBox strPrefix = "txt" strNewCtlName = ControlCS(ctl, strPrefix, fTag) Case acComboBox strPrefix = "cbo" strNewCtlName = ControlCS(ctl, strPrefix, fTag) Case acCheckBox strPrefix = "chk" strControlSource = ctl.ControlSource If fUnbound = False Then strNewCtlName = ControlCS(ctl, strPrefix, fTag) Else strNewCtlName = ControlNA(ctl, strPrefix, fTag) End If Case acBoundObjectFrame strPrefix = "frb" strNewCtlName = ControlCS(ctl, strPrefix, fTag) Case acListBox strPrefix = "lst" strNewCtlName = ControlCS(ctl, strPrefix, fTag) Case acOptionGroup strPrefix = "fra" strNewCtlName = ControlCS(ctl, strPrefix, fTag) Case acOptionButton strPrefix = "opt" strControlSource = ctl.ControlSource If fUnbound = False Then strNewCtlName = ControlCS(ctl, strPrefix, fTag) Else strNewCtlName = ControlNA(ctl, strPrefix, fTag) End If 'Control with caption only Case acToggleButton strPrefix = "tgl" strNewCtlName = ControlCA(ctl, strPrefix, fTag) Case acLabel strPrefix = "lbl" strNewCtlName = ControlCA(ctl, strPrefix, fTag) Case acCommandButton strPrefix = "cmd" strNewCtlName = ControlCA(ctl, strPrefix, fTag) 'Control with source object only Case acSubform strPrefix = "sub" strNewCtlName = ControlSO(ctl, strPrefix, fTag) 'Control with none of the above Case acObjectFrame strPrefix = "fru" strNewCtlName = ControlNA(ctl, strPrefix, fTag) Case acImage strPrefix = "img" strNewCtlName = ControlNA(ctl, strPrefix, fTag) Case acTabCtl strPrefix = "tab" strNewCtlName = ControlNA(ctl, strPrefix, fTag) Case acLine strPrefix = "lin" strNewCtlName = ControlNA(ctl, strPrefix, fTag) Case acPage strPrefix = "pge" strNewCtlName = ControlNA(ctl, strPrefix, fTag) Case acPageBreak strPrefix = "brk" strNewCtlName = ControlNA(ctl, strPrefix, fTag) Case acRectangle strPrefix = "shp" strNewCtlName = ControlNA(ctl, strPrefix, fTag) End Select LNCBuilderExit: 'Delete old tables in calling database. ClearCurrentSystemTable ClearCurrentObjectsTable Exit Function LNCBuilderError: 'If an option button or check box is unbound, set 'fUnbound to True so that the code uses the NA function instead of CS. Select Case Err.Number Case 2455 fUnbound = True Resume Next Case 2465 MsgBox "You can't rename a single control " _ & "from the Detail section" Resume LNCBuilderExit Case Else MsgBox "Error No: " & Err.Number & "; Description: " _ & Err.Description Resume LNCBuilderExit End Select End Function
When the new control name has been determined, it is presented in a Rename Control message box. (A typical one is shown in Figure 21-26). This is the same message box that’s used in the Rename Form Controls and Rename Report Controls menu add-ins.
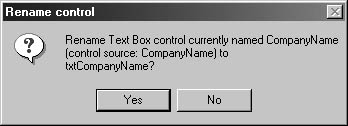
Figure 21-26. The Rename Control message box proposes a new name for a text box control.
LNC Builder All
The LNC Builder All Property Builder (listed as a wizard in the registry) also runs from the Name property, but this builder runs only from the Name property of a form or report’s detail section. Selecting the LNC Rename All Controls item in the Choose Builder dialog box runs the LNCBuilderAll function, which cycles through all the controls on the current form or report, displaying a Rename Control message box for each (as shown earlier in Figure 21-26).
Public Function LNCBuilderAll(strObjectName As String, _ strCtlName As String, strCurrentValue As String) As Variant 'Called from USysRegInfo (property wizard) 'A Property Builder that renames all the controls on a form 'or report On Error GoTo LNCBuilderAllError Dim i As Integer Dim fTag As Integer Dim intTag As Integer Dim strPrefix As String Dim fUnbound As Boolean Dim strControlSource As String Dim strCaption As String 'Delete old tables in calling database. ClearCurrentSystemTable ClearCurrentObjectsTable 'Generate table of control types to use in renaming controls '(if it doesn't already exist). CreateCTTable strOldCtlName = strCurrentValue 'Determine whether original control names should 'be stored in Tag property. strMessage = "When processing controls, should the " _ & "original control name be saved to the " _ & "control's Tag property?" intTag = MsgBox(strMessage, vbYesNo + vbQuestion + _ vbDefaultButton2, "Control Name Backup") If intTag = vbYes Then fTag = True Else fTag = False End If 'Determine whether current object is a form or a report. For Each frm In Forms If frm.Name = strObjectName Then GoTo ObjectIsForm End If Next frm 'strObjectName not found in forms; check whether 'it is a report. For Each rpt In Reports If rpt.Name = strObjectName Then GoTo ObjectIsReport End If Next rpt MsgBox "Current object isn't a form or a report; exiting" Exit Function ObjectIsForm: Set frm = Forms(strObjectName) For Each ctl In frm.Controls strCtlName = ctl.Name lngControlType = ctl.ControlType fUnbound = False Select Case lngControlType 'Controls with control source Case acTextBox strPrefix = "txt" Call ControlCS(ctl, strPrefix, fTag) Case acComboBox strPrefix = "cbo" Call ControlCS(ctl, strPrefix, fTag) Case acCheckBox strPrefix = "chk" strControlSource = ctl.ControlSource If fUnbound = False Then Call ControlCS(ctl, strPrefix, fTag) Else Call ControlNA(ctl, strPrefix, fTag) End If Case acBoundObjectFrame strPrefix = "frb" Call ControlCS(ctl, strPrefix, fTag) Case acListBox strPrefix = "lst" Call ControlCS(ctl, strPrefix, fTag) Case acOptionGroup strPrefix = "fra" Call ControlCS(ctl, strPrefix, fTag) Case acOptionButton strPrefix = "opt" strControlSource = ctl.ControlSource If fUnbound = False Then Call ControlCS(ctl, strPrefix, fTag) Else Call ControlNA(ctl, strPrefix, fTag) End If 'Controls with caption only Case acToggleButton strPrefix = "tgl" Call ControlCA(ctl, strPrefix, fTag) Case acLabel strPrefix = "lbl" Call ControlCA(ctl, strPrefix, fTag) Case acCommandButton strPrefix = "cmd" Call ControlCA(ctl, strPrefix, fTag) 'Controls with source object only Case acSubform strPrefix = "sub" Call ControlSO(ctl, strPrefix, fTag) 'Controls with none of the above Case acObjectFrame strPrefix = "fru" Call ControlNA(ctl, strPrefix, fTag) Case acImage strPrefix = "img" Call ControlNA(ctl, strPrefix, fTag) Case acTabCtl strPrefix = "tab" Call ControlNA(ctl, strPrefix, fTag) Case acLine strPrefix = "lin" Call ControlNA(ctl, strPrefix, fTag) Case acPage strPrefix = "pge" Call ControlNA(ctl, strPrefix, fTag) Case acPageBreak strPrefix = "brk" Call ControlNA(ctl, strPrefix, fTag) Case acRectangle strPrefix = "shp" Call ControlNA(ctl, strPrefix, fTag) End Select SkipToHereForm: Next ctl GoTo Success ObjectIsReport: Set rpt = Reports(strObjectName) For Each ctl In rpt.Controls strCtlName = ctl.Name lngControlType = ctl.ControlType fUnbound = False Select Case lngControlType 'Controls with control source Case acTextBox strPrefix = "txt" Call ControlCS(ctl, strPrefix, fTag) Case acComboBox strPrefix = "cbo" Call ControlCS(ctl, strPrefix, fTag) Case acCheckBox strPrefix = "chk" strControlSource = ctl.ControlSource If fUnbound = False Then Call ControlCS(ctl, strPrefix, fTag) Else Call ControlNA(ctl, strPrefix, fTag) End If Case acBoundObjectFrame strPrefix = "frb" Call ControlCS(ctl, strPrefix, fTag) Case acListBox strPrefix = "lst" Call ControlCS(ctl, strPrefix, fTag) Case acOptionGroup strPrefix = "fra" Call ControlCS(ctl, strPrefix, fTag) Case acOptionButton strPrefix = "opt" strControlSource = ctl.ControlSource If fUnbound = False Then Call ControlCS(ctl, strPrefix, fTag) Else Call ControlNA(ctl, strPrefix, fTag) End If 'Controls with caption only Case acToggleButton strPrefix = "tgl" Call ControlCA(ctl, strPrefix, fTag) Case acLabel strPrefix = "lbl" Call ControlCA(ctl, strPrefix, fTag) Case acCommandButton strPrefix = "cmd" Call ControlCA(ctl, strPrefix, fTag) 'Controls with source object only Case acSubform strPrefix = "sub" Call ControlSO(ctl, strPrefix, fTag) 'Controls with none of the above Case acObjectFrame strPrefix = "fru" Call ControlNA(ctl, strPrefix, fTag) Case acImage strPrefix = "img" Call ControlNA(ctl, strPrefix, fTag) Case acTabCtl strPrefix = "tab" Call ControlNA(ctl, strPrefix, fTag) Case acLine strPrefix = "lin" Call ControlNA(ctl, strPrefix, fTag) Case acPage strPrefix = "pge" Call ControlNA(ctl, strPrefix, fTag) Case acPageBreak strPrefix = "brk" Call ControlNA(ctl, strPrefix, fTag) Case acRectangle strPrefix = "shp" Call ControlNA(ctl, strPrefix, fTag) End Select SkipToHereReport: Next ctl Success: MsgBox "All controls renamed!" LNCBuilderAllExit: 'Delete old tables in calling database. ClearCurrentSystemTable ClearCurrentObjectsTable Exit Function LNCBuilderAllError: 'If an option button or check box is unbound, set 'fUnbound to True so that the code uses the NA function instead of CS. If Err.Number = 2455 Then fUnbound = True Resume Next Else MsgBox "Error No: " & Err.Number & "; Description: " _ & Err.Description Resume LNCBuilderAllExit End If End Function
Preventing Problems with Access Add-Ins
The following suggestions will make it easier to debug your add-in projects:
- To verify that your add-in has been installed properly, write a simple function to display a message box and enter it as the function to run in the USysRegInfo table’s Function line. After you have verified that the add-in was installed correctly (the message box appears when you run the add-in), replace this test function with the add-in’s main function in the USysRegInfo table.
- When you need to make a change to an add-in, first uninstall it in the Add-In Manager (in a regular database), then close the database, and then open the add-in database for editing. Otherwise, you might get an error message about the database being in use as a library database, and you won’t be able to open it for modifications. After making the changes, compile the add-in’s VBA code, save and close it, and then reinstall it from a regular database using the Add-In Manager.
- Occasionally, after making changes to an add-in database, you might find that the latest changes aren’t visible when you run the add-in. In that case, uninstall the add-in, and then reinstall it to force the latest version of the add-in to run. (You can do this in a single session in the Add-In Manager dialog box.)
- While working on an add-in, if you make copies of the add-in database from time to time (definitely a good idea), place the copies in another folder (not the working folder or the Add-Ins folder). Otherwise, you’ll see duplicate entries in the Add-In Manager dialog box, with no way to tell which is the latest version of the add-in.
Troubleshooting - When I try to run an add-in, I get the following message: The wizard you need may be missing from the Libraries key of the Microsoft Access section of the Windows Registry
This error has several possible causes. One is an error in the USysRegInfo table—either the wrong registry key or a typo in the add-in name or a function name. Another possible cause is an uncompiled database. Check the USysRegInfo table to make sure all the information in it is correct, and then compile the add-in database, close it, and try again.
EAN: 2147483647
Pages: 172