The Built-In Camera
| The Pearl's built-in camera is special for a couple of reasons:
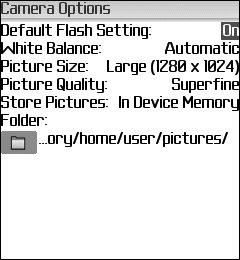
Setting Camera OptionsWhen you are in Camera mode (which you can access via the main menu or the right convenience key), you can press the Menu key and select Camera Options. This menu gives you access to six parameters (Figure 8.1), all of which are important for getting the most out of the Pearl's camera. Figure 8.1. The Camera Options menu Here are the six parameters and the adjustments you can make with them:
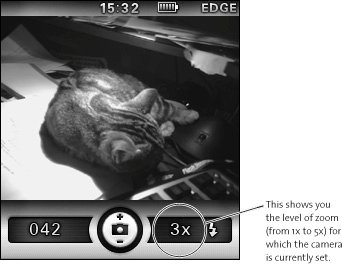
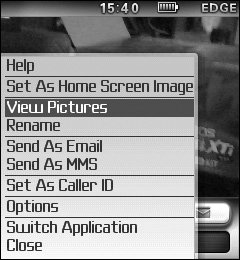
Taking PicturesTaking pictures with the Pearl's camera is as easy as pressing the right convenience key twice in a row. This is the fastest way to take a shot, because the first press puts the Pearl into Camera mode and the second press takes the shot. The other option is to choose Camera from the main menu, use the trackball to manage the various Camera settings, and then take the shot you want. The trackball appears at the bottom center of the main camera screen (Figure 8.2), with plus (+) and minus () signs above and below it. If you move the trackball up, the camera zooms in, and if you move the trackball down, the camera zooms out. The zoom setting, which appears to the right of the trackball, can be anywhere between 1x and 5x, so use it to set up your pictures just the way you like. Figure 8.2. The trackball manages the camera's zoom setting, and the Menu key takes you to the Options screen, which allows you to adjust the various camera settings The rest of the screen shows you how many pictures you can still take, based on the memory available on the Pearl (bottom-left corner) and the state of the flash (on or off; bottom-right corner). What now?You've taken the picture; what do you do now? Well, now you have several choices about what to do with that picture. With the picture sitting on the "desktop" of the Pearl in Camera mode, press the Menu key to display your options (Figure 8.3). Figure 8.3. The Pearl gives you a handful of options for your photos You can choose among the following options for any picture:
Probably the most common use of the Pearl's camera is to take a picture of someone or something impressive and then email it to a friend or business associate immediately. The business applications of this feature are unlimited, but you also can benefit from it in non-business ways. Suppose that you have a friend who is looking to buy a canary-yellow 1985 Toyota Corolla, and you're visiting a city that's a 2-hour drive from your friend's house. While you're in that other city, you find exactly the same car for sale, and you immediately think of your friend. You can wait to tell him about it when you get homeor, better yet, you can use your Pearl to take a picture of the car and then email the picture to him, along with the phone number on the "For Sale" sign in the car's window. In a few short minutes, your friend has a picture of the car he wants and the seller's phone number sitting on his computer.
Self-PortraitsThe Pearl's camera has a metallic mirror-type box just below the camera lens. The reflection from the mirror shows you what the camera's lens is seeing, and it allows you to take self-portraits or to capture yourself and a group of friends having fun somewhere. It's surprising how decent shots like this can be, but ultimately, you are limited by the length of your arms (Figure 8.4). Figure 8.4. Obviously, I have the shortest arms ever. My self-portrait is less than revealing Managing PicturesAfter you have taken some pictures on the Pearl, you can delete them, set them as wallpaper (by choosing Set As Home Screen Image), and attach them as Caller ID pictures. But because the pictures you take on the Pearl are of reasonable quality, you are likely going to want to save them somewhere a little more permanent. The best way to do this is to connect the Pearl to your computer and use the Media Manager utility in BlackBerry Desktop Manager to move the pictures off your Pearl and onto your computer (Figure 8.5). Figure 8.5. Use the Media Manager application to transfer any pictures you want to keep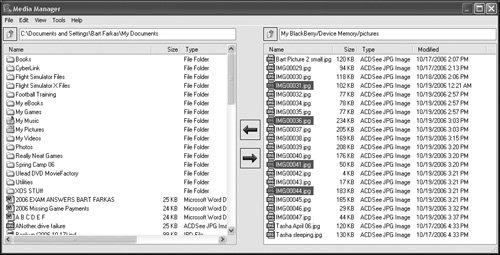 |

EAN: 2147483647
Pages: 67
- Key #1: Delight Your Customers with Speed and Quality
- Key #3: Work Together for Maximum Gain
- Making Improvements That Last: An Illustrated Guide to DMAIC and the Lean Six Sigma Toolkit
- The Experience of Making Improvements: What Its Like to Work on Lean Six Sigma Projects
- Six Things Managers Must Do: How to Support Lean Six Sigma