Installing Office 2003
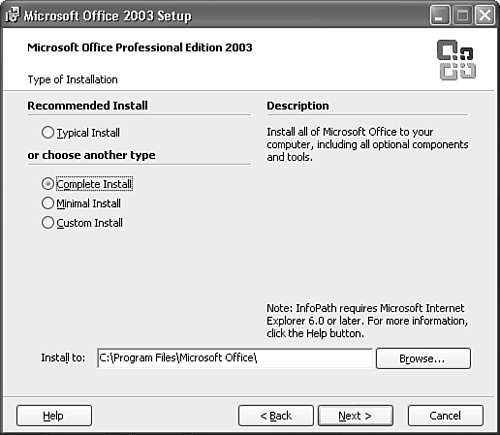
| You can install Outlook with the entire Office 2003 suite or you can install it as a standalone program, either from an Outlook 2003 CD or from the Office 2003 CD. The installation steps are almost identical whether you're installing Office 2003 or Outlook 2003 alone. Office 2003 can also be installed with a network installation. During a network installation, the network administrator can configure specific settings that apply to all users. If you currently have a version of Office on your computer, you'll be able to choose to keep previous versions of most Office programs during your Office 2003 installation. The one exception to this rule is Outlook. You can have only one version of Outlook on your computer. So, if you have Outlook 2002 installed and you install Outlook 2003, Outlook 2002 will be uninstalled. You can choose, however, to keep previous versions of Word, Excel, PowerPoint, and Access. The following paragraphs describe how to install the entire Office 2003 suite from the Office 2003 CD-ROM. Close any running programs on your computer. Many programs running in memory lock certain files. If you try to install Office 2003 with other programs running, you could run into problems. Insert your Office 2003 CD, and the Office 2003 Setup Wizard should launch automatically. If it doesn't, you can either launch the Add/Remove Programs Wizard from the Windows Control Panel, or navigate to your CD drive, double-click the drive to explore the CD, and double-click the file named setup.exe. You'll need to enter your product key in order to install Office. Your product key can be found on the back of your CD case or envelope. Enter your product key in the boxes provided and click Next. Enter your user name, initials, and organization, and click Next. Your user name and organization are displayed on the splash screen when all Office programs launch, so make sure that they're correct. You'll now see the Office 2003 license agreement. You can use the scrollbar to read the entire license agreement. You must check the box marked I Accept the Terms in the License Agreement before you can click Next to display Figure A.1. Figure A.1. Select the type of installation you need.
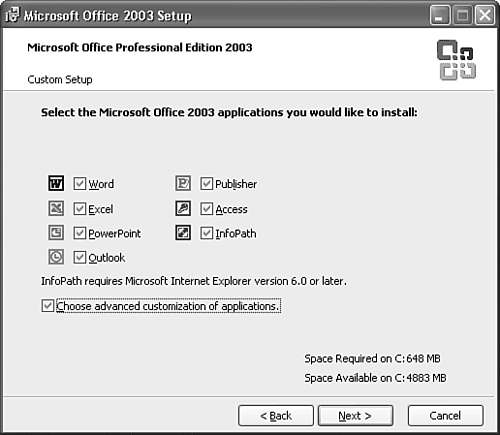
Most users will want to select the Typical Install option. If you're running low on disk space, you can select the Minimal Install option. Choosing Complete Install will install all components with all available options. If you want to customize your Office installation, choose the Custom Install option. You can also use this screen to change the default installation location for Office 2003. If you plan to keep previous versions of Office programs on your system, it is sometimes necessary to install the latest version of Office to a different directory. However, check the Microsoft Knowledge Base for any known issues with changing your installation location. After you select your installation type and location, click Next to display Figure A.2. Figure A.2. Choose the applications you want to install.
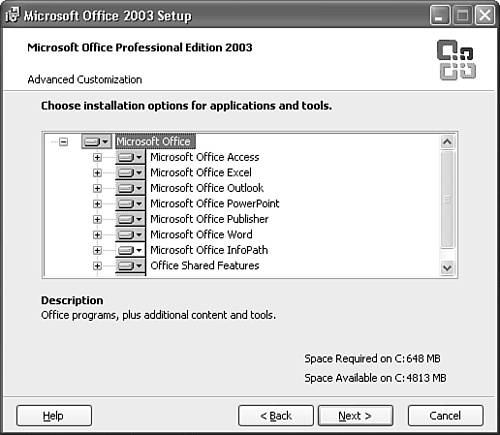
Select which Office applications you want to install. Check the box marked Choose Advanced Customization of Applications if you want to customize each application's installation. Based on the applications you choose to install, an estimate of the space required on your hard drive is displayed along with the total free space on your hard drive. Click Next to display Figure A.3. Figure A.3. Use this screen to customize each application's installation.
In a custom installation, the most common components of an application are selected for installation. You can customize which components are installed by clicking the plus sign next to each application to display which components are scheduled to be installed. Any component with a white label will be installed. A component with a white label and a yellow 1 on that label will be installed the first time it is needed. This will require you to keep your Office 2003 CD handy. A gray component has a mix of subcomponents. Some of the subcomponents are selected for installation and some are not. Any component with a red X next to its label is not scheduled to be installed. To change a component's installation option, click the component's drop-down box and choose Run from My Computer, Run All from My Computer, or Not Available. You can choose Run All from My Computer to install a component and all its subcomponents. When you've completed your customizations, click Next to display a summary screen of your installation choices. Click Install to begin your installation. The installation process can take some time, depending on the components selected and whether there's a previous version of Office already on your system. A message is displayed confirming the install after it has completed. You can also connect to the Office Update site on the Web from this dialog box to check for updates and additional downloads. Click Finish to complete the installation. Depending on your operating system, an Outlook icon might be placed on your desktop and on the QuickLaunch bar if you have that bar displayed. TIP If you're using Windows XP, you won't see an Outlook icon on your desktop. If you've chosen to display the QuickLaunch bar, an Outlook icon will be placed on it. To add an Outlook icon to your desktop, right-click the desktop and select New, Shortcut. Enter the following into the shortcut C:\Program Files\Microsoft Office\OFFICE11\OUTLOOK.EXE. Click Next. You can name your Outlook shortcut and click Finish to create the shortcut. |
EAN: 2147483647
Pages: 426
- Integration Strategies and Tactics for Information Technology Governance
- Measuring and Managing E-Business Initiatives Through the Balanced Scorecard
- Measuring ROI in E-Commerce Applications: Analysis to Action
- Governance in IT Outsourcing Partnerships
- Governance Structures for IT in the Health Care Industry