Viewing Email
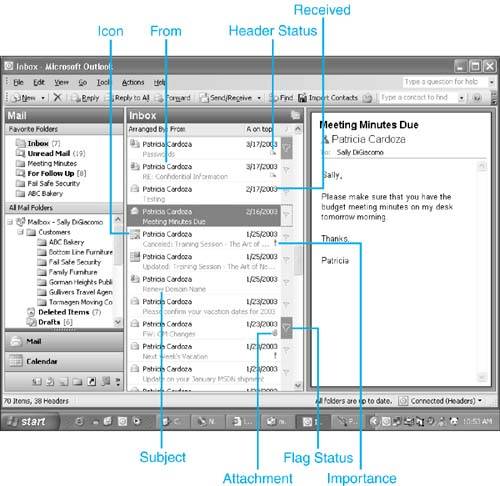
Figure 19.1 shows a typical Inbox with nine messages using the old Outlook 2002 type view. You can view nine messages at a time in the Inbox above the bottom Reading Pane. You can see the sender of the message, the subject, and the date received. The Reading Pane shows the first few lines of the message. Figure 19.1. A typical Inbox view using the bottom Reading Pane.
Now consider the same Inbox in Outlook 2003's new view, shown in Figure 19.2. The Reading Pane occupies the right third of the screen, and the messages are displayed in a new two-line format. Figure 19.2. Outlook 2003's new Inbox view.
In this view, you can see 11 messages in the Inbox. In addition, the Reading Pane displays many more lines of text from the currently selected email. Outlook 2003's new view shows you, on average, 40% more email than Outlook 2002 in the same amount of screen real estate. Using the Reading Pane
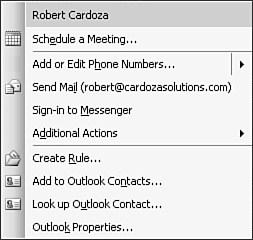
Figure 19.3. The Person SmartTag context menu enables you to interact with the message sender.
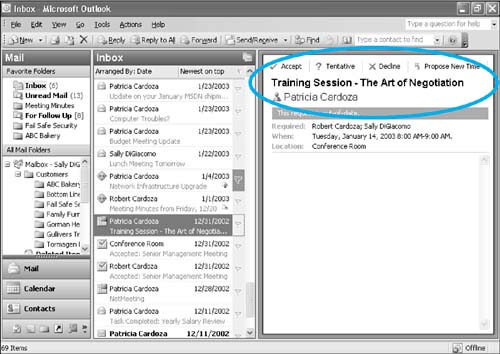
From this context menu, you can quickly perform a variety of tasks such as scheduling a meeting, adding the person to your Messenger contacts, sending email or an instant message, or viewing his contact message. TIP If you never use this SmartTag, you can disable it by selecting Options from the Tools menu and selecting the Other tab. Uncheck the box marked Enable the Person Names SmartTag. Click OK to save your changes. Below the sender's name and email address, Outlook displays the recipient information for the message. You can see the contents of the To and the CC fields. BCC information is never displayed in a message. A horizontal line separates the message header from the actual message. If you've replied to the message, the InfoBar tells you when you replied. TIP A good portion of the information displayed in the message header in the Reading Pane is also displayed in the two-line Inbox view. If you want to view even more of your message in the Reading Pane by hiding the message header, right-click on the thin dark gray border all around the Reading Pane and uncheck the box marked Header Information. The message header will disappear. Repeat those same steps to reactivate the message header. NOTE Certain Outlook configurations (IMAP accounts or Cached Exchange mode set to download only headers) won't show the entire message in the Reading Pane. This happens when only a message header is downloaded. You can configure Outlook to download only headers both when using an IMAP account, and when using Cached Exchange Mode against Exchange Server 2003. If only a header has been downloaded, the recipient information and the first few lines of the message will be visible in the Reading Pane. The Reading Pane is more functional in Outlook 2003 than the Preview Pane was in previous versions of Outlook. If you receive a meeting request in Outlook 2003, as shown in Figure 19.4, you can respond with an accept, tentative, or decline response, or propose a new time directly from the Reading Pane. You can also click the Calendar button to open a new window with your Calendar folder displayed. Figure 19.4. The Reading Pane is highly functional, enabling you to respond to meeting requests.
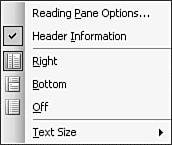
If the message you're viewing contains an attachment, you can double-click the attachment's icon directly in the Reading Pane to launch that attachment, or right-click the attachment to print or save it. Customizing the Reading PaneYou can configure a variety of options for the Reading Pane to ensure that it behaves exactly the way you want. To view the Reading Pane context menu, right-click in the dark-gray space around the Reading Pane to display the context menu shown in Figure 19.5. Figure 19.5. The Reading Pane's context menu contains additional options for customizing the Reading Pane.
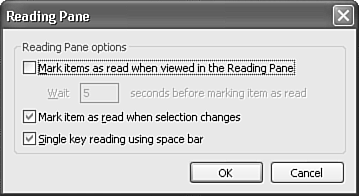
Selecting Reading Pane Options displays Figure 19.6. The default behavior of the Reading Pane is to mark an item as read when the selection changes. You can also configure Outlook to mark any item as read when it has been displayed in the Reading Pane for more than a fixed number of seconds. Checking the box marked Single Key Reading Using Spacebar enables you to move from message to message, marking each message read as you go, by clicking the spacebar. Figure 19.6. Customize your Reading Pane options.
The Header Information check box on the Reading Pane's context menu is used to show or hide header information. The next three choices control the placement of the Reading Pane. The default placement in Outlook 2003 is on the right, but you can choose to return the Reading Pane to its former position on the bottom or turn it off completely. The last Reading Pane option you can configure is the font size used to display the message body in the Reading Pane for HTML messages. Selecting Smallest enables you to display the greatest amount of the message at once. Selecting Largest enables you to display the message in a large font for ease of reading. The default font selection is Medium. Outlook's New Two-Line ViewsThe middle pane of the Outlook 2003 window is your message list. Previous versions of Outlook defaulted to a one-line table view. You could see the following fields:
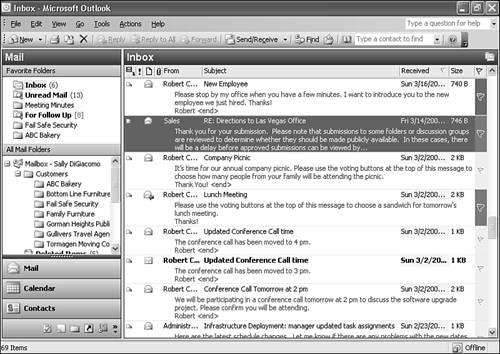
The new two-line Inbox view still shows those fields, but they're shown in a different way. Figure 19.7 shows the new two-line Inbox view with all the previous fields included. Figure 19.7. The new two-line Inbox view.
If you don't like the new two-line Inbox view, you can switch back to the Outlook 2002 style view by setting the Reading Pane to bottom display or dragging the light blue separator between the Inbox and the Reading Pane to the right at least three quarters of the way across the screen. Arrangements and Intelligent Grouping
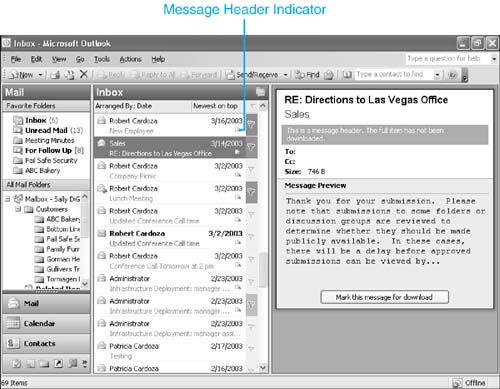
This grouping makes much more sense than grouping by the hour, minute, and second. Every built-in arrangement has its own intelligent grouping. To view the available arrangements, click the Arranged By header in the Inbox view or select View, Arrange By to display a fly-out list of arrangements. Viewing Message HeadersIf Outlook is running in cached mode or if your POP3 or IMAP4 connection is configured to download headers only, the message you see in the Reading Pane will look very different. A typical message header is shown in Figure 19.8. Figure 19.8. A message header displayed in the Reading Pane.
You can easily tell which messages are headers only and which are full messages by looking at the two-line Inbox view. The icon referenced in Figure 19.8 tells you that the message is only a header and still needs to be downloaded. When a message header is downloaded, the first 255 characters of the message are also downloaded. This provides enough information about the message for you to decide whether you want to download the entire message. To mark a message for download, either click in the Reading Pane to download the entire message or right-click the message in the Inbox view and select Mark to download message. Using AutoPreviewAutoPreview enables you to see the first three lines of a message. A typical Inbox view with no Reading Pane and AutoPreview enabled is shown in Figure 19.9. Figure 19.9. AutoPreview enables you to see the first three lines of unread messages.
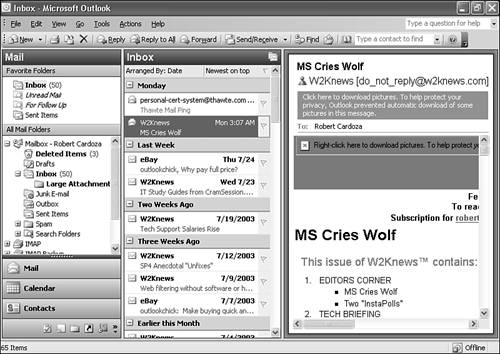
By default, AutoPreview works only on unread messages. Messages you've read are displayed normally. You can turn AutoPreview on or off independently of other view settings. To enable AutoPreview, select View, AutoPreview. The Inbox also contains a predefined view, Messages with AutoPreview, that removes the Reading Pane and turns on AutoPreview. To switch to this view, select View, Arrange By, Current View, Messages with AutoPreview. If you don't like the Reading Pane, AutoPreview is an easy way to view a small amount of the message without actually opening it. Security and Using the Reading PaneWith the rapid increase of virus and virus-like activity over the past few years, one of the worries of many Outlook users is whether the Reading Pane will execute malicious code contained within an email. The Outlook 2003 Reading Pane includes some features to prevent viruses from infecting your system and some other features to reduce the occurrence of spam. The Outlook 2003 Reading Pane cannot execute code. So, if a script is embedded in your email message, that script will not run simply by viewing your message in the Reading Pane. As of the writing of this book, there were no viruses that would launch themselves in an Outlook 2003 Reading Pane. However, there's no guarantee that a virus will not eventually be written to exploit a Reading Pane vulnerability. TIP Your best protection against viruses is to have a virus-scanning program and to ensure that your virus definitions are always up to date. Outlook's Reading Pane includes some other security features to protect you from malicious emails. All external content is blocked from display in the Reading Pane. A popular email marketing ploy is to send an email with an embedded image. Inside that image is something commonly referred to as a Web bug. This Web bug is designed to monitor who is viewing the images embedded in the email. Email marketers use these Web bugs to validate your email address. Consider the following scenario: A mass marketing company wants to send out 100,000 emails. They have a program that runs every possible common email address at the domain home.com. The mass marketing company sends email to john@home.com, lisa@home.com, frank@home.com, joan@home.com, and laura@home.com. Laura then opens the email from the mass marketing company. The Web bug embedded in the image in the email sends information back to the mass marketing company that the address laura@home.com is a valid email address. So, the mass marketing company adds Laura to its mass marketing distribution list. If the mass marketing company doesn't get a response from the other addresses they sent to, it removes those addresses from the mailing list. Figure 19.10 shows a message with blocked external content. Outlook puts the following message in the InfoBar of any message with blocked content: Click here to download pictures. To help protect your privacy, Outlook prevented automatic download of some pictures in this message. Figure 19.10. A message with blocked external content.
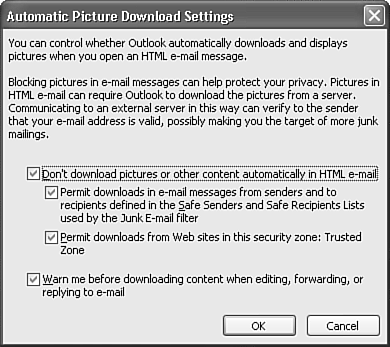
If you decide you want to view the blocked content, it's easy to show it. Just click once on the InfoBar and select Download Pictures from the context menu. Outlook will download the external content. After you view the external content for a particular message, that content is no longer blocked on that particular message. You can also edit the content blocking settings directly from the InfoBar on the Reading Pane. Click the InfoBar and select Change Automatic Download Settings to display the Automatic Picture Download Settings dialog box shown in Figure 19.11. Use the check boxes provided to choose whether to block all content or to display external content from sites in the Trusted Zone or the Internet Zone. Figure 19.11. Use this dialog box to edit your external content settings.
TIP If you regularly receive blocked content from newsletters, you can check the box marked Permit Downloads in E-mail Messages from Senders and to Recipients Defined in the Safe Senders and Safe Recipients Lists Used by the Junk E-mail Filter. This ensures that any addresses you add to those lists will never have external content blocked. When you edit, reply, or forward a message with external content, that content is downloaded. By default, Outlook warns you with the message displayed in Figure 19.12 when you attempt to perform one of the previous actions on a message with blocked external content. If you don't want Outlook to warn you, uncheck the box marked Warn Me Before Downloading Content When Editing, Forwarding, or Replying to E-mail. Click OK to save your changes to the external content settings. Figure 19.12. Outlook warns you when forwarding a message with blocked external content.
|


 For more information about security zones,
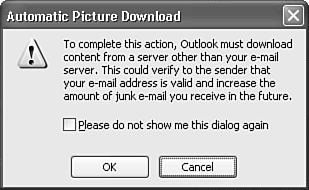
EAN: 2147483647
Pages: 426