Sending Options
| In addition to setting your message editor and email format, you can manipulate a variety of other options when composing and sending your message. Message options can be set on a per-message basis or globally.
Message SettingsAccess your message options by clicking the Options button on the Message Editor toolbar to display Figure 18.19. Figure 18.19. Use this dialog box to set your message options.
There are three main settings in the Message Options dialog box. You can set individual message settings, change voting and tracking options, and set delivery options. You can also associate contacts and categories with your message. Use the Importance drop-down list to give your message a high or low importance. The default importance is Normal. You can also set the sensitivity of your message. There are four sensitivity settings: Normal, Personal, Private, and Confidential. Use the drop-down list to set your sensitivity level. Security and Digital SignaturesThe use of security certificates and digital signatures is growing as businesses become more aware of the potential ramifications of ignoring security concerns. Some companies are even beginning to require all employees to use a digital signature or security certificate. In other cases, corporations won't accept certain types of sensitive email messages that aren't digitally signed for fear the messages have been tampered with. To use a digital certificate, you must know what one is. A digital certificate is a software tool that identifies you to others after it's installed. Digital certificates are issued by a certification authority, commonly referred to as a CA. The certificate contains your name, a serial number, an expiration date, a copy of the certificate holder's public key, and the digital signature of the CA. A public key is used to encrypt a digitally signed message. The recipient of a digitally signed message can use a private key to decrypt the message. You can obtain a digital certificate from any valid CA. Two common CAs are VeriSign and Thawte. You must install your digital certificate in Outlook before you can use it to sign a message.
After your digital certificate has been installed, you can use it to sign messages you send. To change security options for your message, click the Security Settings button to display Figure 18.20. Figure 18.20. Configure security settings for your outgoing message.
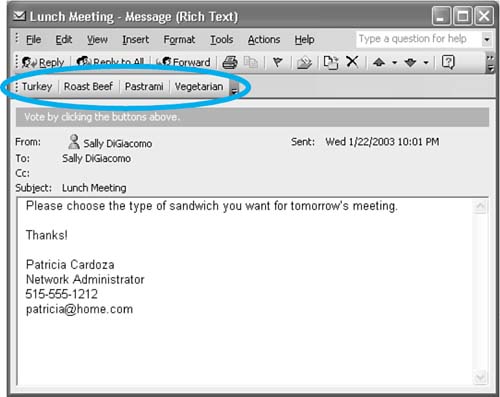
From this dialog box, you can choose to encrypt the message contents and add a digital signature to this message. Message encryption ensures that the message that arrives in the recipient's inbox is the exact same message that left the sender's outbox. Check the boxes to encrypt message contents and attachments and add a digital signature to this message. Use the Security Settings drop-down list to select the digital certificate to use to sign your message. Advanced users can also select a Policy Module, Classification, and Privacy Mark. You can also change your security settings right from this dialog box. Click the Change Settings button to edit your security settings directly. Do not edit your security settings without instructions from the issuing Certificate Authority. When you're done digitally signing your message, click OK to save your changes and return to the Options dialog box. Voting and Tracking OptionsThe second section in the Message Options dialog box enables you to specify voting buttons for your message. You can use voting buttons to have Outlook perform some bookkeeping and tracking tasks for you. The use of voting buttons requires that your messages be sent in either rich text or HTML. They will not reliably work outside an Exchange organization. A typical use of voting buttons is to tally orders for a lunch meeting. To create voting buttons for the four sandwich choices for a lunch meeting, check the box marked Use Voting Buttons. The default voting buttons are Approve and Reject. You can select some typical voting button choices from the drop-down list or create your own. To create your own voting buttons, highlight the existing choices and type your choices in the field, separated by semicolons. To create the sandwich choice voting buttons, type Turkey;Roast Beef;Pastrami;Vegetarian. When you send your message, recipients will see the voting options at the top of your message as shown in Figure 18.21. Figure 18.21. Voting buttons appear at the top of the message.
You can also specify tracking options from the Options dialog box. You can choose to request a read receipt and a delivery receipt for the particular message you are sending. NOTE Just because you request a read receipt or a delivery receipt doesn't mean that you'll actually receive one. Some ISPs block delivery receipts from being sent. In addition, some mail clients, including Outlook, enable the recipient to choose whether to send a read receipt to the sender. Delivery OptionsThe next section in the Message Options dialog box enables you to configure delivery options for your message. You can have replies sent to a different address than the one you are sending the mail from. To specify an alternative reply address, check the Have Replies Sent To box and enter an alternative email address. You can also use the Select Names button to select a reply recipient from one of your address books. By default, Outlook saves sent messages in the Sent Items folder. However, on occasion, you might want to save a message in another folder. To save this particular message in an alternative folder, use the Browse button to select an alternative folder in which to save your sent item. You can also clear the Save Sent Message To check box to choose not to save a copy of this message anywhere. The Do Not Deliver Before option works best for sending information on a scheduled basis, such as weekly reports due on a specific day. You can prepare the message, send it to your Outbox, and have the item delivered automatically at the specified time and date. You can set an expiration date on any email you send. The expiration date will display in the message's Info Bar. A good use for message expiration is a message that requires action be taken by a specific time. If you need a report by 3 P.M. for a meeting, you can send your coworker an email requesting information for the report. If your coworker doesn't receive the email until 4 P.M., you probably won't need the information anymore. Click the Expires After check box and specify a date and time for the message to expire. If your recipient has restrictions on the format he can receive attachments in, you can set the format for attachments directly in the Message Options dialog box. You can choose from the default attachment settings, MIME encoding, UUEncode encoding, or BINHEX encoding. Unless your recipient has restrictions on attachment encoding, it's a good idea not to change these settings. Assigning Contacts and CategoriesThe last two settings in the Message Options dialog enable you to assign contacts and categories to your outgoing message. To associate contacts with your email message, click the Contacts button to display Figure 18.22. Figure 18.22. The Select Contacts dialog box enables you to associate contacts with your outgoing message.
You can associate one or many contacts with your outgoing message so that the message appears in the Activities tab of those contacts. If you use Outlook categories, you can associate one or many categories with your Outlook message. Click on the Categ_ories button to display Figure 18.23. Figure 18.23. Use this dialog box to choose categories for your outgoing message.
Assigning categories to your outgoing message enables you to search your mailbox for all items with a specific category. If you create a category for each project you're working on, a search can show you all incoming and outgoing messages, meetings, appointments, tasks, journal entries, and notes associated with that category.
|
 Global message options settings are discussed in "Email Options,"
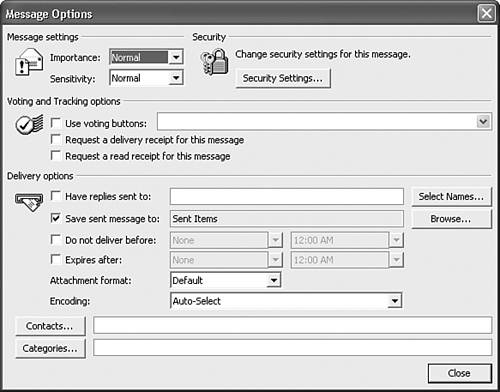

EAN: 2147483647
Pages: 426