Working with Notes
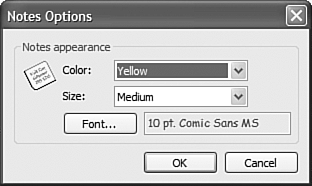
| Outlook Notes are pretty basic, especially compared to other Outlook items. They don't support many of the advanced options found in other Outlook items, such as custom forms and toolbars. Even so, you have some limited customization options, including changing the Note's background color, font type, size, and color, and the Note's size. Notes support categories and can be assigned to contacts, making it easier to locate your Notes when you need them. Customizing the Note AppearanceThe default settings for your Note font, Note size, and Note color are changed by selecting Tools, Options to open the Options dialog box. Click the Preferences tab and then the Notes Options button (Figure 16.2). Notes are yellow by default, with blue, green, pink, and white available as alternative colors. Figure 16.2. The global options for Notes are limited to changing the color, size, and font.
To change the font, font style, font size, and add effects and a font color, click the Font button. Changes made in the Font dialog box apply to all Notes, including existing Notes. Changes to Note background color and size affect only new Notes created after the settings are changed. NOTE Because Notes is a simple text editor and doesn't support rich text formatting within the Note body, so you can't highlight words or phrases with different colors or fonts or include images in a Note. You can change the color of individual Notes at any time. If the Note is open, click on the Note icon in the upper-left corner of a Note and then choose Color from the menu. If the Note is closed, right-click on the Note and choose Color. TIP When you use the Group by Color view, you can drag Notes between groups to change their color. Notes can be resized by dragging a side or the lower-right corner. Note size is persistent and when you resize a Note, it remains that size until you resize it again. Window position is also persistent: If you position a Note on the screen, it always opens in that position until you move it. TIP Did you know you could use a command line to create a new Note? Enter the following command line in the Start, Run dialog box or use it to create a desktop shortcut: C:\Program Files\Microsoft Office\OFFICE11\OUTLOOK.EXE " /c IPM.StickyNote This enables you to create a new Note using a desktop shortcut. If you save a Note as a template, you can create a shortcut to the template. Using templates enables you to create larger Note windows than Outlook's default sizes.
NOTE Notes are the only Outlook items that you cannot design custom forms for. Using a Time Stamp in NotesYou can display the time and date a Note was last modified in the Note's status bar. Turn the time and date display on by selecting Tools, Options. Click the Other tab and then click the Advanced Options button. Check the box for When Viewing Notes, Show Time and Date. This is a global setting and applies to all Notes. It uses the short date format used by the computer system and is configured in the Regional Settings applet in Control Panel. When you edit a Note, the modified time is updated to the current time this is the time the status bar displays. If you want to see the created time, add the Created Time field to the List view. NOTE If it's important that you know the date a Note was created, type it in the Note body don't rely on the created or modified date fields in Outlook. Assigning a Category to a NoteAlthough you can't see a Category field on the Note form, you can assign categories to Notes. When you use categories, you can use the By Category view, display the Category field in the Notes List view, or use Advanced Find to find your Notes by category. There are two ways you can add a category to Notes:
NOTE If you need to assign a category to several Notes at once, select your Notes, right-click on the selections, and choose Categories. You can also use the By Category view and drag Notes to category groups. NOTE You can associate a Note with a contact and the Note will be listed on the Activities tab of the contact with other Outlook items. Like categories, the Contact field isn't visible on the Note form. You can add a contact by clicking the Note icon and selecting Contacts from the menu. Saving Notes in Outlook FoldersWhen you use the File menu or keyboard shortcut to create a Note, it's saved in the default Notes folder. To save a Note in a Notes folder other than the default folder, you first need to create a new Notes folder, open it, and then save the Note. You can create another Notes folder by right-clicking on a folder in your message store and selecting New folder. In the Create New Folder dialog, enter the name for your new folder and, if necessary, change the folder type by selecting Note Items from the Folder Contains drop-down. You can create as many Notes folders as you need and they can be subfolders in any folder. You can use the mouse to move or copy Notes to another Notes folder. Drag and drop a Note to move it, or use a right-click drag and drop to select between Move and Copy. NOTE When you select two or more Notes and right-click, one of the menu options is Move to Folder. Selecting this option opens the Move items dialog box, which enables you to select the folder to move the Notes to. Saving Notes on the DesktopYou can save contents of a Note to the Windows file system as Notes, RTF documents, Outlook templates, and text files. Dragging and dropping is usually the easiest way to save Notes to your desktop. The Note is saved in the Note format as it appears in Outlook and you can double-click it to open it. You can also select the Note and use the File, Save As menu option to save the Note using the message format (.msg). This also results in the Note appearing as an Outlook Note rather than as a text file. NOTE When you store Outlook items in the Windows file system and open them when Outlook is closed, Outlook loads into memory. Your reminders will fire and Outlook will get new mail if you have it automatically checking your mail, but you won't see Outlook's interface. If you close Outlook when you have a Note open on the desktop, Outlook remains in memory and continues to check your email or fire reminders until the Note is closed. When you need to share the contents of your Notes with people who don't use Outlook or copy them to a computer where Outlook is not installed, you'll need to save the Notes as a different file type. You may want to save a backup copy of your Notes outside of Outlook using a file type readable on any computer system. Individual Notes can be saved in the file formats shown in Table 16.1.
Select the Note you want to save and select File, Save As. Rich text (RTF) is the default format for Notes, but you can select one of the other formats. Message format (.msg) saves the Note as an Outlook Note, readable only if Outlook is installed. RTF and text formats are readable from any computer. NOTE Unicode includes the characters used by many different languages in one font. If you use only one language, you can use the standard .msg format. If your computer is set up for multilanguage support, or if you share Notes with people who use other languages, you should use the Unicode format. For more information about Unicode, see http://www.unicode.org. TIP When you want to use many short Notes in a document, you can copy them using Notes List view. Select the notes and use Ctrl+C to copy them. This copies the first line of the note, up to 256 characters long, to the clipboard. Because any fields in the view are also copied, if you modify the view to include the Content field, you can copy the first 256 characters of the Note body, including line feeds. Use Edit, Paste Special, Unformatted Text to paste this into any document. Saving a Note as a TemplateYou can save at emplate in each color or in various sizes or screen positions, with categories and contacts assigned to save time. When you need a blue note in a particular category, use its template to create the Note. To create a template:
When you're ready to use the template, double-click on it. Notes created using templates are saved in the default Notes folder. If you want to file them in other folders, you have to move them. TIP To make it easier to use your templates, create shortcuts to them on Outlook's toolbar or in the Shortcut section of the Outlook Bar.
|
 For help in creating toolbar shortcuts,
 EAN: 2147483647
Pages: 426