Creating Appointments in the Calendar
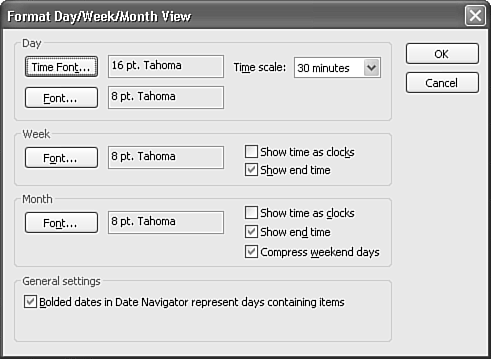
| There are several ways to create appointments. You can create appointments directly from the Calendar folder or you can create appointments using the appointment form. You can also use a function called AutoCreate to create appointments from existing items such as email messages or tasks. The Calendar viewer, shown in Figure 12.1, has several distinct parts. There is the Navigation Pane, the appointment area, broken into 30-minute increments with a time bar on the left, an area for events at the top of the appointment area, a Date Navigator, and optionally, the TaskPad. The appointment area enables you to see the day's appointments, add new appointments, and delete appointments. By default, the appointment area is divided into 30-minute blocks of time. You can change the time divisions by right-clicking on a blank area of the main appointment window and selecting Customize Current View, Other Settings to display the Format Day/Week/Month View dialog box shown in Figure 12.2. Use the Time Scale drop-down box to select the time scale you want. In addition to changing your time bar, the time scale you choose will also be the default appointment length. Figure 12.2. Use this dialog box to change the time scale of your Calendar folder.
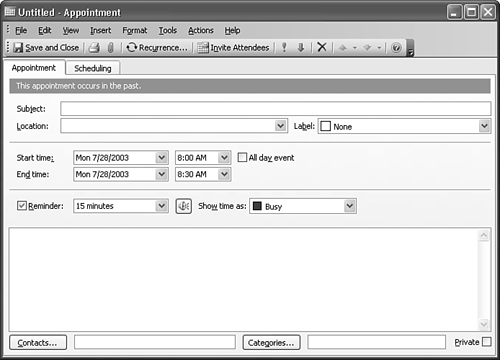
TIP In addition to changing the time scale through the Customize Current View dialog box, you can right-click on the time bar displayed in the Calendar folder and choose a new time scale. The right-click menu also enables you to change your time zone and create new appointments, meetings, and events. There are several ways to create an appointment from the appointment area. Click on the time you want the appointment to start and drag the mouse to the time you want the appointment to end. When the duration of the appointment is highlighted, start typing the subject of the appointment. Press the Enter key when you're done and the appointment is created with the default appointment settings. A reminder is set for 15 minutes before the start time of the appointment, and the appointment time is marked as busy on the calendar. Although this is the simplest method of creating an appointment, it doesn't give you many options. You can't set a location, enter notes, or associate contacts or categories with the appointment. After you create the appointment, you can double-click it to open it and edit any of the properties of the appointment. If you want to create an appointment with more details, you can right-click a highlighted block of time in the appointment area and choose New Appointment from the context menu. This brings up the standard Appointment form automatically populated with the start and end time selected. Creating Appointments with the Appointment FormTo create a new appointment with the Appointment form, click the New button on the toolbar while in the Calendar folder to display Figure 12.3. Figure 12.3. The Appointment form enables you to enter detailed information about an appointment, including a reminder, notes, and categories.
The appointment form's start date and end date default to the date selected in the Date Navigator. If a block of time is selected in the appointment area, the start and end time of the appointment default to that block of time. If you haven't selected a specific block of time after switching to your Calendar folder, 8:00 through 8:30 is selected for your new appointment. If no time is selected, the new appointment defaults to an all-day event. NOTE You'll probably notice that when you launch a new appointment, the InfoBar (the dark gray bar above the subject) often tells you that the appointment occurs in the past. This is normal as Outlook creates new appointments at 8:00 a.m. on the day you're currently viewing. After you choose a new appointment time, the InfoBar message will go away.
Entering appointment information is pretty straightforward. After you've entered a subject, you can type a location or select from the Location drop-down list. Outlook saves all locations you enter for appointments, so if you've entered the location before, use the drop-down to select the location again. You can use the high and low priority buttons on the toolbar to set a priority for the appointment. Use the drop-down calendars to select a start date and end date if they're different from the day you're currently viewing, and use the drop-down time selector to choose a start time and end time. NOTE The list of locations is not profile specific, but it is user specific. That might sound a bit confusing, but you can set up multiple Outlook profiles using the same Windows username. All profiles under that username will use the same location list. Profiles created under different Windows usernames will use different location lists. TIP Unfortunately, there's no easy way to edit the list of locations in Outlook. The locations are stored in a Registry key. You can delete the Registry key and delete all stored locations, but you cannot remove a single location. For information about removing a Registry key, see the Microsoft Knowledge Base Article 300579: http://support.microsoft.com/default.aspx?scid=kb;EN-US;Q300579. Outlook interprets date information entered in a variety of ways. You don't have to type in a date in the format 12/28/2002. You can actually enter the phrase three days after Christmas and Outlook will translate that date into 12/28/2002. Phrases such as Tomorrow, Next Month, Three Months from Today, and New Year's Day are all valid date phrases. However, if it's July 12, 2003, and you enter New Year's Day in the Start Date field, Outlook assumes that you meant January 1, 2003, not the next New Year's Day, January 1, 2004. To enter that date, you would use the phrase Next New Year's Day. Outlook also recognizes abbreviations such as 1mo for one month from now and 2y for two years from now. These abbreviations can even be combined into 5mo 2d, which translates to five months and two days from today. You can use phrases to describe times as well, such as noon and midnight. Entering Free/Busy DataIf you use an Exchange Server or an Internet Free/Busy Server, it's helpful to specify if you'll be free, busy, or out of the office for each appointment. Including this information in your appointment can assist others when inviting you to meetings. Each status has its own color coding that displays when viewing free/busy information. When you create a new appointment, the default time status is busy. To change this status, use the drop-down marked Show Time As:. Choose from the following list of options:
Setting Reminders for AppointmentsA reminder is helpful if you spend a lot of time at your desk or carry a PDA that synchronizes with Outlook. You can set reminders to display well in advance of the actual appointment, or you can have the reminder display only minutes before the appointment. Set a reminder time for your appointment by using the Reminder drop-down box. If you don't want a reminder for this appointment, uncheck the Reminder box. To change the reminder sound associated with this appointment, click the speaker icon next to the Reminder drop-down box to display the Reminder Sound dialog box shown in Figure 12.4. Use the Browse button to select a sound to associate with your appointment. Figure 12.4. Use this dialog box to select a custom reminder sound.
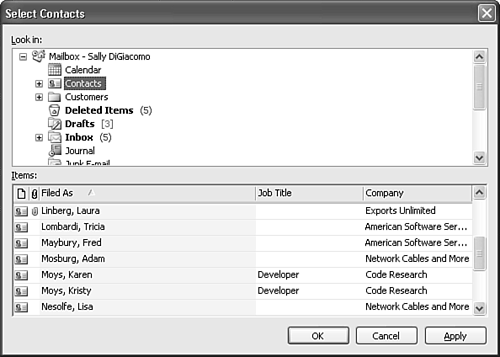
TIP If you choose a new sound when setting an appointment up in the Appointment form, the sound will play only for that appointment. You can change the default reminder sound for all reminders in Outlook's Options settings (Tools, Options, Advanced Options, Reminder Options). Click the Browse button to choose a new reminder sound. Adding Notes to an AppointmentThe notes area can hold text, links to files, attached files, and embedded objects such as Excel files or images. To attach files to an appointment, click the paperclip icon on the toolbar or select the Insert menu and choose either File, Item, or Object. Selecting Item from the Insert menu enables you to attach other Outlook items to your appointment. For example, you might want to insert relevant emails into the body of an appointment so that you can refresh your memory of what you need to accomplish at that appointment. Assign Contacts and Categories to AppointmentsYou can assign a contact to an appointment item to ensure that the appointment is listed in that contact's activities. For example, if a project is due for a client and you set an appointment to work on that project, you might want to associate the appointment with the client's contact record. This is different from a meeting because the client won't actually be at the appointment, but you still need a record of the appointment to show in the contact's Activities list. To associate a contact with an appointment, click the Contacts button on the Appointment form to display the Select Contacts window (see Figure 12.5). You can select any Contacts folder in your mailbox or a public Contacts folder. Select the contact or contacts you want to associate with the appointment item. To associate multiple contacts, use the Ctrl or Shift key while clicking individual contacts. Click OK to save your selection and return to the Appointment form. Figure 12.5. The Select Contacts dialog box enables you to associate contacts with an appointment item.
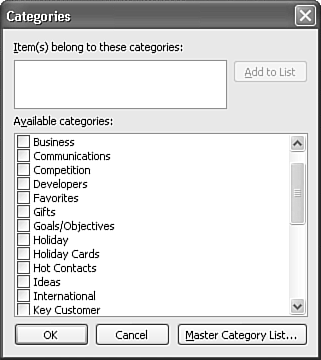
NOTE Another good reason to associate a contact with an appointment is so that you have the contact's information easily accessible when you open the appointment. Simply double-click on the underlined contact's name within the appointment and that contact's record will display. Categories can be a very powerful organizational tool if you make a habit of using them. To assign a category or categories to an appointment item, click the Categories button on the Appointment item to display the Categories dialog box shown in Figure 12.6. Check the categories you want to assign to the appointment and click OK to commit your changes. Figure 12.6. The Categories dialog box enables you to assign one or many categories to an appointment.
Marking the Appointment PrivateIf you share Outlook information with others through an Exchange Server, you might want to mark certain appointments private to prevent those you're sharing with from seeing them. After an appointment is marked private, those who share your calendar will see that you have an appointment, but they won't be able to see any details about it. You can also choose to hide the details of private appointments when you print your calendar. NOTE Some personal digital assistants (PDAs) will not synchronize private appointments between the PDA and Outlook. Consult your PDA documentation for more information about synchronizing private appointments with your PDA. Using Labels to Organize AppointmentsTo further organize and classify your appointments, use Outlook's label feature. There are 11 built-in labels, and you can customize the caption of each label color.
If you haven't customized your labels, you can choose from the following labels for your appointment:
To choose a label for your appointment, click the Label drop-down box and select your desired label. After you select a label, the background color of the appointment on your calendar changes to the label color. You cannot choose multiple labels for an appointment. Labels can help you organize a busy calendar by providing a visual cue of the types of appointments you have in any given day. Labels work in any of the Day/Week/Month views. They do not work in any of the Table views. NOTE Labels are available only on your local machine. So, if you create a new meeting request and invite someone else in your organization, he won't see the label you just assigned to your meeting request. If you send an appointment as an attachment, the recipient won't be able to see your label either.
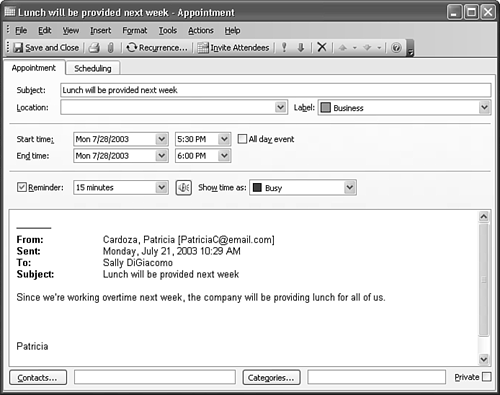
Setting Up an Appointment Using AutoCreateYou can create appointments automatically from any other Outlook item using a process known as AutoCreate. This process enables you to take an email message, task, note, journal entry, or contact and create an appointment by dragging that Outlook item to the Calendar folder. To use AutoCreate, select an email message and drag it to the Calendar bar on the Navigation Pane. Release the email and a new appointment is created automatically. The notes for the appointment contain the header and body of the email message, and the subject of the appointment is the subject of the email message, as shown in Figure 12.7. Just enter the start date, end date, label, and location, and you have a complete appointment. Figure 12.7. You can create an appointment in as little as two clicks by dragging an email message to the Calendar folder.
|
 For more information about all day events,
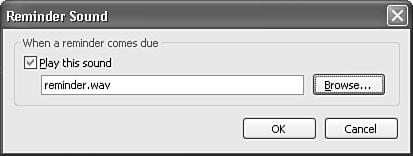
EAN: 2147483647
Pages: 426