Creating a Setup Project by Using Visual Studio .NET
You can have complete control over the deployment of an application to a user’s computer by creating a Windows Installer 2setup project, or Windows Installer project for short. A Windows Installer project uses Visual Studio .NET to create a setup file and a Microsoft Installer file (.msi) that will install with Windows Installer (msiexec.exe). This is the customary way to package and install a Windows application on Windows, but you can also use it to package and deploy an ASP.NET application to a web server or group of web servers.
MSI files can also be published to Add/Remove Programs in the Control Panel console and deployed by using Active Directory software deployment policies. If they are wrapped in a cabinet file (.cab), you can deploy them via Internet Explorer. Creating a Microsoft Installer file gives you full control over the location of files and what needs to be put into the global assembly cache (GAC) or the Registry.
You can use the Windows Installer project to install, repair, or uninstall applications. This is the most effective way to make sure your users can install and uninstall an application that has shortcuts, Start menu items, Registry entries, and assemblies installed in the GAC. Your applications and controls written with Visual Studio .NET require that the .NET Framework is installed on any computer to which you distribute them.
In this section you will learn to configure a Windows Installer project and then look at the editors that you will use to build a setup project.
Choosing Setup Templates and Configuring Properties
You create a Windows Installer project in Visual Studio .NET in a way similar to creating code projects in Visual Studio .NET. There are templates for each of the projects that you can create in the Setup And Deployment Projects section of the Visual Studio .NET Project Templates dialog box, which is shown in Figure 10.1. They are as follows:
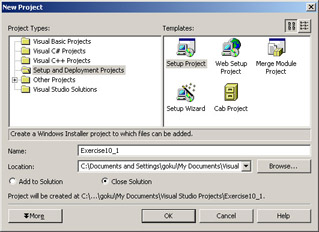
Figure 10.1: Setup and Deployment Projects templates in Visual Studio .NET
Setup Project The Setup Project template is the standard project that will create the familiar deployment package with a setup.exe file that the user can run to start the install. This installation option will generate MSI files by default for packaging the application files. The application will install into a folder under the Program Files folder on the system. You can also specify any Registry settings and location of Start menu and Desktop shortcuts, install components in the GAC, install other files or setup projects that might be needed , and even do conditional installs based on the operating system. This is the option that you will use to deploy a Windows application to a client computer.
Web Setup Project The Web Setup Project template is similar to the Setup Project template except that the Web Setup Project installs in a virtual directory under the Virtual Root directory on a web server as opposed to the file system. It is used to generate packages for installing web applications.
Merge Module Project The Merge Module Project template packages assemblies that might be shared by other setup projects. When this project is built, it will generate an .msm file that can be added to other setup projects. The MSM file contains all the files and Registry settings and the setup configuration for installing the assemblies. They must be used from within a setup project and cannot be run alone. Merge modules should never be modified after they are distributed because this can lead to dependency and versioning problems. You should create a new merge module for each version of your assembly.
Setup Wizard The Setup Wizard template helps you get started by providing a wizard that generates a setup project.
Cab Project The Cab Project template enables you to package ActiveX controls for downloading into Internet Explorer. This is used to support legacy applications or to wrap an MSI file for distribution via Internet Explorer.
After you decide which project you will use, you need to set the deployment project properties to tell Visual Studio .NET how to build the deployment project. This is done in the deployment project Property Pages dialog box, shown in Figure 10.2. To open this dialog box, right-click the deployment project name in the Solution Explorer window and choose Properties.
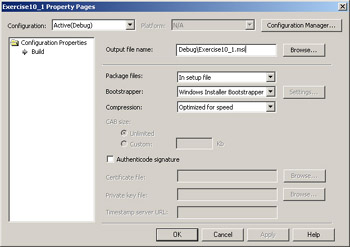
Figure 10.2: The deployment project Property Pages dialog box
In the deployment project Property Pages dialog box, you can set the following:
Output File Name This is the name and location of the Windows Installer file that will be built from the deployment project. By default, this is the debug\projectname.msi or .msm, depending on whether it is a setup project (Web or Windows) or merge module, respectively.
Package Files This is the type of packaging you want for Windows Installer. The options are as follows:
As Loose Uncompressed Files The application’s files are copied to the directory along with the MSI file.
In Setup File The application’s files are put inside the MSI file.
In Cabinet File(s) The application’s files are put into one or more cabinet files that can be distributed across multiple disks.
Bootstrapper Visual Studio .NET uses Windows Installer 2, which comes with Windows XP. If you plan to install the application to an older version of Windows, you will need to include a bootstrapper. A bootstrapper will first install Windows Installer 2 and then install the application that was packaged in the Windows Installer files. The options are as follows:
None Don’t deploy a bootstrapper.
Windows Installer Bootstrapper Include the bootstrapper in this install.
Web Bootstrapper Include a version of the bootstrapper that can be installed from a web server with the install.
Settings This will become available if you select Web Bootstrapper in the Bootstrapper list box. This enables you to set the location of where the Windows Installer’s files and your application’s files are downloaded.
Compression This indicates the amount of compression you want for the In Setup File or In Cabinet File(s) options under the Package Files section. The options are as follows:
Optimized For Speed Results in less compression, meaning that the files will be larger but the install will go more quickly.
Optimized For Size Results in more compression, meaning the files will be smaller but the install will go more slowly.
None Results in no compression being applied to the files.
CAB Size Use this option for deploying the application from multiple disks. You can set the maximum size for each cabinet file generated and then copy them to each disk. The options are as follows:
Unlimited Only one cabinet file is created.
Custom The maximum size of each cabinet file in kilobytes (KB).
Authenticode Signature This determines whether the files in the deployment project are signed. This provides the client with a mechanism for determining if the code came from a certain company or individual. The signature will aid them in determining how much to trust the package.
Certificate File Set this to the Authenticode certificate file (.spc), which can be obtained from a certificate authority. You can obtain a certificate from your own certificate authority by setting up a certificate server on Windows 2000 Server or Windows 2003 Server (best for an intranet or extranet situation), or from a third-party certificate authority such as VeriSign whose public key is already shipped with each Internet browser (best for some extranets or the Internet). A certificate is basically a public key and some contact information that has been signed by the certificate authority, which is trusted by the end user. The public key in the certificate can then be used to verify that the file really came from the vendor who claims to be shipping the application.
Private Key File Set this to the private key file (.pvt) that will be used to sign the package. This must be the private key that matches the public key contained in the Authenticode certificate file.
Timestamp Server URL This is the server providing the timestamp used to sign the setup files.
Using the Setup Project Editors
After you configure your setup application, you need to tell the installer how to install the application on the system. Visual Studio .NET provides six setup project editors to configure your Windows Installer project. You can switch editors by using the toolbar at the top of the Solution Explorer window or the View option in the pop-up menu for the setup project shown in Figure 10.3, or by selecting the icon for each editor at the top of the Solution Explorer window while your setup project is selected.
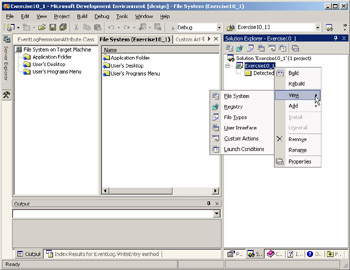
Figure 10.3: Using the View option to select an editor
Use any of the following six editors to add to or modify the contents of the setup project and to control where you want the files of your application to be placed:
File System Editor Lets you create the directories and place files where they will be installed. You can also choose to install files in special locations such as the desktop or GAC.
Custom Actions Editor Lets you create code called custom actions to be run during the installation or in response to four stages of the install.
File Types Editor Lets you create associations for file extensions that your application will use. For example, if you create an application that uses .xyz extensions, you can associate all files with .xyz extensions with your application’s executable.
Launch Conditions Editor Lets you set conditions that have to be met before the application will install on a computer. For example, if your application depends on another application or on a specific version of an application, you can search for files and Registry keys specific to the application; if they are not found, the associated launch condition will present an error message.
Registry Editor Lets you specify the Registry keys and values that your application will write to the Registry on installation.
User Interface Editor Lets you customize the appearance of the Installation Wizard. For example, you could customize the install screens with your company’s logo.
Using the File System Editor
The default editor is the File System Editor, so we’ll cover it first. By using the File System Editor, you can add new folders, project outputs (such as source files, the DLLs generated by the project, debug symbols, or all content files), files, or assemblies to the setup project. Figure 10.4 shows the File System Editor.
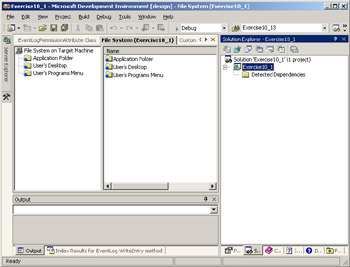
Figure 10.4: The File System Editor [f1004.tif]
If you are using the Setup Project template, you can add special folders to the project by right-clicking the File System On Target Machine node on the project tree and choosing Add Special Folder Ø special_folder_name.Figure 10.5 shows this pop-up menu choice. Special folders represent various locations in the Windows operating system—for example, the GAC or the Start menu. You can then put files in these folders to have the installer deploy them there.
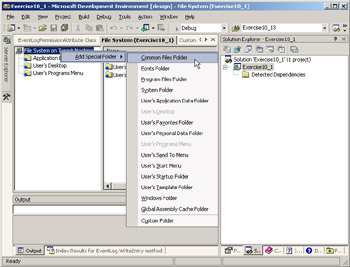
Figure 10.5: The pop-up menu for the special folders
Table 10.1 lists the special folders and their typical locations on a Windows XP machine.
| Folder | Description |
|---|---|
| Application Folder | The application’s folder; usually located in the C:\Program Files folder, but the user can specify another folder on install. |
| Common Files Folder | The application’s folder for components between applications, usually located in the C:\Program Files\Common folder. |
| Fonts Folder | The folder containing the system fonts, usually located in C:\Windows\fonts. |
| Module Retargetable Folder | The alternative custom folder you want a merge module to install into. |
| Program Files Folder | The program files folder, which represents the location that Microsoft recommends for installing software on Windows. It is usually located at C:\Program Files. |
| System Folder | The Windows system folder, where shared DLLs and files are installed, usually located in C:\Windows\System32. |
| User’s Application Data Folder | A per-user folder that can store application data, usually located in C:\Documents and Settings\user_name\Application Data. |
| User’s Desktop | The per-user folder representing the Windows Desktop, usually located in C:\Documents and Settings\user_name\Desktop. |
| User’s Favorites Folder | A per-user folder representing the user’s Favorites folder, usually located in C:\Documents and Settings\user_name\Favorites. |
| User’s Personal Data Folder | A per-user folder representing the user’s My Documents folder, usually located in C:\Documents and Settings\user_name\My Documents. |
| User’s Programs Menu | A per-user folder representing the user’s Programs in the Start menu, usually located in C:\Documents and Settings\user_name\Start Menu\Programs. |
| User’s Send To Menu | A per-user folder representing the user’s Send To pop-up menu item, usually located in C:\Documents and Settings\user_name\SendTo. |
| User’s Start Menu | A per-user folder representing the user’s Start menu, usually located in C:\Documents and Settings\user_name\Start Menu. |
| User’s Template Folder | A per-user folder representing a folder that contains the user’s document templates, usually located in C:\Documents and Settings\user_name\Templates. |
| Windows Folder | The system’s root directory, usually located in C:\Windows. |
| Custom Folder | A folder that you want created on the target system. |
Using the Custom Actions Editor
The Custom Actions Editor, shown in Figure 10.6, enables you to create code to respond to four events:
-
Install
-
Commit
-
Rollback
-
Uninstall
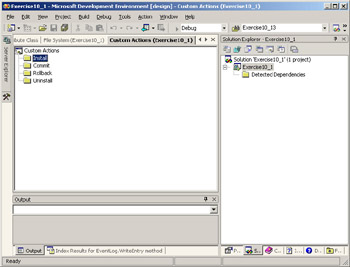
Figure 10.6: The Custom Actions Editor
You can require code in a DLL, EXE, VBScript, or JScript file to run for any one of these events, or for each one. The Install event happens after the installation of the application is completed, but before the installation is committed on the computer. The Commit event executes the code after the installation is committed on the computer. Code in the Rollback event executes if the installation fails or is canceled and needs to be undone. The code in the Uninstall event section executes when the application is uninstalled from the computer.
After you add the action to the event, you can right-click the event and select the Properties window option to set the condition for executing this action, the entry point for a DLL (the function in the DLL that will be executed for the action), or the custom data that you want to pass into your action.
Using the File Types Editor
The File Types Editor, shown in Figure 10.7, enables you to link file types to your application. This means that when a user double-clicks the data file, your application will launch and load the data file automatically. For example, if you double-click a file with a .doc extension, Microsoft Word will generally launch and load the document you clicked. You can add a new file type by right-clicking File Types On Target Machine and choosing Add File Type. In the Properties window for the file type, you can set the command or application to run when the file type is double-clicked, the description for the file type, the file extension, the icon to use for files with the extension, and the MIME type to associate with this extension.
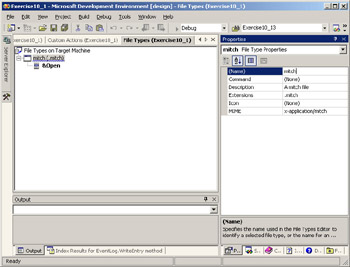
Figure 10.7: The File Types Editor
Using the Launch Conditions Editor
The Launch Conditions Editor, shown in Figure 10.8, enables you to check whether files, Registry keys, and Windows Installer components exist before the installation will proceed. You can check whether a specific version of Windows is installed or the .NET runtime exists on the machine.
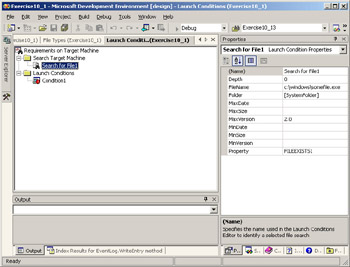
Figure 10.8: The Launch Conditions Editor
You set up launch conditions in two steps with this editor. First, you add a search condition by right-clicking the Search Target Machine category and choosing a file, Registry, or Windows Installer search condition. You then configure the properties of the specific search condition you want to search out. For example, you can specify the filename, the minimum date of the file, the Registry key, and so forth. After you have set up your Search Target Machine section, you can configure the Launch Conditions Editor to set the error message for the specific search condition created, as shown in Figure 10.9.
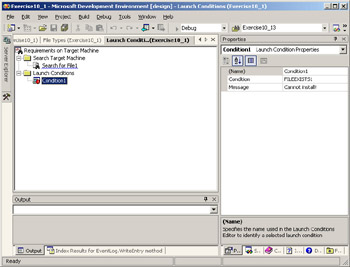
Figure 10.9: Setting the Launch Conditions for a specific search target
Using the Registry Editor
The Registry Editor, shown in Figure 10.10, is where you can create Registry keys and the name/value pairs that you want to add to the Registry when the application is installed. You simply navigate to the location where you want to add the key or value in the editor. You then right-click and choose New Ø item you want to add from the pop-up menu.
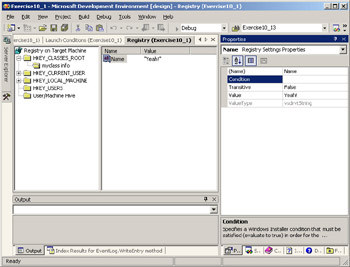
Figure 10.10: The Registry Editor
You can set many properties on the keys and values in the Properties window—such as a condition to be met for this key to be added to the Registry, or whether you would like to remove this key when the application is uninstalled.
Using the User Interface Editor
The User Interface Editor, shown in Figure 10.11, enables you to insert custom dialog boxes for the Installation Wizard that the user will step through when installing your application. You can customize messages and graphics presented to the user during installation. This is where you would add your own splash screens and installation instructions.
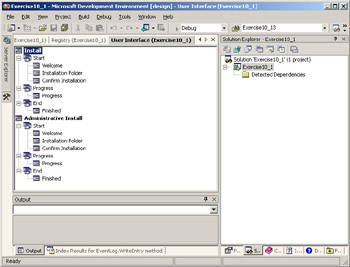
Figure 10.11: The User Interface Editor
You right-click on the installation step and choose Add Dialog from the pop-up menu to add a new dialog box (see Figure 10.12).
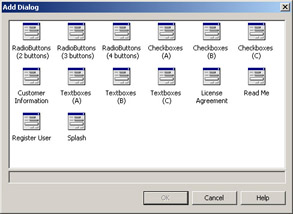
Figure 10.12: Add Dialog dialog box
After you select which dialog box you want to add, you use the Properties window to set the bitmap image you want on the dialog box and the labels and names of the various controls (mostly CheckBoxes) on the dialog box. You can then access these properties programmatically, by using an action setup in the Custom Actions Editor to process the user’s choices.
In Exercise 10.1, you will create and explore the options of a Windows setup project to familiarize yourself with it.
Exercise 10.1: Creating and Exploring a Windows Setup Project in Visual Studio .NET
-
Create a new Visual Studio .NET project by choosing File Ø New Ø Project from the main menu.
-
Under Project Types, choose Setup And Deployment Projects and under Templates, choose Setup Project.
-
Name the setup project WindowsSetup and click the OK button.
-
Right-click File System On Target Machine in the rightmost pane and choose Add Special Folder to reveal the special folders you can add to a project.
-
In the Solutions Explorer window, right-click WindowsSetup and choose View to reveal the various setup project editors. Click the Custom Actions option to switch to the Custom Actions Editor. Try switching to some of the other editors. You can also use the toolbar buttons at the top of the Solution Explorer window.
-
Right-click WindowsSetup and choose Properties from the pop-up menu. This reveals the setup project’s Property Pages dialog box. Click the Cancel button to close the dialog box.
EAN: 2147483647
Pages: 153