ADO.NET DataSets and XML
ADO.NET DataSets and XML
Chapter 6 covered the basic use of the DataSet to retrieve and edit data from a database. In this chapter, you will look at the additional capabilities of the DataSet class to work with XML data. The DataSet can be loaded directly with data that is already stored as an XML file on disk, or with XML data that is stored in a Stream object, a String variable, a TextReader, or an XmlReader. The DataSet can also write its data into XML format by using any of those same mechanisms. The DataSet XML methods all work with or without a specific schema and can generate a schema if none is provided. You can capture a representation of the DataSet that includes user changes and the original values of data that were modified, by requesting the DiffGram option when saving data as XML. Table 7.1 lists the methods of the DataSet that work with XML data.
| Method | Description |
|---|---|
| GetXml | Returns the XML representation of the data stored in the DataSet |
| GetXmlSchema | Returns the XSD schema for the XML representation of the data stored in the DataSet |
| InferXmlSchema | Infers the XML schema from the specified TextReader or file into the DataSet |
| ReadXml | Reads XML schema and data into the DataSet |
| ReadXmlSchema | Reads an XML schema only, no data, into the DataSet |
| WriteXml | Writes XML data, and optionally the schema, from the DataSet |
| WriteXmlSchema | Writes the DataSet structure as an XML schema |
In this section, you will see examples of filling a DataSet by using an XML file, writing XML files with DataSet data, and creating DiffGram output.
Reading XML Data into a DataSet
The ReadXml method and ReadXmlSchema method enable you to load your DataSet directly from XML data—no database required. Anytime you fill a DataSet, a schema is created that describes the contents of the DataSet. Even if you fill the DataSet from a database query, you can ask to view the schema by using the GetXmlSchema method. When you are working with XML data rather than a database as your data source, it is likely that you will have a schema defined and will want to use that information to verify that your data is valid.
The schema for your XML data will either be in-line, that is stored in the same file as the data itself, or stored in a separate XSD file with a .xsd extension. If you would like to load schema information only, use the ReadXmlSchema method. This method can be used either with in-line schemas—in which case the data will not be loaded—or with a separate XSD file. One approach is to load the schema information first, from a known schema file, and then when the data is loading, the DataSet will validate it against the specified schema.
This code shows how to load a DataSet from an XML data file:
Dim xmlSet As DataSet = New DataSet() xmlSet.ReadXml("C:\path\titles.xml") Here is an example of loading a DataSet by using an XmlTextReader:
Dim xmlSet As DataSet = New DataSet() Dim fsXml As New System.IO.FileStream _ ("C:\path\titles.xml", System.IO.FileMode.Open) Dim xmlReader As New System.Xml.XmlTextReader(fsXml) xmlSet.ReadXml(xmlReader, XmlReadMode.ReadSchema) ‘process the XML data xmlReader.Close() The ReadXml method has different behaviors based on its optional XmlReadMode parameter (Auto, DiffGram, Fragment, IgnoreSchema, InferSchema, and ReadSchema). The default behavior is to use an XmlReadMode value of Auto, which attempts to determine the format of the XML file automatically and use the appropriate behavior. If the DataSet already has a schema or the file has an in-line schema, the ReadSchema behavior will be used. If there is no DataSet schema and no in-line schema, the InferSchema behavior will be used and a schema will be created based on the contents of the XML data.
There are subtle differences among three of the XmlReadMode choices: ReadSchema, IgnoreSchema, and InferSchema. It’s important to understand the differences, because using them incorrectly could result in a failure to load data (either partially or completely) or a runtime error. The ReadSchema choice requires that schema information be available (either already loaded in the DataSet or in-line with the data) or the ReadXml method will fail to load data. If the DataSet has a schema defined, you can add new tables to the DataSet via an in-line schema, but if the in-line schema information duplicates what is already in the DataSet, an error will occur. The IgnoreSchema choice will disregard any in-line schema and use the previously defined DataSet schema. Any data that does not match the existing schema will not be loaded. If there is no schema established for the DataSet, then no data will be loaded. There is a subtle difference in the behavior of InferSchema: this choice also ignores any in-line schema, but will load data and create schema information for any data that does not match the existing DataSet schema.
Using the DataSet.InferXmlSchema method is similar to using ReadXml with the InferSchema parameter. The InferXmlSchema method offers the extended functionality of being able to specify one or more namespaces in the incoming data that should be ignored when creating the schema for the DataSet.
The GetXml method and GetXmlSchema method can be used when you simply want to display or to pass the data or the schema stored in a DataSet in an XML format. Both of these methods return a string value. Exercise 7.2 later in this section demonstrates how to use these methods.
Now let’s look at how to write XML data from a DataSet.
Writing XML Data from a DataSet
Writing the contents of a DataSet to an XML disk file, a Stream object, a TextWriter, or an XmlWriter is simple. Call the DataSet WriteXml method and specify a filename or the object that will hold the data. The WriteXml method has an optional XmlWriteMode parameter that determines what output is created. The values for the XmlWriteMode parameter are WriteSchema, IgnoreSchema, and DiffGram.
The WriteSchema choice for this parameter adds the schema information, in-line with the data, as a single output. WriteSchema is the default and this is what you will get if no value is specified for the parameter. Another choice is IgnoreSchema; only the data will be written. The third option is DiffGram; this format includes information about user modifications to the data in the DataSet and also includes the original values from the database. DiffGrams are explained further in the section titled “Creating DiffGram Output.” You will work with the DiffGram format in Exercise 7.3.
The WriteXmlSchema method can be used when you want to output only schema information, separate from the data. WriteXmlSchema can be used to create the same types of output as the WriteXml method (disk file, string, TextWriter, or XmlWriter). This method has no additional parameters.
The following code shows how to use the WriteXml and WriteXmlSchema methods to create two disk files, one that contains the XML data and one that contains the schema definition. By convention, the .xml filename extension is used for XML data files, and the .xsd extension is used for schemas.
xmlSet.WriteXml("C:\path\job-list.xml", XmlWriteMode.IgnoreSchema) xmlSet.WriteXmlSchema("C:\path\job-schema.xsd") The DataSet provides methods to easily create XML output in a default format. Sometimes you will need to have greater control over the exact format of XML that is created. You can do this by setting properties of the DataColumns that contain the data that will be output.
Controlling XML Format with Column Mappings
By default, the DataSet.WriteXml method creates a format of XML that uses only elements, not attributes. The element hierarchy for a simple table would be as follows: first, a root element, which takes its name from the DataSet, followed by an element that represents each row in the table, which takes its name from the DataTable. Nested inside the table-level element is a set of elements that contain data from each column in the table. This default behavior of the DataSet.WriteXml method with the IgnoreSchema creates a format of XML that is shown in Listing 7.3.
Listing 7.3: Default XML Format for the DataSet.WriteXml Method
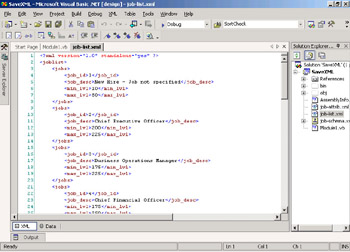
<?xml version="1.0" standalone="yes"?> <NewDataSet> <Jobs> <job_id>1</job_id> <job_desc>New Hire - Job not specified</job_desc> <min_lvl>10</min_lvl> <max_lvl>10</max_lvl> </Jobs> <Jobs> <job_id>2</job_id> <job_desc>Chief Executive Officer</job_desc> <min_lvl>200</min_lvl> <max_lvl>225</max_lvl> </Jobs> </NewDataSet>
If you need to create a different format that uses attributes, or if you need to change the default names, you can set properties of the DataColumn to do this. If you do not provide a value for the DataSet.Name property (either when you are instantiating it or later), the default name NewDataSet will be used. The DataTable name that was assigned when you filled the DataSet will be used as an element tag name that occurs for each row in the table, and the database column names will be used as element tag names for each data item.
| Note | Keep in mind that XML element tag names are strictly case sensitive, so the names that you assign in your code—or the database column names—must match any defined schema. Otherwise, any code that consumes the XML data will experience parsing errors. |
The ColumnMapping property of the DataColumn object controls whether a column is output as an XML element or as an attribute. The ColumnMapping property can be specified as either Element, Attribute, Hidden (that column will not be included in the XML output), or SimpleContent (the column data will be output as the text content of the row element). Additionally, you can set the DataColumn.ColumnName property to change the element or attribute name that is used in the output. This code snippet shows how to assign a DataSet name and a DataTable name, and then set the ColumnMapping and ColumnName properties for the job_id column:
Dim jobSet As DataSet = New DataSet("joblist") jobAdapter.Fill(jobSet, "jobs") Dim dt As DataTable dt = jobSet.Tables("jobs") dt.Columns("job_id").ColumnMapping = MappingType.Attribute dt.Columns("job_id").ColumnName = "id" Listing 7.4 shows the XML output that was created by the preceding code.
Listing 7.4: Changing the Format of XML Output
<?xml version="1.0" standalone="yes"?> <joblist> <jobs > <job_desc>New Hire - Job not specified</job_desc> <min_lvl>10</min_lvl> <max_lvl>50</max_lvl> </jobs> <jobs > <job_desc>Chief Executive Officer</job_desc> <min_lvl>200</min_lvl> <max_lvl>225</max_lvl> </jobs> </joblist>
In Exercise 7.1, you will create a simple console application that will write XML data and schema files from a DataSet (again, you will be using the sample pubs database from SQL Server 2000). You will use the files that you create in this exercise to complete Exercise 7.2, in which you will load a DataSet from the XML files.
Exercise 7.1: Writing DataSet Data to an XML File
-
Start Visual Studio .NET and create a new Console Application project called SaveXML.
-
You will be using the same pubs sample database that you did in Chapters 5 and 6. You are going to set up SqlConnection, SqlDataAdapter, and DataSet objects that are very similar to the examples used in Chapter 6. Feel free to cut and paste some of the code from those exercises if you have it available. Place the Imports statements at the top of the code module and place the rest of the code inside the Sub Main procedure. Notice in the following code that the lines shown in bold are new or different for this exercise. Your code should look like this (note that where the code shows C:\path, you should specify the same directory that you specified when you created this project):
Option Strict On Imports System.Data Imports System.Data.SqlClient Module Module1 Sub Main() Dim myConn As SqlConnection = New SqlConnection( _ "Data Source=localhost; Initial " & _ "Catalog=pubs; Integrated Security=SSPI;") Dim jobAdapter As SqlDataAdapter = New SqlDataAdapter() Dim jobSet As DataSet = New DataSet("joblist") jobAdapter.SelectCommand = New SqlCommand( _ "SELECT job_id, job_desc, min_lvl, max_lvl " & _ "FROM jobs", myConn) Try jobAdapter.Fill(jobSet, "jobs") ' column mapping code will be added here later jobSet.WriteXml("C:\path\job-list.xml", _ XmlWriteMode.IgnoreSchema) jobSet.WriteXmlSchema("C:\path\job-schema.xsd") Console.WriteLine("Files have been created.") Catch exp As Exception Console.WriteLine(exp.Message) Finally Console.ReadLine() End Try End Sub End Module -
Save and test your work. Select the project name in the Solution Explorer and click the Show All Files button on the Solution Explorer toolbar.
-
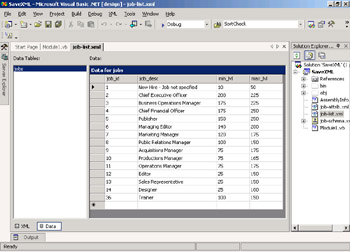
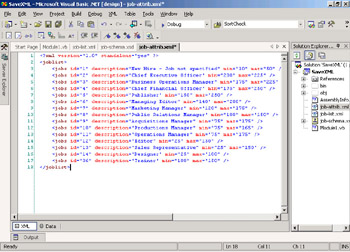
Open the file named job-list.xml. It will be displayed in the code editor. Review the contents of the file. When Visual Studio .NET displays an XML file, it shows you two views: first the XML markup and, alternatively, a table display. To switch to the table display, click the Data tab at the bottom of the window. The two views of the XML data file should look like the following images.
-
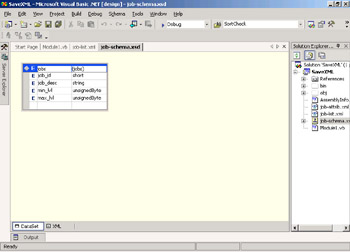
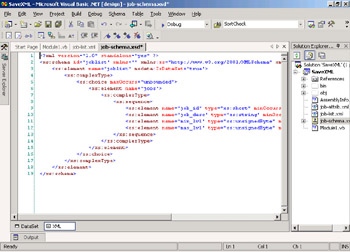
Double-click the job-schema.xsd file in the Solution Explorer to open it. When Visual Studio .NET displays a schema file, it shows you two views: the DataSet view (which shows a table that lists elements and attributes and their data types) and the XSD view. To see the XSD, click the XML tab at the bottom. The schema file should look like the following.
-
Create a different format of XML. Use the DataColumn.ColumnMapping property to completely change the format of XML that is created. Insert the following code after the call to jobAdapter.Fill:
Dim dt As DataTable dt = jobSet.Tables("jobs") dt.Columns("job_id").ColumnMapping = MappingType.Attribute dt.Columns("job_id").ColumnName = "id" dt.Columns("job_desc").ColumnMapping = MappingType.Attribute dt.Columns("job_desc").ColumnName = "description" dt.Columns("min_lvl").ColumnMapping = MappingType.Attribute dt.Columns("min_lvl").ColumnName = "min" dt.Columns("max_lvl").ColumnMapping = MappingType.Attribute dt.Columns("max_lvl").ColumnName = "max" -
Comment out the calls to jobSet.WriteXml and jobSet.WriteXmlSchema and add this line:
jobSet.WriteXml("C:\path\job-attrib.xml") -
Save and test your work. Review the files that are created; the new XML file job-list.xml should contain a <joblist> root element and repeating <jobs> element, each with four attributes and no nested elements. The complete file will look like the next screen shot. A single row would look like this:
<jobs description="Chief Executive Officer" min="200" max="225" />
Exercise 7.1 showed you that it is easy to read XML data into an ADO.NET DataSet. Now, in Exercise 7.2, you will practice how to create XML output from a DataSet.
Exercise 7.2: Reading XML Data into a DataSet
-
Start Visual Studio .NET and create a new Windows Application project called ReadXML.
-
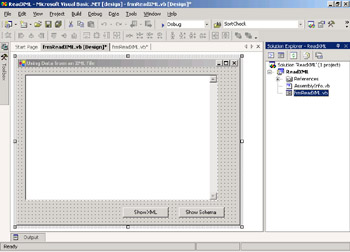
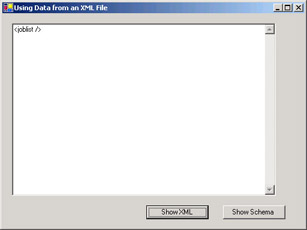
Add a TextBox and two Command Button controls to the form. Name them txtDisplay, btnShowXML, and btnShowSchema, respectively. Your form should look like the following one.
-
Add an Imports statement for System.Data at the top of the form’s code module:
Imports System.Data
-
Add a module-level declaration to instantiate a DataSet:
Dim jobSet As DataSet = New DataSet("joblist") -
In the Form_Load event procedure, load the DataSet from the XML file that you created in Exercise 7.1 (substitute the correct path and filename for the files on your computer) and add a simple error handler. Here is the code to do this:
Try jobSet.ReadXml("C:\path\job-list.xml") Catch exp As Exception MessageBox.Show(exp.Message) End Try -
Add code to the btnShowXML_Click procedure to call the GetXml method of the DataSet and display the data in the text box:
txtDisplay.Clear() txtDisplay.Text = jobSet.GetXml()
-
Add code to the btnShowSchema_Click procedure to call the GetXmlSchema method of the DataSet and display the schema in the text box:
txtDisplay.Clear() txtDisplay.Text = jobSet.GetXmlSchema()
-
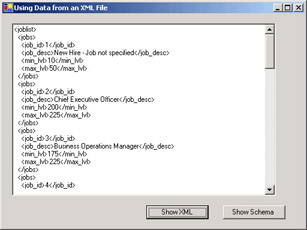
Save the project and test your work. The application should show the data as follows.
-
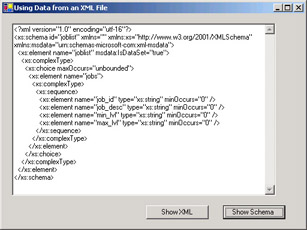
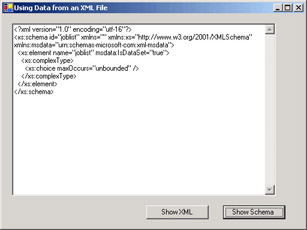
The application should show the schema as follows when you click the Show Schema button.
-
Test some variations on the ReadXml method to see how schemas can be used to control how data is loaded. Add the XmlReadMode.ReadSchema parameter to the code that loads the DataSet:
jobSet.ReadXml("C:\path\job-list.xml", XmlReadMode.ReadSchema) -
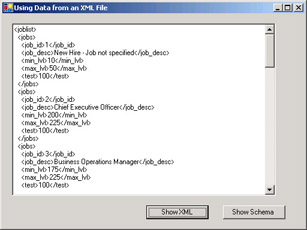
Test your application. Click the Show XML button. No data will be loaded because there has been no schema established for the DataSet and there is no in-line schema in the XML file.
-
Click the Show Schema button. A default schema outline will be displayed, but no specific elements are defined.
-
Add a call to ReadXmlSchema to load a schema, before loading the data:
jobSet.ReadXmlSchema("C:\path\job-schema.xsd") jobSet.ReadXml("C:\path\job-list.xml", XmlReadMode.ReadSchema) -
Test this version. It should work exactly like the first test when no XmlReadMode parameter was specified. The first test worked because the default behavior uses the InferSchema option and generates a schema for the DataSet if none is provided. This test worked because the schema was explicitly provided.
-
Test the behavior of the IgnoreSchema option. To do this, add some additional XML elements to the XML data file. Open the XML file, job-list.xml, in Visual Studio .NET or any text editor. Add a new XML element to the first two or three <jobs> elements (make sure you don’t break the rules for a well-formed XML document):
<jobs> <job_id>1</job_id> <job_desc>New Hire - Job not specified</job_desc> <min_lvl>10</min_lvl> <max_lvl>50</max_lvl> <test>100</test> </jobs>
-
Save the job-list.xml file.
-
Change the code in your project that loads the DataSet to use the IgnoreSchema parameter:
jobSet.ReadXmlSchema("C:\path\job-schema.xsd") jobSet.ReadXml("C:\path\job-list.xml", XmlReadMode.IgnoreSchema) -
Test your project. The original data is loaded correctly, but the new elements you added were not loaded. This is because they are not described in the schema, so they are ignored.
-
Comment out the call to ReadXmlSchema and test the application again. No data will be loaded. Just like the ReadSchema parameter, the IgnoreSchema parameter will not load any data if no schema is present.
-
Change the parameter value to InferSchema.
jobSet.ReadXml("C:\path\job-list.xml", XmlReadMode.InferSchema) -
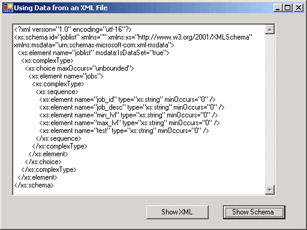
Test the application. You should see that the new items that you added are loaded and displayed in the XML data.
-
The description of a <test> element has also been added to the schema.
-
Save this project. You will be using it in future exercises. Remove the test items that you added to job-list.xml to return it to its original state.
Creating DiffGram Output
As discussed earlier, the DataSet.WriteXml method has an optional parameter called XmlWriteMode. This parameter has three possible settings. The WriteSchema and IgnoreSchema choices determine whether an in-line schema is included in the output file. The third choice, DiffGram, creates a completely different type of output.
A DiffGram file contains additional attributes that indicate which of the items in the DataSet have been modified, inserted, or deleted. Following the XML output of the data rows, the DiffGram contains a section of XML that retains the original values of the modified records. The new section of XML output begins with a <diffgr:before> element. If any of the data rows have an error, that information will be noted in another section of the output file starting with a <diffgr:errors> element.
The element and attribute names that are added to the data when creating DiffGram output, called annotations, are defined as part of the diffgr: namespace. There are also annotations defined by the DataSet itself; these are part of the msdata: namespace. The annotations are listed in Table 7.2. Listing 7.5 shows a partial DiffGram output file; in Exercise 7.3 you will create your own DiffGram output and you can examine a complete file.
| Name | Type | Description |
|---|---|---|
| <diffgr:diffgram> | Element | Indicates the root element for the output file. |
| <diffgr:before> | Element | Begins the section that shows original values. |
| <diffgr:errors> | Element | Begins the section that shows error information. |
| diffgr:id | Attribute | Creates a unique sequential ID value. Matches elements in the main output section with the corresponding information in the <diffgr:before> and <diffgr:errors> blocks. |
| diffgr:parentId | Attribute | Identifies the parent element of an element, when a DataSet has multiple, related tables. |
| diffgr:hasChanges | Attribute | Identifies a modified row as either inserted, modified, or descent (a modification was made in a child row). |
| diffgr:hasErrors | Attribute | Identifies a row with a RowError. |
| diffgr:Error | Attribute | Contains the text of the RowError, used in the <diffgr:errors> block. |
| msdata:rowOrder | Attribute | Indicates the row order of the original data in the DataTable. |
| msdata:hidden | Attribute | A column in the DataTable that had its ColumnMapping property set to hidden. |
Listing 7.5: An XML DiffGram Data File
<?xml version="1.0" standalone="yes"?> <diffgr:diffgram xmlns:msdata="urn:schemas-microsoft-com:xml-msdata" xmlns:diffgr="urn:schemas-microsoft-com:xml-diffgram-v1"> <joblist> <jobs diffgr: msdata:rowOrder="0" diffgr:hasChanges="modified"> <job_id>1</job_id> <job_desc>New Hire - Job not specified</job_desc> <min_lvl>10</min_lvl> <max_lvl>75</max_lvl> </jobs> </joblist> <diffgr:before> <jobs diffgr: msdata:rowOrder="0"> <job_id>1</job_id> <job_desc>New Hire - Job not specified</job_desc> <min_lvl>10</min_lvl> <max_lvl>50</max_lvl> </jobs> </diffgr:before> </diffgr:diffgram>
Exercise 7.3: Creating DiffGram Output
-
Open the ReadXML project that you created in Exercise 7.2. Add a new form to the project and name it frmDiff.
-
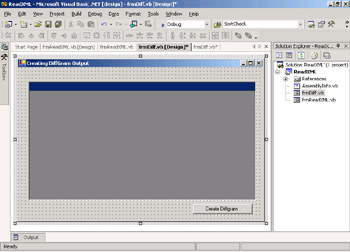
Add a DataGrid control and a Command Button control to the form. Name the button btnMakeDiff. Your form should look like the following one.
-
Right-click the project in the Solution Explorer and choose Properties from the menu. Set the new frmDiff to be the startup object.
-
Add an Imports statement for System.Data at the top of the form’s code module:
Imports System.Data
-
Add a module-level declaration to instantiate a DataSet:
Private jobSet As DataSet = New DataSet("joblist") -
In the Form_Load event procedure, load the DataSet from the XML file that you created in Exercise 7.2 (substitute the correct path and filename for the files on your computer). Call the DataSet.AcceptChanges method; otherwise, all entries will show up as newly inserted. Set the data binding for the DataGrid to use data from the DataSet. Add a simple error handler. Here is the code to do this:
Try jobSet.ReadXml("C:\path\job-list.xml") jobSet.AcceptChanges() DataGrid1.SetDataBinding(jobSet, "jobs") Catch exp As Exception MessageBox.Show(exp.Message) End Try -
Add code to the btnMakeDiff_Click procedure to call the WriteXml method of the DataSet, with the XmlWriteMode.DiffGram parameter:
jobSet.WriteXml("C:\path\diffgram.xml", XmlWriteMode.DiffGram) -
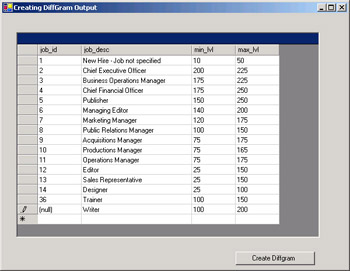
Save and run the application. It should look like this one.
-
Add one or two new items to the DataSet by entering them on the last line of the DataGrid. Make changes to the values of some of the existing rows.
-
Click the Create DiffGram button.
-
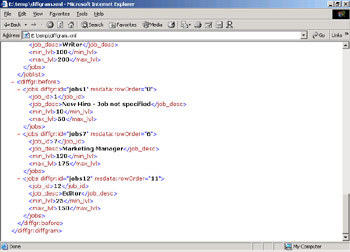
Use Windows Explorer or Visual Studio .NET to open the resulting XML file. Additional attributes that belong to the diffgr: namespace are added to the code, such as the hasChanges attribute that marks the rows you inserted or modified. You will see items that look like this:
<jobs diffgr: msdata:rowOrder="0" diffgr:hasChanges="modified"> <job_id>1</job_id> <job_desc>New Hire - Job not specified</job_desc> <min_lvl>10</min_lvl> <max_lvl>75</max_lvl> </jobs> <jobs diffgr: msdata:rowOrder="15" diffgr:hasChanges="inserted"> <job_desc>Writer</job_desc> <min_lvl>100</min_lvl> <max_lvl>200</max_lvl> </jobs>
At the end of the file, a section of XML marked <diffgr:before> has the <jobs> element for all of the new or changed items. These elements contain the original values, as shown in the following screen shot.
EAN: 2147483647
Pages: 153
- Chapter VI Web Site Quality and Usability in E-Commerce
- Chapter X Converting Browsers to Buyers: Key Considerations in Designing Business-to-Consumer Web Sites
- Chapter XI User Satisfaction with Web Portals: An Empirical Study
- Chapter XIV Product Catalog and Shopping Cart Effective Design
- Chapter XVI Turning Web Surfers into Loyal Customers: Cognitive Lock-In Through Interface Design and Web Site Usability