12.3 Hardware Management Revisited
12.3 Hardware Management Revisited
In a cluster, hardware management is by and large unchanged from a standalone system, but then again, the way that hardware is handled in Tru64 UNIX (starting with version 5.0) was redesigned specifically to accommodate two things:
-
Multiple paths to storage devices.
-
TruCluster Server.
However, a few things have changed, and we thought that it would be a good idea to let you in on the differences.
12.3.1 Hardware Management Databases Revisited
The first minor change that occurs when the cluster is created is that some of the hardware databases that were previously located in the /etc directory have been relocated to each member's boot partition and replaced with CDSLs (see Figure 12-2).
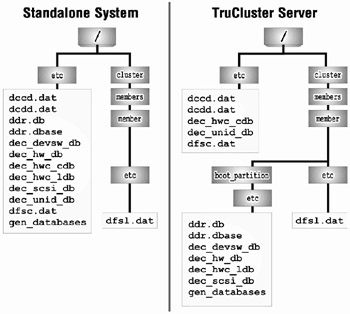
Figure 12-2: Hardware and Device Special Files Database Locations
Table 12-2 lists the databases and their locations respective to a cluster or standalone system.
| Database | Cluster | Standalone |
|---|---|---|
| dccd.dat | file | file |
| dcdd.dat | file | file |
| ddr.db | cdsl[*] | file |
| ddr.dbase | cdsl[*] | file |
| dec_devsw_db | [*] | file |
| dec_hw_db | [*] | file |
| dec_hwc_cdb | file | file |
| dec_hwc_ldb | [*] | file |
| dec_scsi_db | [*] | file |
| dec_unid_db | file | file |
| dfsc.dat | file | file |
| dfsl.dat | cdsl | cdsl |
| gen_databases | cdsl[*] | file |
|
[*]- this CDSL resolves to the member's boot_partition/etc directory | ||
12.3.2 The hwmgr(8) Command Revisited
The hwmgr command is cluster aware. It must, however, be focused on the cluster in order to see clusterwide results or you will see only member-specific information. For example, if you want to view the devices on your cluster you would use the "hwmgr –view device" command.
[sheridan] # hwmgr view device | tee hwmgr_view_device.sheridan HWID: Device Name Mfg Model Location ------------------------------------------------------------------------------ 3: /dev/dmapi/dmapi 50: /dev/disk/dsk1c COMPAQ BD009635C3 bus-3-targ-0-lun-0 51: /dev/disk/dsk2c COMPAQ BD009635C3 bus-3-targ-1-lun-0 52: /dev/disk/dsk3c COMPAQ BD009635C3 bus-3-targ-2-lun-0 53: /dev/disk/dsk4c COMPAQ BD009635C3 bus-3-targ-3-lun-0 54: /dev/disk/dsk5c COMPAQ BD009635C3 bus-3-targ-4-lun-0 55: /dev/disk/dsk6c COMPAQ BD009635C3 bus-3-targ-5-lun-0 58: scp (unknown) (unknown) 59: /dev/kevm 89: /dev/disk/floppy1c 3.5in floppy fdi0-unit-0 102: /dev/disk/cdrom1c COMPAQ CRD-8402B bus-0-targ-0-lun-0 103: /dev/disk/dsk8c COMPAQ BB009235B6 bus-2-targ-0-lun-0 104: /dev/disk/dsk9c COMPAQ BB009235B6 bus-2-targ-1-lun-0
[molari] # hwmgr view device | tee hwmgr_view_device.molari HWID: Device Name Mfg Model Location ------------------------------------------------------------------------------ 3: /dev/dmapi/dmapi 4: scp (unknown) (unknown) 5: /dev/kevm 35: /dev/disk/floppy0c 3.5in floppy fdi0-unit-0 46: /dev/disk/cdrom0c COMPAQ CRD-8402B bus-1-targ-0-lun-0 47: /dev/disk/dsk0c COMPAQ BD009734A3 bus-2-targ-0-lun-0 50: /dev/disk/dsk1c COMPAQ BD009635C3 bus-3-targ-0-lun-0 51: /dev/disk/dsk2c COMPAQ BD009635C3 bus-3-targ-1-lun-0 52: /dev/disk/dsk3c COMPAQ BD009635C3 bus-3-targ-2-lun-0 53: /dev/disk/dsk4c COMPAQ BD009635C3 bus-3-targ-3-lun-0 54: /dev/disk/dsk5c COMPAQ BD009635C3 bus-3-targ-4-lun-0 55: /dev/disk/dsk6c COMPAQ BD009635C3 bus-3-targ-5-lun-0
Taking the output from the "hwmgr –view device" command on both members you can see that it is slightly different. The reason for the difference is that you are seeing each member's physical view of the hardware. We used the tee(1) command to be able to save the output to a file so that we could see the differences between the two members' hardware. We will use the diff(1) command.
# diff hwmgr_view_device.* 4,8d3 < 4: scp (unknown) (unknown) < 5: /dev/kevm < 35: /dev/disk/floppy0c 3.5in floppy fdi0-unit-0 < 46: /dev/disk/cdrom0c COMPAQ CRD-8402B bus-1-targ-0-lun-0 < 47: /dev/disk/dsk0c COMPAQ BD009734A3 bus-2-targ-0-lun-0 14a10,15 > 58: scp (unknown) (unknown) > 59: /dev/kevm > 89: /dev/disk/floppy1c 3.5in floppy fdi0-unit-0 > 102: /dev/disk/cdrom1c COMPAQ CRD-8402B bus-0-targ-0-lun-0 > 103: /dev/disk/dsk8c COMPAQ BB009235B6 bus-2-targ-0-lun-0 > 104: /dev/disk/dsk9c COMPAQ BB009235B6 bus-2-targ-1-lun-0
The output that is preceded by a "<" shows the hardware that is specific to molari while the output preceded by a ">" shows sheridan's hardware.
12.3.2.1 How Can I See a Clusterwide Hardware View?
Many of the hwmgr command options provide for the ability to "focus" the command on a member or the cluster. The "-cluster" option can be used to focus on the entire cluster.
[sheridan] # hwmgr -view device -cluster HWID: Device Name Mfg Model Hostname Location ------------------------------------------------------------------------------------- 3: /dev/dmapi/dmapi molari 3: /dev/dmapi/dmapi sheridan 4: scp (unknown) molari (unknown) 5: kevm molari 35: /dev/disk/floppy0c 3.5in floppy molari fdi0-unit-0 46: /dev/disk/cdrom0c COMPAQ CRD-8402B molari bus-1-targ-0-lun-0 47: /dev/disk/dsk0c COMPAQ BD009734A3 molari bus-2-targ-0-lun-0 50: /dev/disk/dsk1c COMPAQ BD009635C3 molari bus-3-targ-0-lun-0 50: /dev/disk/dsk1c COMPAQ BD009635C3 sheridan bus-3-targ-0-lun-0 51: /dev/disk/dsk2c COMPAQ BD009635C3 molari bus-3-targ-1-lun-0 51: /dev/disk/dsk2c COMPAQ BD009635C3 sheridan bus-3-targ-1-lun-0 52: /dev/disk/dsk3c COMPAQ BD009635C3 molari bus-3-targ-2-lun-0 52: /dev/disk/dsk3c COMPAQ BD009635C3 sheridan bus-3-targ-2-lun-0 53: /dev/disk/dsk4c COMPAQ BD009635C3 molari bus-3-targ-3-lun-0 53: /dev/disk/dsk4c COMPAQ BD009635C3 sheridan bus-3-targ-3-lun-0 54: /dev/disk/dsk5c COMPAQ BD009635C3 molari bus-3-targ-4-lun-0 54: /dev/disk/dsk5c COMPAQ BD009635C3 sheridan bus-3-targ-4-lun-0 55: /dev/disk/dsk6c COMPAQ BD009635C3 molari bus-3-targ-5-lun-0 55: /dev/disk/dsk6c COMPAQ BD009635C3 sheridan bus-3-targ-5-lun-0 58: scp (unknown) sheridan (unknown) 59: /dev/kevm sheridan 89: /dev/disk/floppy1c 3.5in floppy sheridan fdi0-unit-0 102: /dev/disk/cdrom1c COMPAQ CRD-8402B sheridan bus-0-targ-0-lun-0 103: /dev/disk/dsk8c COMPAQ BB009235B6 sheridan bus-2-targ-0-lun-0 104: /dev/disk/dsk9c COMPAQ BB009235B6 sheridan bus-2-targ-1-lun-0
12.3.2.2 How Can I See Another Member's Hardware View?
The "-member" option can be used to focus on a particular member.
[sheridan] # hwmgr -view device -member molari HWID: Device Name Mfg Model Hostname Location ------------------------------------------------------------------------------------ 3: /dev/dmapi/dmapi molari 4: scp (unknown) molari (unknown) 5: kevm molari 35: /dev/disk/floppy0c 3.5in floppy molari fdi0-unit-0 46: /dev/disk/cdrom0c COMPAQ CRD-8402B molari bus-1-targ-0-lun-0 47: /dev/disk/dsk0c COMPAQ BD009734A3 molari bus-2-targ-0-lun-0 50: /dev/disk/dsk1c COMPAQ BD009635C3 molari bus-3-targ-0-lun-0 51: /dev/disk/dsk2c COMPAQ BD009635C3 molari bus-3-targ-1-lun-0 52: /dev/disk/dsk3c COMPAQ BD009635C3 molari bus-3-targ-2-lun-0 53: /dev/disk/dsk4c COMPAQ BD009635C3 molari bus-3-targ-3-lun-0 54: /dev/disk/dsk5c COMPAQ BD009635C3 molari bus-3-targ-4-lun-0 55: /dev/disk/dsk6c COMPAQ BD009635C3 molari bus-3-targ-5-lun-0
12.3.2.3 What hwmgr Command Options Have Focus?
The easiest way to determine whether a command option can be focused clusterwide or redirected to another member is to ask hwmgr with the "-help" option. For example, say we want to scan for new hardware but want to ensure that we perform the scan clusterwide.
# hwmgr -help scan Usage: hwmgr -scan component [ -id <hardware-component-ID> ] [ -category <hardware-category> ] [ -recurse ] [ -instance <member-instance-number> ] [ -member <cluster-member-name> ] [ -cluster ] Usage: hwmgr -scan [name] -entry <hardware-name> [ -member <cluster-member-name> ] [ -cluster (scan cluster-wide) ] Usage: hwmgr -scan scsi [ -bus <scsi-bus> ] [ -target <scsi-target> ] [ -lun <scsi-lun> ] [ -member <cluster-member-name> ]
According to the help output, the "hwmgr -scan component" command provides a member or a cluster option, whereas the "hwmgr -scan scsi" command only provides a member option. Table 12-3 shows the various hwmgr commands and whether or not they can be directed to the cluster or an alternate member.
| hwmgr(8) Command Option | ||
|---|---|---|
| Option | -member | -cluster |
| add name | √ |
|
| delete component | | |
| edit name | √ | |
| get attribute | √ | |
| locate |
|
|
| offline |
|
|
| online |
|
|
| power |
|
|
| redirect scsi |
|
|
| refresh componant | √ | √[√] |
| reload name | √ |
|
| remove | √ |
|
| scan component | √ | √ |
| set attribute | √ | √ |
| show component | √ | √ |
| status component | √ |
|
| unconfigure | √ |
|
| unidict | √ |
|
| unload name | √ |
|
| view cluster | | |
|
[√]-default | ||
| Note | We have written a script to run the "hwmgr scan scsi" command on every member. The clu_scan_scsi script is available at the TruCluster Server Handbook website (see Appendix B for the URL). |
12.3.3 The dsfmgr(8) Command Revisited
When using the dsfmgr command in a cluster, there are a few things to keep in mind:
-
When adding a device class, specify a "c" as the entry_type to indicate that the device will have a clusterwide scope.
# dsfmgr -a class guitar c 755
See the last line of the following output for the results of the previous command.
-
When using the "-s" option, a "c" in the scope of the Device Class Directory Default Database indicates that that class is clusterwide.
# dsfmgr -s | grep -p "Device Class Directory Default Database" Device Class Directory Default Database: # scope mode name -- --- ---- ----------- 1 l 0755 . 2 l 0755 none 3 c 0755 cport 4 c 0755 disk 5 c 0755 rdisk 6 c 0755 tape 7 c 0755 ntape 8 c 0755 changer 9 c 0755 dmapi 10 c 0755 guitar
We used the grep(1) command in order to shorten the rather lengthy output of the "dsfmgr -s" output and to save a few trees.
-
The "-o" and "-O" options, used to create legacy device special file names (e.g., rz34c), cannot be used in a cluster because legacy device special files are not supported.
EAN: 2147483647
Pages: 273