The My Keyword
The My keyword is a novel concept introduced in the .NET Framework 2.0 to quickly give you access to your application, your users, your resources, the computer, or the network on which the application resides. The My keyword has been referred to as a way of speed-dialing common but complicated resources to which you need access. Using the My keyword, you can quickly access a wide variety of items, such as user details or specific settings of the requestor’s browser.
Though not really considered a true namespace, the My object declarations that you make work the same as the .NET namespace structure you are used to working with. To give you an example, let’s first look at how you get the user’s machine name using the traditional namespace structure:
Environment.MachineName.ToString() For this example, you simply need to use the Environment class and use this namespace to get at the MachineName property. Now let’s look at how you would accomplish this same task using the new My keyword:
My.Computer.Info.MachineName.ToString() Looking at this example, you may be wondering what the point is if the example, using My, is lengthier than the first example that just works off of the Environment namespace. Remember that the point isn’t the length of what you type to get access to specific classes, but a logical way to find frequently accessed resources without spending a lot of time hunting them down. Would you have known to look in the Environment class to get the machine name of the user’s computer? Maybe, but maybe not. Using My.Computer.Info.MachineName.ToString() is a tremendously more logical approach; and once compiled, this namespace declaration will be set to work with the same class as previously without a performance hit.
If you type the My keyword in your Windows Forms application, you will notice that IntelliSense provides you with seven items to work with - Application, Computer, Forms, Resources, Settings, User, and WebServices. Though this new keyword works best in the Windows Forms environment, there are still things that you can use in the Web Forms world. If you are working for a Web application, then you will have three items off of the My keyword - Application, Computer, and User. Each of these is broken down in the following sections.
My.Application
The My.Application namespace gives you quick access to specific settings and points that deal with your overall application. The following table details the properties and methods of the My.Application namespace:
| Property/Method | Description |
|---|---|
| ApplicationContext | Returns contextual information about the thread of the Windows Forms application |
| ChangeCulture | A method that allows you to change the culture of the current application thread |
| ChangeUICulture | A method that allows you to change the culture that is being used by the Resource Manager |
| Culture | Returns the current culture being used by the current thread |
| Deployment | Returns an instance of the ApplicationDeployment object, which allows for programmatic access to the application’s ClickOnce features |
| GetEnvironmentVariable | A method that allows you to get at the value of an environment variable |
| Info | Provides quick access to the assembly of the Windows Forms. You can get at assembly information such as version number, name, title, copyr ight information, and more. |
| IsNetworkDeployed | Returns a Boolean value that indicates whether the application was distributed via the network using the ClickOnce feature. If True, then the application was deployed using ClickOnce - otherwise False. |
| Log | This property allows you to write to your application’s Event Log listeners. |
| MinimumSplashScreen DisplayTime | Allows you to set the time for the splash screen |
| OpenForms | Returns a FormCollection object, which allows access to the properties of the forms currently open |
| SplashScreen | Allows you to programmatically assign the splash screen for the application |
| UICulture | Returns the current culture being used by the Resource Manager |
While much can be accomplished using the My.Application namespace, for an example of its use let’s focus on the use of the Info property. This property provides access to the information stored in the application’s AssemblyInfo.vb file, as well as other details about the class file. In one of your applications, you can create a message box that is displayed using the following code:
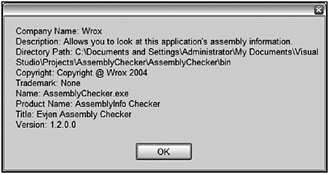
MessageBox.Show("Company Name: " & My.Application.Info.CompanyName & _ vbCrLf & _ "Description: " & My.Application.Info.Description & vbCrLf & _ "Directory Path: " & My.Application.Info.DirectoryPath & vbCrLf & _ "Copyright: " & My.Application.Info.Copyright & vbCrLf & _ "Trademark: " & My.Application.Info.Trademark & vbCrLf & _ "Name: " & My.Application.Info.AssemblyName & vbCrLf & _ "Product Name: " & My.Application.Info.ProductName & vbCrLf & _ "Title: " & My.Application.Info.Title & vbCrLf & _ "Version: " & My.Application.Info.Version.ToString()) From this example, it is clear that you can get at quite a bit of information concerning the assembly of the running application. Running this code produces a message box similar to the one shown in Figure 8-10.

Figure 8-10
Another interesting property to look at from the My.Application namespace is the Log property. This property enables you to work with the log files for your application. For instance, you can easily write to the system’s Application Event Log by first changing the application’s app.config file to include the following:
<?xml version="1.0" encoding="utf-8" ?> <configuration> <system.diagnostics> <sources> <source name="DefaultSource" switchName="DefaultSwitch"> <listeners> <add name="EventLog"/> </listeners> </source> </sources> <switches> <add name="DefaultSwitch" value="Information" /> </switches> <sharedListeners> <add name="EventLog" type="System.Diagnostics.EventLogTraceListener" initializeData="EvjenEventWriter" /> </sharedListeners> </system.diagnostics> </configuration> Once the configuration file is in place, you can record entries to the Application Event Log as shown in the following simple example:
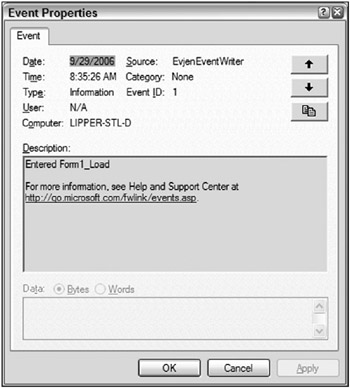
Private Sub Form1_Load(ByVal sender As System.Object, _ ByVal e As System.EventArgs) Handles MyBase.Load My.Application.Log.WriteEntry("Entered Form1_Load", _ TraceEventType.Information, 1) End Sub You could also just as easily use the WriteExceptionEntry method in addition to the WriteEntry method. After running this application and looking in the Event Viewer, you will see the event shown in Figure 8-11.

Figure 8-11
The previous example showed how to write to the Application Event Log when working with the objects that write to the event logs. In addition to the Application Event Log, there is also a Security Event Log and a System Event Log. Note that when using these objects, it is impossible to write to the Security Event Log, and it is only possible to write to the System Event Log if the application does it under either the Local System or the Administrator accounts.
In addition to writing to the Application Event Log, you can just as easily write to a text file. As with writing to the Application Event Log, writing to a text file also means that you are going to need to make changes to the app.config file:
<?xml version="1.0" encoding="utf-8" ?> <configuration> <system.diagnostics> <sources> <source name="DefaultSource" switchName="DefaultSwitch"> <listeners> <add name="EventLog"/> <add name="FileLog" /> </listeners> </source> </sources> <switches> <add name="DefaultSwitch" value="Information" /> </switches> <sharedListeners> <add name="EventLog" type="System.Diagnostics.EventLogTraceListener" initializeData="EvjenEventWriter" /> <add name="FileLog" type="Microsoft.VisualBasic.Logging.FileLogTraceListener, Microsoft.VisualBasic, Version=8.0.0.0, Culture=neutral, PublicKeyToken=b03f5f7f11d50a3a, processorArchitecture=MSIL" initializeData="FileLogWriter"/> </sharedListeners> </system.diagnostics> </configuration>
Now with this app.config file in place, you simply need to run the same WriteEntry method as before. This time, however, in addition to writing the Application Event Log, the information is also written to a new text file. You can find the text file at C:\Documents and Settings\[ username ] \Application Data\[ AssemblyCompany ]\[ AssemblyProduct ]\[ Version ]. For instance, in my example, the log file was found at C:\Documents and Settings\Administrator\Application Data\Wrox\Log Writer\1.2.0.0\. In the .log file found, you will see a line such as the following:
DefaultSource Information 1 Entered Form1_Load By default it is separated by tabs, but you can change the delimiter yourself by adding a delimiter attribute to the FileLog section in the app.config file:
<add name="FileLog" type="Microsoft.VisualBasic.Logging.FileLogTraceListener, Microsoft.VisualBasic, Version=8.0.0.0, Culture=neutral, PublicKeyToken=b03f5f7f11d50a3a, processorArchitecture=MSIL" initializeData="FileLogWriter" delimiter=";" /> In addition to writing to Event Logs and text files, you can also write to XML files, console applications, and more.
My.Computer
The My.Computer namespace can be used to work with the parameters and details of the computer in which the application is running. The following table details the objects contained in this namespace:
| Property | Description |
|---|---|
| Audio | This object enables you to work with audio files from your application. This includes starting, stopping, and looping audio files. |
| Clipboard | This object enables you to read and write to the clipboard. |
| Clock | This enables access to the system clock to get at GMT and the local time of the computer running the application. You can also get at the tick count, which is the number of milliseconds that has elapsed since the computer was started. |
| FileSystem | This object provides a large collection of properties and methods that enable programmatic access to drives, folders, and files. This includes the ability to read, write, and delete items in the file system. |
| Info | This provides access to the computer’s details, such as amount of memory, the operating system type, which assemblies are loaded, and the name of the comp uter itself. |
| Keyboard | This object provides access to knowledge of which keyboard keys are pressed by the end user. Also included is a single method, SendKeys, which enables you to send the pressed keys to the active form. |
| Mouse | This provides a handful of properties that enable detection of the type of mouse installed, including details such as whether the left and right mouse buttons have been swapped, whether a mouse wheel exists, and how much to scroll when the user uses the wheel. |
| Name | This is a read-only property that provides access to the name of the computer. |
| Network | This object provides a single property and some methods that enable you to interact with the network to which the computer on which the application is running is connected. With this object, you can use the IsAvailable property to first verify that the computer is connected to a network. If so, then the Network object allows you to upload or download files, and ping the network. |
| Ports | This object can provide notification if there are available ports as well as allow access to the ports. |
| Registry | This object provides programmatic access to the registry and the registry settings. Using the Registry object, you can determine whether keys exist, determine values, change values, and delete keys. |
|
Screen |
This provides the ability to work with one or more screens that may be attached to the computer. |
There is a lot to the My.Computer namespace, and it is impossible to cover all or even most of it. For an example that uses this namespace, let’s take a look at the FileSystem property. The FileSystem property enables you to easily and logically access drives, directories, and files on the computer.
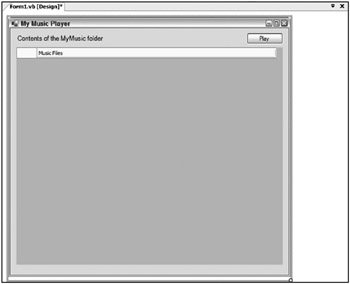
To illustrate the use of this property, first create a Windows Form with a DataGridView with a single column and a Button control. It should appear as shown in Figure 8-12.

Figure 8-12
This little application will look in the user’s My Music folder and list all of the .mp3 files found therein. Once listed, the user of the application will be able to select one of the listed files; and after pressing the Play button, the file will be launched and played inside Microsoft’s Windows Media Player.
The first step after getting the controls on the form in place is to make a reference to the Windows Media Player DLL. You can find this on the COM tab, and the location of the DLL is C:\WINDOWS\System32\ wmp.dll. This gives you an object called WMPLib in the References folder of your solution.
You might be wondering why you would make a reference to a COM object in order to play a .wma file from your application, instead of using the My.Computer.Audio namespace that is provided to you. The Audio property only allows for the playing of .wav files, because to play .wma, .mp3, and similar files, users must have the proper codecs on their machine. These codecs are not part of the Windows OS, but are part of Windows Media Player.
Now that the reference to the wmp.dll is in place, let’s put some code in the Form1_Load event:
Private Sub Form1_Load(ByVal sender As System.Object, _ ByVal e As System.EventArgs) Handles MyBase.Load For Each MusicFile As String _ In My.Computer.FileSystem.GetFiles _ (My.Computer.FileSystem.SpecialDirectories.MyMusic, _ FileIO.SearchOption.SearchAllSubDirectories, "*.wma*") Dim MusicFileInfo As System.IO.FileInfo = _ My.Computer.FileSystem.GetFileInfo(MusicFile.ToString()) Me.DataGridView1.Rows.Add(MusicFileInfo.Directory.Parent.Name & _ "\" & MusicFileInfo.Directory.Name & "\" & MusicFileInfo.Name) Next End Sub In this example, the My.Computer.FileSystem.GetFiles() method points to the My Music folder through the use of the SpecialDirectories property. This property enables logical and easy access to folders such as Desktop, My Documents, My Pictures, Programs, and more. Though it is possible to use just this first parameter with the GetFiles() method, this example makes further definitions. The second parameter defines the recurse value - which specifies whether the subfolders should be perused as well. In this case, the SearchOption enumeration is set to SearchAllSubDirectories. The last parameter defines the wildcard that should be used in searching for elements. In this case, the value of the wildcard is *.wma, which instructs the GetFile method to get only the files that are of type .wma. You could just as easily set it to *.mp3 or even just *.* to get at anything contained within the folders. Once retrieved with the GetFile() method, the retrieved file is then placed inside the DataGridView control, again using the My.Computer.FileSystem namespace to define the value of the item placed within the row.
Once the Form1_Load event is in place, the last event to construct is the Button1_Click event:
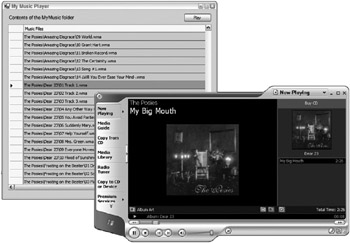
Private Sub Button1_Click(ByVal sender As System.Object, _ ByVal e As System.EventArgs) Handles Button1.Click Dim MediaPlayer As New WMPLib.WindowsMediaPlayer MediaPlayer.openPlayer(My.Computer.FileSystem.SpecialDirectories.MyMusic & _ "\" & DataGridView1.SelectedCells.Item(0).Value) End Sub From this example, you can see that it is pretty simple to play one of the provided .wma files. It is as simple as creating an instance of the WMPLib.WindowsMediaPlayer object and using the openPlayer() method, which takes as a parameter the location of the file to play. In this case, you are again using the SpecialDirectories property. The nice thing about using this property is that it could be more difficult to find the user’s My Music folder due to the username changing the actual location of the files that the application is looking for, but using the My namespace enables it to figure out the exact location of the items. When built and run, the application provides a list of available music files, enabling you to easily select one for playing in the Media Player. This is illustrated in Figure 8-13.

Figure 8-13
Though it would be really cool if it were possible to play these types of files using the Audio property from the My.Computer namespace, it is still possible to use the My.Computer.Audio namespace for playing .wav files and system sounds.
To play a system sound, you use the following construct:
My.Computer.Audio.PlaySystemSound(SystemSounds.Beep) The system sounds in the SystemSounds enumeration include Asterisk, Beep, Exclamation, Hand, and Question.
My.Forms Namespace
The My.Forms namespace provides a quick and logical way of getting at the properties and methods of the forms contained within your solution. For instance, to get at the first form in your solution (assuming that it’s named Form1), use the following namespace construct:
My.Form.Form1 To get at other forms, you simply change the namespace so that the name of the form you are trying to access follows the Form keyword in the namespace construction.
My.Resources
The My.Resources namespace is a tremendously easy way to get at the resources stored in your application. If you open the MyResources.resx file from the My Projects folder in your solution, you can easily create as many resources as you wish. For example, you could create a single String resource titled MyResourceString and give it a value of St. Louis Rams.
To access the resources that you create, use the simple reference shown here:
My.Resources.MyResourceString.ToString() Using IntelliSense, you will find all of your created resources listed after you type the period after the My.Resources string.
My.User
The My.User namespace enables you to work with the IPrincipal interface. You can use the My.User namespace to determine whether the user is authenticated or not, what the user’s name is, and more. For instance, if you have a login form in your application, you could allow access to a particular form with code similar to the following:
If (Not My.User.IsInRole("Administrators")) Then ' Code here End If You can also just as easily get at the user’s name with the following:
My.User.Name In addition, you can check whether the user is authenticated:
If My.User.IsAuthenticated Then ' Code here End If
My.WebServices
When not using the My.WebServices namespace, you access your Web Services references in a lengthier manner. The first step in either case is to make a Web reference to some remote XML Web Service in your solution. These references will then appear in the Web References folder in Solution Explorer in Visual Studio 2005. Before the introduction of the My namespace, you would have accessed the values that the Web reference exposed in the following manner:
Dim ws As New ReutersStocks.GetStockDetails Label1.Text = ws.GetLatestPrice.ToString() This works, but now with the My namespace, you can use the following construct:
Label1.Text = My.WebServices.GetStockDetails.GetLatestPrice.ToString() EAN: 2147483647
Pages: 267