Using Workflows with Other Applications
Workflows are not typically standalone applications, or run as part of a Console application, although this is an excellent way to develop them initially. Usually, workflows are created to work within some larger application, so you need to integrate your workflow with the rest of your application, whether it is a Windows Forms application or ASP.NET.
Using Workflow Foundation with Windows Forms
When combining WF with Windows Forms, there are three main points of contact: hosting (and starting) the workflow, setting parameters for the workflow, and getting data out of the workflow.
Recall that the workflow runs within a host process. This process may be the Windows Forms process itself or an external one. If the Windows Forms process is hosting the workflow, then the workflow only exists as long as the application is running. The alternative is a workflow hosted within a Windows Service or another Windows Forms application. In this case, your application needs to use some form of inter-process communication to communicate with the workflow. Typically, this would take the form of remoting between the two applications. Either way, the application that hosts the workflow needs to initialize the WF runtime, load the workflow, and start it. In addition, the workflow host may initialize event handlers for the events that the WF runtime will throw. The following code shows an example of hosting the WF runtime and loading a workflow:
Imports System.Workflow.Activities Imports System.Workflow.ComponentModel Imports System.Workflow.Runtime Public Class MainForm Private WithEvents wr As WorkflowRuntime Private wf As WorkflowInstance Private Sub StartButton_Click(ByVal sender As System.Object, _ ByVal e As System.EventArgs) Handles StartButton.Click If wr Is Nothing Then wr = New WorkflowRuntime() wr.StartRuntime() End If 'load a new instance of the workflow wf = wr.CreateWorkflow(GetType(TranslatedWorkflowDLL.SimpleWorkflow)) 'Start the workflow wf.Start() End Sub Private Sub MainForm_FormClosing(ByVal sender As Object, _ ByVal e As System.Windows.Forms.FormClosingEventArgs) _ Handles Me.FormClosing If (wr IsNot Nothing) Then If (wr.IsStarted) Then wr.StopRuntime() End If End If End Sub In addition to the this, you have to load references to the three Workflow DLLs, and to the assembly that holds the workflow you want to create. Notice that you must create and start the WF runtime before you can load and start workflows. While the preceding code only creates a single instance of a workflow, you can create multiple instances from a single application. Stopping the runtime is not absolutely necessary, but gives you better control when the resources used by the WF runtime are freed.
The second step in working with WF and Windows Forms is providing parameters to the workflow. This is done by supplying a Dictionary when you create the workflow. The items in the Dictionary should match the public properties of the workflow. This changes the code used to create the workflow in the preceding sample as follows:
'load a new instance of the workflow Dim parms As New Dictionary(Of String, Object) parms.Add("Message", Me.MessageField.Text) wf = wr.CreateWorkflow(GetType(TranslatedWorkflowDLL.SimpleWorkflow), parms) By using a Dictionary with an Object value, any type of data can be supplied to the workflow. This provides flexibility in terms of the number and type of parameters you supply to the workflow, including changing the parameters over time.
The final step when working with WF and Windows Forms is retrieving data from the workflow. This is slightly more difficult than it may first seem because the workflow runs on a separate thread from the Windows Forms code. Therefore, the workflow can’t directly access the controls on a form, and vice versa. The communication between the two is best performed by having the workflow generate events. The following code receives the WorkflowCompleted event and updates the ListBox on the form:
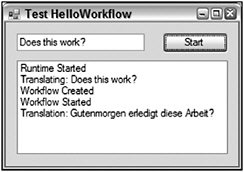
Private Sub wr_WorkflowCompleted(ByVal sender As Object, _ ByVal e As System.Workflow.Runtime.WorkflowCompletedEventArgs) _ Handles wr.WorkflowCompleted If Me. EventList.InvokeRequired Then Me. EventList.Invoke(New EventHandler(Of WorkflowCompletedEventArgs)( _ AddressOf Me.wr_WorkflowCompleted), _ New Object() {sender, e}) Else Me.EventList.Items.Add("Translation: " & _ e.OutputParameters("Message").ToString()) End If End Sub Recall that the workflow runtime is actually running on a separate thread. Therefore, any attempts to access the EventList directly throw an exception. The first time through this code, the InvokeRequired property of the EventList is true. This means that the running code is executing on a separate thread. In this case, the code invokes a new instance of the event, passing in copies of the sender and EventArgs. This has the side effect of marshalling the data across to the thread containing the form. In this case, InvokeRequired is false, and you can retrieve the data from the workflow. Figure 25-14 shows the result.

Figure 25-14
Using Workflow Foundation with ASP.NET
Combining ASP.NET with Windows Workflow Foundation raises many of the same issues involved in using WF with other technologies. That is, you still need to host the services and the runtime of WF within the host process under which ASP.NET runs. However, developing solutions using ASP.NET offers more features and requires more decisions than other solutions. In particular, it is possible to publish workflows as ASP.NET Web Services. Hosting workflows within ASP.NET solutions is similar to hosting workflows with Windows Forms, with a difference being that an ASP.NET solution might actually be supporting multiple concurrent users. This means that you must be more aware of where the runtime is created and how instances are created and freed.
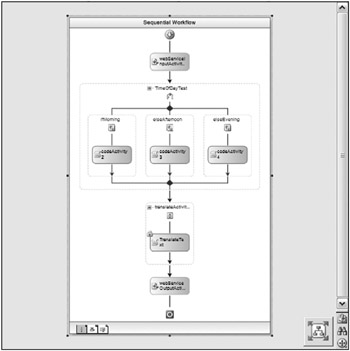
You can host a workflow as a Web Service if it has one or more WebServiceInput activities. This activity represents a SOAP endpoint. The WebServiceInput activity needs two properties set: InterfaceType and MethodName. Communication between the client code and the Web Service is achieved via a shared interface. This interface is the value needed for the InterfaceType property. It represents the contract between the client code and the WebServiceInput activity. The MethodName identifies the method on the interface that will initiate the Web Service call. The first WebServiceInput activity should have the IsActivating property set to true. In addition to the WebServiceInput activity, the workflow should also include a WebServiceOutput if the method includes a return value. Including a WebServiceFault activity is also useful if you need to return an error to the client code. If the Web Service has parameters or return values, these may be mapped to the properties of the workflow using the Bind property dialog (refer to Figure 25-12).
Once you have built the workflow including these activities (see Figure 25-15), you must publish it as a Web Service. This adds an additional ASP.NET Web Service project to the solution. The wizard creates the ASMX file that wraps the workflow and adds the required settings to the web.config file. The ASMX wrapper does nothing but delegate to the workflow class.
<%@WebService %> 
Figure 25-15
The additional settings in the configuration file add a new section for configuring the WorkflowRuntime and load the workflow HTTP handler that translates the incoming request:
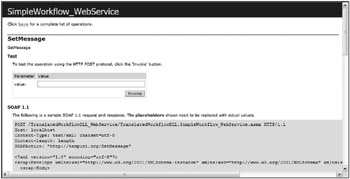
<?xml version="1.0"?> <configuration> <configSections> <section name="WorkflowRuntime" type="System.Workflow.Runtime.Configuration.WorkflowRuntimeSection, System.Workflow.Runtime, Version=3.0.00000.0, Culture=neutral, PublicKeyToken=31bf3856ad364e35"/> </configSections> <WorkflowRuntime Name="WorkflowServiceContainer"> <Services> <add type="System.Workflow.Runtime.Hosting.ManualWorkflowSchedulerService, System.Workflow.Runtime, Version=3.0.0.0, Culture=neutral, PublicKeyToken=31bf3856ad364e35"/> <add type="System.Workflow.Runtime.Hosting.DefaultWorkflowCommitWorkBatchService, System.Workflow.Runtime, Version=3.0.0.0, Culture=neutral, PublicKeyToken=31bf3856ad364e35"/> </Services> </WorkflowRuntime> <appSettings/> <connectionStrings/> <system.web> <httpModules> <add type="System.Workflow.Runtime.Hosting.WorkflowWebHostingModule, System.Workflow.Runtime, Version=3.0.0.0, Culture=neutral, PublicKeyToken=31bf3856ad364e35" name="WorkflowHost"/> </httpModules> </system.web> </configuration> The resulting Web Service works just like any other created by Visual studio: You can access it in a browser to receive a test form (Figure 25-16), request the WSDL, and access it using Web Service clients.

Figure 25-16
Beyond Web Services, ASP.NET applications can also host and access regular workflows. When hosting workflows in ASP.NET, you must be aware of the fact that your application may be accessed by many concurrent users, so you must also be aware of when you create the runtime instance. In addition, remember that each workflow instance can use a good deal of memory. Therefore, limit the creation of workflows to when they are needed and free them quickly when they are no longer needed.
As you will probably want a single workflow runtime instance supporting all of your workflows, the best place to create the workflow runtime is when the application first starts. You can do this in the application’s Start event in the global.asax file:
Sub Application_Start(ByVal sender As Object, ByVal e As EventArgs) Dim wfRun As New System.Workflow.Runtime.WorkflowRuntime Dim wfSked As _ New System.Workflow.Runtime.Hosting.ManualWorkflowSchedulerService wfRun.AddService(wfSked) wfRun.StartRuntime() Application.Item("WorkflowRuntime") = wfRun End Sub This ensures that the same runtime is available to all sessions. In addition, free up the resources used by the runtime when the application ends:
Sub Application_End(ByVal sender As Object, ByVal e As EventArgs) Dim wfRun As System.Workflow.Runtime.WorkflowRuntime wfRun = CType(Application.Item("WorkflowRuntime"), _ System.Workflow.Runtime.WorkflowRuntime) wfRun.StopRuntime() End Sub Running a workflow instance is now a matter of retrieving the runtime instance and using it to execute the workflow. This leads to another issue related to the way Web pages are handled. Recall that the workflow typically runs asynchronously. This could mean that the workflow instance continues to run in the background after the Web page has returned. Therefore, you must run the workflow instance synchronously, so that it completes before returning data to the Web page:
Dim wfRun As WorkflowRuntime wfRun = CType(Application.Item("WorkflowRuntime"), WorkflowRuntime) Dim wfSked As ManualWorkflowSchedulerService wfSked = wfRun.GetService(GetType(ManualWorkflowSchedulerService)) Dim wfInst As WorkflowInstance wfInst = wfRun.CreateWorkflow(GetType(SimpleWorkflow)) wfInst.Start() wfSked.RunWorkflow(wfInst.InstanceId) The preceding code extracts the workflow runtime from the Application storage. It then retrieves the workflow scheduling service that was associated with the runtime as part of the Application_Start event handler. This scheduling service executes the workflows synchronously. This ensures that the entire workflow runs before the Web page is returned. The runtime is also used to create a new instance of the workflow desired, which is then started and associated with the scheduler. You could provide parameters to the workflow just as you did with the Windows Forms sample, by creating a Dictionary and populating it with the properties. This Dictionary would then be provided as a second parameter on the CreateWorkflow call. Similarly, you could retrieve the result of the workflow using the Output Parameters property in the Completed event handler for the workflow, just as you did with Windows Forms.
EAN: 2147483647
Pages: 267