Building Web Services with Java
XML is a cross platform neutral-data format and Java is a cross-platform programming language. These technologies provide a perfect solution for developing network independent and extensible applications; they enable interoperability, portability, and flexibility. They also provide a standard solution for integrating heterogeneous applications and systems ranging from cell phones to large-scale enterprise applications. An application can be written in Java and ported to various supported platforms (known as "Write Once, Run Anywhere"). In addition, XML also has the capability to talk to Java as well as non-Java applications running on diverse platforms.
With the overwhelming success of XML and Java in enterprise applications, the use of XML has required the development of parsers and other supporting technologies to process the XML data. Many XML- based technologies have been developed over the last few years using vendor-specific APIs that require specific vendor implementation knowledge. The introduction of the Java XML APIs provides standard interfaces that are independent of any vendor-specific implementation. For example, in using a JAXP- compliant parser, this standardization provides better support for maintaining application code and enables the application provider to exchange the underlying implementation of the parser. This change does not require any modification in the application code because the method calls are the same due to compliance of the two parsers.
This chapter presents an introduction to developing Java Web services through the use of Apache Axis and Jakarta Tomcat. Before looking at the Web service implementation, here is a quick introduction to Axis and Tomcat.
Introduction to Axis and Tomcat
Axis is essentially a SOAP engine that provides a framework for constructing SOAP processors such as clients, servers, gateways, etc. In addition to being the third generation of Apache SOAP, the Axis also includes:
-
q A simple stand-alone server
-
q A server that plugs into servlet engines such as Tomcat
-
q Extensive support for the Web Service Description Language (WSDL)
-
q Emitter tooling that generates Java classes from WSDL
Tomcat is a Java Servlet container and Web server from the Jakarta project of the Apache software foundation. A Web server dishes out Web pages in response to requests from a user sitting at a web browser. But Web servers are not limited to serving up static HTML pages; they can also run programs in response to user requests and return the dynamic results to the user's browser. Tomcat is very good at this because it provides both Java Servlet and Java Server Pages (JSP) technologies (in addition to traditional static pages and external CGI programming). The result is that Tomcat is good choice for use as a Web server for many applications; also if you want a free Servlet and JSP engine. It can be used standalone or used behind traditional Web servers such as Apache http, with the traditional server serving static pages and Tomcat serving dynamic servlet and JSP requests.
For the purposes of this chapter, I will use the combination of Tomcat (as a Web server) and Axis (as the SOAP runtime engine) for the development and deployment of Java Web services.
Setting Up Axis and Tomcat
Before you can begin using Axis, you need to download a copy of Jakarta Tomcat and Apache Axis:
-
q Jakarta TOMCAT (http://www.tomcat.apache.org/download-60.cgi)
-
q Apache AXIS (apache.org/dyn/closer.cgi/ws/axis/1_4)
For TOMCAT to start properly, set the JAVA_HOME system environment variable to <Drive_Name> Program Files\Java\jdk1.6.0 through Control Panel ![]() System
System ![]() Advanced
Advanced ![]() Environment Variables. If you don't have JDK 1.6.0 already installed, download it from the http://www.java.sun.com Web site.
Environment Variables. If you don't have JDK 1.6.0 already installed, download it from the http://www.java.sun.com Web site.
To configure AXIS, set the CLASSPATH environment variable to <axis_home>\axis-1_4\lib\ axis.jar; <axis_home>\axis-1_4\lib\commons-discovery-0.2.jar; <axis_home>\axis-1_4\lib\commons-logging-1.0.4.jar; <axis_home>\axis-1_4\lib\jaxrpc.jar; <axis_home>\axis-1_4\lib\saaj.jar; <axis_home>\axis-1_4\lib\wsdl4j-1.5.1.jar; <axis_home>\axis-1_4\;
After installing Tomcat and decompressing Axis, copy the axis folder from <axis-home>/webapps to <tomcat-home>/webapps. This gives you the following folder:
<tomcat-home>/webapps/axis
Start Tomcat by executing the startup script from the <tomcat-home>/bin folder. For example, on Windows:
C:\apache-tomcat-5.5.20\bin> startup
Now you can test your installation by directing your Web browser to the following URL:
http://www.localhost:8080/axis
Click on Validation or go directly to the URL:
http://www.localhost:8080/axis/happyaxis.jsp
This page tells you if Axis located the libraries that it needs to run properly. If you have any errors, you are provided with links to the required libraries that you need to install. Follow the links, download the libraries, and copy the JAR files to the <tomcat-home>/webapps/axis/WEB-INF/lib folder.
| Note | Note you may need to restart Tomcat for the changes to take effect; execute the shutdown script followed by the startup script from the <tomcat-home>/bin folder. |
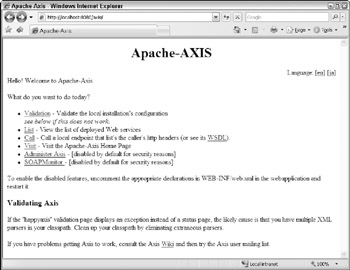
Finally, you might want to test your installation by listing the currently deployed Web services. Bring up the Axis home page by navigating to http://www.localhost:8080/axis from the browser. If the installation is successful, you should see an output similar to Figure 19-7.

Figure 19-7
If you click List on the Axis homepage, you should initially see two services:
-
q AdminService
-
q Version
Click on the wsdl link for the Version service to validate that Axis is properly serving its content.
Publishing Web Services Using Axis
Now that you have set up your Web application to use Axis as the SOAP engine, it's time to publish the Web services. Axis provides two ways to deploy the Web services.
-
q Instant deployment through renaming .java to .jws
-
q Advanced deployment through the .wsdd (Web Service Deployment Descriptor) configuration file
The next two sections examine both of these approaches in detail.
Instant Deployment Through Renaming .java to .jws
The simplest and most straightforward way to deploy Web services is to rename the .java file to .jws and place it in the root of your Web application. JWS stands for Java Web Service. For example, consider the following java class named HelloWorld.java.
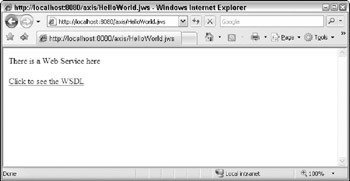
public class HelloWorld { public static String HelloWorld(String name){ return "Hello : " + name; } } To expose this as a Web service, you simply rename it to HelloWorld.jws and place it in the root of your Web application. That's all there is to deploying the Web service. With that, you are ready to access the WSDL contents of the Web service by navigating to http://www.localhost:8080/axis/HelloWorld.jws using the browser. Figure 19-8 shows the output generated by the browser.

Figure 19-8
In the Consuming Web Services with Java”section, you will see the steps involved in consuming this service from a client application.
As you can see, this approach is very simple. However, one of the major caveats of using this technique is that you are forced to use mainly primitive data types and some very common Java classes such as java.util.Date as method arguments and return types. In other words, you cannot use your custom classes (also sometimes referred to as Value Objects or VOs) as method parameters or return types. This is where the advanced deployment comes into your rescue, which is the topic of focus for the next section.
Advanced Deployment
The advanced deployment allows you to use your own classes as parameter values and return type of methods. These parameter values are called Value Objects. Value Objects are typically used to represent the collection of data that needs to be passed on via methods. To illustrate the advanced deployment approach, let us consider a slightly complex service, wherein you retrieve the product data from a SQL Server 2005 database, convert the resultset into a Product object, and return that from the service.
First, to be able to access SQL Server data, you must download the corresponding JDBC driver. You can download the JDBC driver for SQL Server 2005 from the link (http://www.microsoft.com/downloads/details.aspx?FamilyId=&displaylang=en) in Microsoft Web site. Once you unzip the installation zip file in a local file, ensure that the path to the sqljdbc.jar file is also set in the CLASSPATH environment variable.
Creating the Service Implementation
Create a new java class file named ProductService.java and place it under the < Drive_Name>\ Projects\Wrox\WebServices\com\wrox\webservices folder. This is shown in Listing 19-7.
Listing 19-7: Exposing the Product data from the AdventureWorks database in SQL Server
package com.wrox.webservices; import java.sql.Connection; import java.sql.DriverManager; import java.sql.PreparedStatement; import java.sql.ResultSet; public class ProductService { public static Product getProduct(int productID) { Product obj = new Product(); try { Class.forName("com.microsoft.sqlserver.jdbc.SQLServerDriver"); String connectionUrl = "jdbc:sqlserver://localhost;database=AdventureWorks;user=sa;password=thiru"; Connection con = DriverManager.getConnection(connectionUrl); con.setAutoCommit(false); PreparedStatement pstmt = con.prepareStatement ("SELECT ProductID, Name, ProductNumber, Color FROM " + " Production.Product WHERE ProductID = ?"); pstmt.setInt(1, productID); ResultSet rs = pstmt.executeQuery(); while (rs.next()) { obj.setProductID(rs.getInt("ProductID")); obj.setName(rs.getString("Name")); obj.setProductNumber(rs.getString("ProductNumber")); obj.setColor(rs.getString("Color")); } rs.close(); pstmt.close(); con.close(); } catch (Exception e) { e.printStackTrace(); } return obj; } } To start with, you load the Microsoft JDBC driver for SQL Server 2005 by calling the Class.forName() method passing in the name of the class that represents the SQL Server driver.
Class.forName("com.microsoft.sqlserver.jdbc.SQLServerDriver"); After that, you specify the connection string to the database using the JDBC connection string syntax. Once the connection string is set, the next step is to get reference to the Connection object, which can be accomplished using the DriverManager.getConnection() method.
String connectionUrl = "jdbc:sqlserver://localhost;database=AdventureWorks;user=sa;password=thiru"; Connection con = DriverManager.getConnection(connectionUrl);
Next, you obtain reference to the PreparedStatement object through the prepareStatement() method of the Connection object. To the prepareStatement() method, you pass in the SQL statement to be executed as an argument.
PreparedStatement pstmt = con.prepareStatement ("SELECT ProductID, Name, ProductNumber, Color FROM " + " Production.Product WHERE ProductID = ?"); Here you set the value of the ProductID parameter by invoking the setInt() method of the Prepared Statement object. Finally you execute the SQL query through the invocation of executeQuery() method, which returns a ResultSet object with results from the execution of the query.
pstmt.setInt(1, productID); ResultSet rs = pstmt.executeQuery();
Once you have the ResultSet object, you can then invoke its getXXX() methods to get to the specific column values.
while (rs.next()) { obj.setProductID(rs.getInt("ProductID")); obj.setName(rs.getString("Name")); obj.setProductNumber(rs.getString("ProductNumber")); obj.setColor(rs.getString("Color")); } Finally, you return the Product object as a return value to the caller.
return obj;
The Product class used in Listing 19-8 is declared as follows:
Listing 19-8: Implementation of Product class
package com.wrox.webservices; public class Product { private int productID; private String name; private String productNumber; private String color; public int getProductID() { return productID; } public void setProductID(int productIDVal) { productID = productIDVal; } public String getName() { return name; } public void setName(String nameVal) { name = nameVal; } public String getProductNumber() { return productNumber; } public void setProductNumber(String productNumberVal) { productNumber = productNumberVal; } public String getColor() { return color; } public void setColor(String colorVal) { color = colorVal; } } As you can see from Listing 19-8, the Product class just has a set of getter/setter methods that allow you to work with the various attributes of a Product.
The Product class file is also stored in the same location <Drive_Name>\Projects\Wrox\ WebServices\com\wrox\webservices. Now compile the ProductService.java file using the command line compiler javac. For the compiler to identify the Product class, your CLASSPATH variable must also include the location C:\Projects\Wrox\WebServices\. Instead of setting the CLASSPATH environment variable, you can also specify the classpath switch at the time of invoking the compiler.
Creating a Web Service Deployment Descriptor (WSDD) File
Now that you have created the service implementation, the next step is to create a WSDD file that contains the service deployment information. To really use the flexibility available to you in Axis, you should get familiar with the Web Service Deployment Descriptor (WSDD) format. A deployment descriptor contains a bunch of things you want to "deploy" into Axis, meaning make available to the Axis engine. For ProductService, create a WSDD file called Deploy.wsdd and add the following contents to it.
<deployment xmlns="http://xml.apache.org/axis/wsdd/" xmlns:java="http://xml.apache.org/axis/wsdd/providers/java"> <service name="ProductProcessor" provider="java:RPC"> <parameter name="className" value="com.wrox.webservices.ProductService"/> <parameter name="allowedMethods" value="getProduct"/> <beanMapping qname="myNS:Product" xmlns:myNS="urn:ProductService" languageSpecificType="java:com.wrox.webservices.Product"/> </service> </deployment>
The <service> element enables you to specify the details of the service including the name of the class as well the methods that are allowed to act as Web methods. The <beanMapping> sub-element points to your custom bean. This element allows Axis to handle (most appropriately serialize and de-serialize) the Java classes that are not handled by default by Axis (mostly primitive) and they follow the Java bean style setter and getter methods. You have to define as many bean mappings as the beans used by the Web method and the beans used within those beans.
Now go ahead and deploy the deploy.wsdd file using the AdminClient utility:
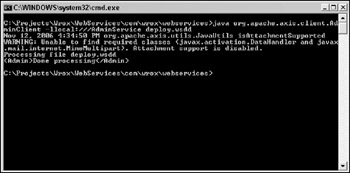
java org.apache.axis.client.AdminClient -llocal:///AdminService deploy.wsdd
You should see an output similar to Figure 19-9:

Figure 19-9
Now that you have created the Web service, you are ready to consume it from a client application, which will be covered in the "Consuming Web Services with JAVA" section.
EAN: 2147483647
Pages: 215