Manipulating Your Outline
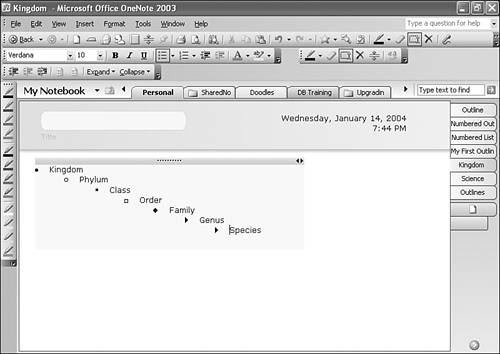
| You can store a vast amount of information in your outline. However, you might not always want to display all that information on your OneNote page. For example, you might want to hide certain sections of an outline in a printout. If you have an outline for tasks for a variety of departments, you can create a printout for each department with only their tasks. You could, of course, copy and paste just the relevant portions of the outline for each department, but it is simpler to merely hide certain portions of the outline. You can collapse a section of an outline by double-clicking on the top line you want to show. For example, in Figure 15.8, you can hide all levels below Family by double-clicking on the note handle to the left of the word Family. The Genus and Species entries (along with any text in lower levels) are collapsed under the Family level. Figure 15.8. You can collapse sections of your outline by double-clicking them.
You can also use OneNote's menus to control which levels of your outline are shown. You can hide all information under the third level of your outline by selecting the entire outline and choosing View, Hide Levels Below Level 3. This hides all the information at level 4, level 5, and so on. No matter how many levels you have in your outline, the Hide Levels Below menu only shows levels 1 through 5. You can choose to hide any of these levels through the menu or with the keyboard. To use the keyboard to hide all levels below level 4, press Alt+Shift+4. This syntax works for all levels of your outline. If you have eight outline levels and you want to hide all levels below level six, press Alt+Shift+6. In addition to double-clicking a line of the outline and using the Hide Levels Below menu, you can also use the Outlining toolbar to collapse your outline. Choose the Collapse button on the Outlining toolbar and select a level to collapse. You can also collapse the entire outline by choosing All. tip
Once you've hidden the levels, you might want to get them back again. To do this, either select Expand from the Outlining toolbar or double-click the level you want to expand on the screen. If you choose Expand from the Outlining toolbar, you can choose to expand just a specific level or All. Changing Outline SpacingThe last method of manipulating the outline we'll discuss is changing the outline spacing. By default, when using either bullets or numbering, there's a space of 0.1 inches between the bullet and the text. You can change this spacing for both bulleted and numbered outlines, and numbered lists. To alter the spacing for bulleted outlines, first select your outline. Choose Bullets from the Format menu to display the Bullets task pane, shown in Figure 15.9. Figure 15.9. You can control the spacing between the bullet and the text.
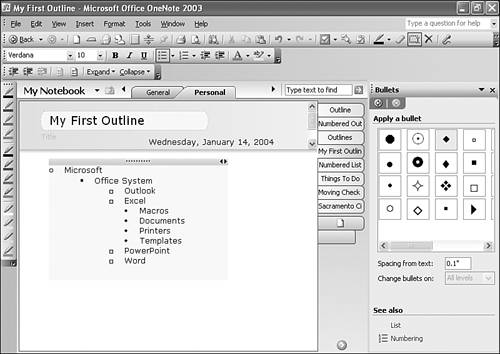
It's possible to adjust the spacing for the entire outline or only one or two lines of the outline. To adjust spacing, select the portion of the outline you're interested in. In the Spacing from text box, enter a number other than 0.1. Spacing changes can affect more than just the currently selected line. For example, in Figure 15.10, if you select the line that starts with "Office System" through the line that starts with "Word" and change the spacing of the bullets, you won't affect the spacing of the line that starts with "Java," even though it's at the same level as "Office System." However, if you choose the line that starts with "Excel" and its nested bullets of "Macros," "Documents," "Printers," and "Templates," any changes to spacing will affect the "Outlook," "PowerPoint," and "Word" lines as well. You can always choose Undo from the Edit menu if changing spacing produces any unintended consequences. Figure 15.10. Changing outline spacing can often have unpredictable results.
tip
Once you've entered a spacing number, press Tab or Enter to apply your changes. Controlling List SpacingWhen working with lists, you have a few other spacing options to control. Choose List from the Format menu to display the List task pane, as shown in Figure 15.11. Figure 15.11. You can control several spacing options for lists.
To alter the horizontal spacing, change the number in the box marked Indent from previous list level. This value controls how far the list is indented from the outline level. For example, referring back to Figure 15.5, increasing this value causes the second-level items to indent themselves further under the first-level items. There are three values you can manipulate for vertical spacing. First, you can control the default space that's present above the list. If you always want there to be a fixed amount of space above your list, regardless of where on the page the list appears, change the value for the Above the list box. To change the spacing between list items, alter the value in the Between list items box. Finally, to alter the spacing below the list, change the value in the Below the list box. Changing all these values to 8 pt changes Figure 15.5 into Figure 15.12. Figure 15.12. Changing the spacing of your outline can give it a unique look.
|
EAN: 2147483647
Pages: 182