Using the FormManager DTC
The FormManager DTC is designed to automate much of the coding required to construct a mode-based data-entry form. For instance, if you want a four-button form (Display, New, Modify, and Delete, for example) to control the form's mode, you can hook this form up with the FormManager DTC without writing any code.
Let's look at an example of the FormManager DTC. This form has two actions:
- New Clears the form and lets you enter a new record
- Modify Lets you modify the current record
You can scroll around the form in either mode. Figure 9-1 below shows the form in Modify mode. Notice that the Modify button is disabled.
This form uses the RecordsetNavbar DTC to navigate through the recordset. The RecordsetNavbar DTC is located at the bottom of the form. You can change any one of the fields. After you have changed a field, you can save it by moving to the next record with the RecordsetNavbar DTC or clicking the Save button. Figure 9-2 shows the same form in New mode, immediately after a new record has been entered and saved.
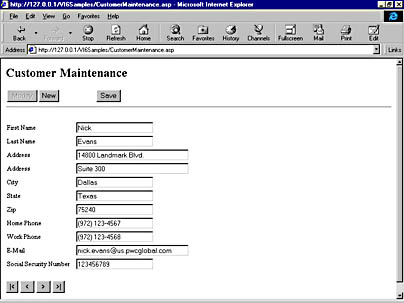
Figure 9-1. Data Entry form in Modify mode.
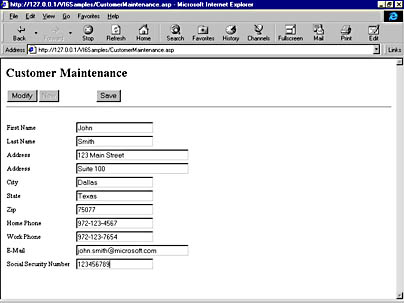
Figure 9-2. Data Entry form in New mode.
The FormManager DTC is a type of "super DTC"—it works with the other DTCs on the page to map and control functional changes during mode switches. Here's how to use it:
- Create an ASP Web page.
- Insert the DTCs you will use for your data form. This normally includes a Recordset DTC, DTCs for each field you will display, a RecordsetNavbar DTC to control navigation, and buttons that will control switching from one mode to the next.
- Insert a FormManager DTC. This FormManager interface wires the various modes and actions together.
The first step in creating the data entry form is easy—you can use the standard techniques we have already covered to build the form and bind it to a recordset. Figure 9-3 shows the sample page in Design view. You can see the Recordset DTC at the top of the page. Next are the Button DTCs that will switch from one mode to the next. Next come the Textbox DTCs for the fields on the form. Finally the RecordsetNavbar DTC and the FormManager DTC come below the last Textbox DTC (off the screen).
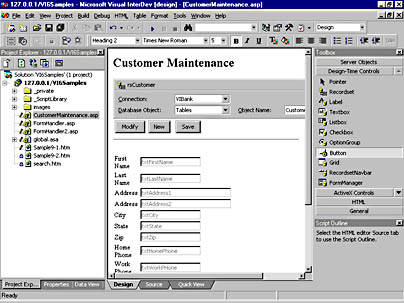
Figure 9-3. Data Entry form in Design view.
After building the basic layout of the page with the controls just mentioned, your next step is to test it in the browser. Finally, you'll want to edit the FormManager DTC on the page and set its properties. Let's look at how to wire up the FormManager DTC with a few lines of ASP code.
Defining Modes, Actions, and Transitions in the FormManager DTC
First a few terms used in conjunction with the FormManager DTC need to be defined:
Table 9-1. FormManager modes.
| Term | Description |
|---|---|
| Form Mode | Defines an operational setting for the form. For instance, in New mode the user should be able to enter a new record but not delete a record. In Modify mode, the user can make changes to a record but not enter a new record or delete a record. |
| Action | Determines what happens at an execution point between modes. Actions occur when the form switches from one mode to another. For instance, when the user clicks the New button, we set the disabled property of the cmdNew button to True to turn off that button, and we set the disabled property of cmdModify to False to turn it on. |
| Transition | The period between one mode and another. Transitions occur when the form changes from one mode to another. For instance, when the user clicks the New button, the transition period occurs between the time the New button is clicked and the New mode becomes active. |
Defining modes for the FormManager DTC
Defining modes for the form is the first step in setting up the FormManager DTC. Figure 9-4 shows the Form Mode tab of the FormManager Properties dialog box. This figure shows two modes defined for our form: Modify and New.
To define a mode:
- Right-click the FormMode DTC and select Properties.
- Click the Form Mode tab in the FormManager Properties dialog box.
- Enter the new mode name in the New Mode text box.
- Click the > button to create the mode and add it to the Form Mode list.
Figure 9-4 also shows the Default Mode set to Modify. The form will start in this mode.
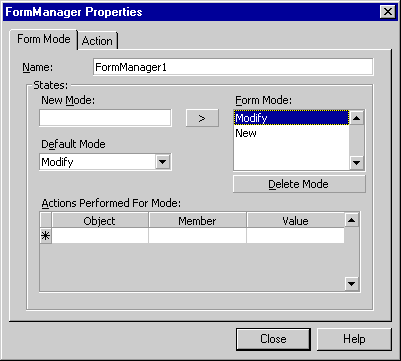
Figure 9-4. The Form Mode tab of the FormManager Properties dialog box.
Defining actions for the FormManager DTC
Now that we have defined our modes, we can define the actions for them. Figure 9-5 shows the Form Mode tab of the FormManager Properties dialog box with actions defined for the Modify mode. You can display the actions for a mode by selecting the mode in the Form Mode list. The actions will display in the Actions Performed For Mode grid.
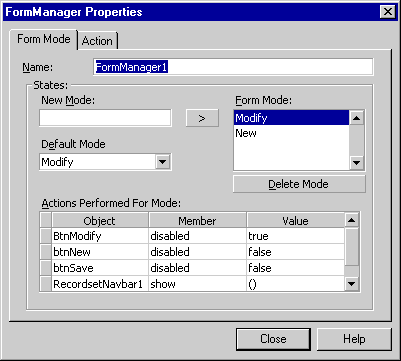
Figure 9-5. The FormMode tab of the FormManager Properties dialog box with actions defined.
The actions occur when the mode becomes active. For instance, when the Modify mode becomes active, the properties shown in Figure 9-5 are set.
To define actions for a mode:
- Select the mode in the Form Mode list.
- Click in the first Object cell to activate it, and then select the object you wish to use from the drop-down list.
- Tab to the Member cell.
- Select the member (method or property) to use from the drop-down list.
- Tab to the Value cell.
- Enter the value for the property or method.
Defining transition actions for the FormManager DTC
When our mode actions have been defined, we can define the transition actions. Your transition actions can do several things. First you will define a Form Mode Transition for each mode that performs the change to the new mode. For instance, Figure 9-6 shows the Action tab of the FormManager Properties dialog box for the FormManager DTC in our sample. You can see that we have a Form Mode Transition defined for each of our modes (New and Modify). In addition, we have a third and fourth transition defined for Modify and New mode when the user clicks the Save button.

Figure 9-6. The Action tab of the FormManager Properties dialog box.
You can also define actions that take place before the transition occurs. This is extremely useful in database operations. In Figure 9-6, notice that we have selected the first Modify mode line in the Form Mode Transitions grid. This displays the corresponding actions that occur before that transition occurs in the Actions Performed Before Transition grid. In this example, the rsCustomer.addRecord method will execute when the user clicks the New button. Clicking the second Modify mode line in the top grid would show that the rsCustomer.updateRecord method is executed when the user clicks the Save button. The same is true for the New mode line in the top grid when the user clicks the Save button.
This example demonstrates the power of the FormManager DTC. No code actually has to be written on the page to achieve this type of functionality. Everything has been accomplished using the Recordset, Button, Textbox, RecordsetNavbar and FormManager DTCs. Of course, you can also add your own custom code to the ASP Web page to extend the functionality by adding data validation checks and so on. The FormManager DTC allows you to create the basic wiring for your dynamic, data-driven forms automatically and to concentrate on the specific business rules for your applications—thus increasing your productivity.
EAN: 2147483647
Pages: 143