Dynamic Content
Now that we've seen some code examples that change the style and position of elements on the screen, let's take a look at some examples that change the actual content that is displayed on the screen. Obviously, when dealing with content, we need to be able to change both the text that appears on the screen and its formatting. We therefore need to be able to change not only text itself but also the HTML tags that control the formatting of the text.
The following example shows how to change the text and HTML formatting of various textual elements on the screen. Figure 7-6 comes from the DynamicContent.htm file in the Chap07 folder on the CD-ROM.
Figure 7-6. DHTML code showing how to change the text and formatting of several elements on a page.
<HTML> <HEAD> <META NAME="GENERATOR" Content="Microsoft Visual Studio 6.0"> <TITLE>Dynamic Content</TITLE> <SCRIPT LANGUAGE="JScript"> function changeMe() { document.all.MyHeading.outerHTML = "<H1 ID=MyHeading>Dynamic HTML!</H1>"; document.all.MyHeading.style.color = "red"; document.all.MyText.innerText = "This text was altered using the innerText property."; document.all.MyText.align = "center"; document.body.insertAdjacentHTML("BeforeEnd", "<P ALIGN=\"center\">This text was added using the insertAdjacentHTML property!</P>"); } </SCRIPT> </HEAD> <BODY TOPMARGIN=0 BGPROPERTIES="FIXED" BGCOLOR="#FFFFFF" LINK="#000000" VLINK="#808080" ALINK="#000000" onclick="changeMe()"> <H2 ID=MyHeading>Dynamic HTML - Dynamic Content Example</H2> <HR> <P ID=MyText>Click anywhere on this page.</P> </BODY> </HTML> When this code is executed in the browser, you'll notice that the heading is changed in several ways. The color, text, and formatting are changed using the style.color property and the outerHTML property. Also, the alignment of text is changed by using the align property and some new text is added to the document by using the insertAdjacentHTML method.
The insertAdjacentHTML method has the following syntax:
object.insertAdjacentText(where, text)
Table 7-1 lists the where parameters for this method and their effects.
Table 7-1. Parameters for the insertAdjacentHTML method.
| Parameter | Description |
|---|---|
| BeforeBegin | Inserts the text immediately before the element |
| AfterBegin | Inserts the text after the start of the element but before all other content in the element |
| BeforeEnd | Inserts the text immediately before the end of the element but after all other content in the element |
| AfterEnd | Inserts the text immediately after the end of the element |
The next example, shown in Figure 7-7, is intended to demonstrate some of the differences between the following properties: innerText, outerText, innerHTML, and outerHTML. The following list describes how each of these properties can be applied:
- innerText Sets or retrieves the text between the start and end tags of the current element
- outerText Sets or retrieves the text of the current element
- innerHTML Sets or retrieves the HTML between the start and end tags of the current element
- outerHTML Sets or retrieves the current element and its content in HTML
These properties are useful in manipulating content within a document.
Figure 7-7. DHTML code illustrating the differences between the innerText, outerText, innerHTML, and outerHTML properties for manipulating content within the browser.
<HTML> <HEAD> <META NAME="GENERATOR" Content="Microsoft Visual Studio 6.0"> <TITLE>Dynamic Content</TITLE> <SCRIPT ID=clientEventHandlersJS LANGUAGE=javascript> <!-- function submit1_onclick() { document.all.MyText.innerText = "Changed using innerText"; } function submit2_onclick() { document.all.MyText.outerText = "Changed using outerText"; alert("You'll need to click Refresh to get the ID property back or you'll get an error!"); } function submit3_onclick() { document.all.MyText.innerHTML = "<B><I>Changed using innerHTML</B></I>"; } function submit4_onclick() { document.all.MyText.outerHTML = "<H4 ID=MyText><U>Changed using outerHTML</U></H4>"; } //--> </SCRIPT> </HEAD> <BODY TOPMARGIN=0 BGPROPERTIES="FIXED" BGCOLOR="#FFFFFF" LINK="#000000" VLINK="#808080" ALINK="#000000"> <H2>Dynamic HTML - Dynamic Content Example</H2> <HR> <H3 ID=MyText>Example showing functionality of innerText, outerText, innerHTML, and outerHTML.</H3> <HR> <INPUT type="submit" value="innerText" id=submit1 name=submit1 LANGUAGE=javascript onclick="return submit1_onclick()"> Changes the text only <P> <INPUT type="submit" value="outerText" id=submit2 name=submit2 LANGUAGE=javascript onclick="return submit2_onclick()"> Changes the HTML and text and replaces with just text <P> <INPUT type="submit" value="innerHTML" id=submit3 name=submit3 LANGUAGE=javascript onclick="return submit3_onclick()"> Changes the text and adds HTML tags; does not change current HTML tags <P> <INPUT type="submit" value="outerHTML" id=submit4 name=submit4 LANGUAGE=javascript onclick="return submit4_onclick()"> Changes the text and the HTML <HR> </BODY> </HTML> Figure 7-7 allows you to experiment with these various properties and see how the text within the browser is altered. The code comes from the DynamicContent2.htm file in the Chap07 folder on the CD-ROM. Note that if you choose the outerText property you'll lose the ID of the text element and you'll need to refresh the page to be able to continue applying various properties. The reason for this is that the outerText property replaces both the text of the element and its surrounding HTML so that the ID attribute is replaced along with all the rest of the HTML formatting.
Figure 7-8 shows the view within Visual InterDev 6.0 when running this code sample.
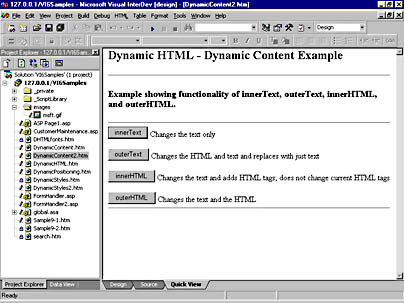
Figure 7-8. The output of DynamicContent2.htm.
Note
The innerText, outerText, innerHTML, and outerHTML properties do not apply to text elements only. For example, the outerText property applies to the following HTML elements: A, ACRONYM, ADDRESS, APPLET, AREA, B, BGSOUND, BIG, BLOCKQUOTE, BR, BUTTON, CENTER, CITE, CODE, COMMENT, DD, DEL, DFN, DIR, DIV, DL, DT, EM, EMBED, FIELDSET, FONT, FORM, H1, H2, H3, H4, H5, H6, HR, I, IFRAME, IMG, INPUT, INS, KBD, LABEL, LEGEND, LI, LISTING, MAP, MARQUEE, MENU, OBJECT, OL, P, PLAINTEXT, PRE, Q, S, SAMP, SELECT, SMALL, SPAN, STRIKE, STRONG, SUB, SUP, TABLE, TEXTAREA, TT, U, UL, VAR, XMP. See the Visual InterDev online documentation for complete details of which property supports which HTML elements.
Using Design View with DHTML
Visual InterDev 6.0 supports DHTML in Microsoft Internet Explorer 4 (or any other DHTML-capable browser). The Visual InterDev 6.0 editor helps you create script for DHTML objects and events by presenting statement-completion options for the object model, and also by displaying the object model hierarchy in the Script Outline window. As well as scripting directly to the Internet Explorer 4 object model, you can choose to have your design-time controls (DTCs) create client-side data-binding script.
There are two ways to place controls on the page from the Toolbox: either drag them from the Toolbox or double-click them (placing the control in the upper left corner of the page).
One of the nicest features of DHTML is the ability to absolutely position elements on a page. Once a control is on the page, it can be absolutely positioned by dragging it to a new location. However, you need to turn this capability on before it will work. The Design toolbar, shown in Figure 7-9, contains the key. By first selecting the control you are interested in, and then clicking the Absolute Positioning button on the toolbar, you can position the control anywhere on the page.
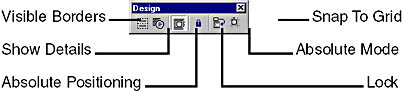
Figure 7-9. The Design toolbar.
Remember that the Design toolbar is active only while you are viewing the Design tab. (It's easy to Quick View the page and then wonder why the toolbar isn't active.) Also, the control you wish to place absolutely needs to be selected with the four-headed arrow (by moving the pointer over the control border) before the Absolute Positioning button will be active.
Here's a little shortcut that can save you time when you are adding a lot of controls to a page. Activate Absolute Mode by clicking the Absolute Mode button on the Design toolbar. In Absolute Mode, if you place controls on a page by double-clicking, it won't have any effect—the controls will still appear in the upper left corner of the page. However, if you drag them from the Toolbox, they'll stay right where you drop them.
Want to see where breaks and other nonvisual HTML elements are placed? No problem. Use the Show Details button on the Design toolbar and glyphs for nonvisual elements will appear.
Unfortunately, DTCs cannot be absolutely positioned (as evidenced by the fact that none of the Design toolbar buttons are enabled when working with DTCs). In order to absolutely position DTCs you'll need to resort to the old HTML table tricks.
EAN: 2147483647
Pages: 143