XML Serialization at Work in ASP.NET
| only for RuBoard |
Demonstrations and examples can only remain interesting for so long before most people start looking for something more substantial. In this section, we put XML serialization to work in a tool that some of our readers might find useful in their own ASP.NET projects.
Creating and Modifying an XML-Based Menu Using Serialization
Now that you're familiar with what's involved in XML serialization, you can make something useful out of the MenuLink class that was introduced earlier in this chapter. Specifically , you'll build an XML-based menuing system for ASP.NET that uses XML serialization to both edit and display the menu.
Source Code AvailabilityDue to space constraints, the full source code for the menuing system outlined in this section is not included in this chapter; however, it is available for download from this book's website, located at www.xmlandasp.net. |
Requirements for a Menuing System
Before you begin, let's examine the requirements for the menuing system:
-
The menu data should be stored in XML so that the menu contents are independent of the menu format and to allow for easy editing of the menu, either manually or with a tool.
-
The menu data must be cached in memory to improve performance, but any changes to the underlying XML data needs to be reflected immediately in the menu.
-
We want to be able to read and modify the menu data in an object-oriented fashion without touching the XML directly.
-
The menu itself must allow for internal links that open in the same browser window, external links that open in a new browser window, and separators to allow for grouping of menu items.
Getting Started
If you're coding along as you read, the remainder of this chapter assumes that you're working with a single solution that contains two projects: a C# class library project called XMLMenu and a C# web application called XMLSerialization . The web application project needs to have a reference to the class library project. To save space, we cover the important classes and techniques involved, but will not offer a step-by-step walk-through for creating every single file. You're welcome to code as you read, but you might want to retrieve the full source code for this section from this book's website, located at www.xmlandasp.net, and follow along with that instead. If you do code while you read, most of the listings in this section focus on the code rather than on the framework around the code, and omit many repetitive elements, such as the using statements, that are required to compile the code as listed.
Creating the MenuItems
Let's start with the last bulleted item in the section, "Requirements for a Menuing System": We need internal and external links and separators for grouping menu items. The MenuLink class that you used at the beginning of this chapter already has an IsExternal property that you'll be able to make good use of later, but it has no provisions for a menu separator. Rather than add this to the existing MenuLink class, you'll create a MenuSeparator class that you can use to mark the location of a separator in the menu. However, it would be helpful to treat both classes the same way and, because both links and separators are types of menu items, our first step is to create a MenuItem base class from which both MenuLink and MenuSeparator can inherit. In just a bit, you'll see what this inheritance structure gives us.
The first step to creating the MenuItems is an easy one. Add a new class file to our XMLMenu class library project and name the file MenuItem.cs . The class definition should look like this:
public abstract class MenuItem { } That's all there is to the MenuItem class at this point. It's an abstract class, which means that you cannot create an instance of the class itself. Its only purpose is to serve as a common base class for both MenuLink and MenuSeparator .If MenuLink and MenuSeparator had any properties in common, you would define them in this class to ensure that all classes that inherit from MenuItem implement those properties; in this case, you can see that none are necessary.
Now you can define the MenuSeparator , which is almost as simple as MenuItem because its only role is to serve as a placeholder. You'll implement it as an empty class that inherits from MenuItem .
Simply add a class file, called MenuSeparator , to the XMLMenu project. The class definition should look like this:
public class MenuSeparator : MenuItem { } Now you can focus on the MenuLink class. This class is almost identical to the version used earlier in this chapter, but it inherits from MenuItem and includes some additional overloads to the constructor to make creating new menu links more convenient . Add a new class file, called MenuLink , to the XMLMenu project. The class definition is shown in Listing 10.5.
Listing 10.5 The MenuLink Class
public class MenuLink : MenuItem { private string _Url, _Title, _ToolTip; private bool _IsExternal; public MenuLink() { _Url = ""; _Title = ""; _ToolTip = ""; _IsExternal = false; } public MenuLink(string Url, string Title) { _Url = Url; _Title = Title; _ToolTip = ""; _IsExternal = false; } public MenuLink(string Url, string Title, bool IsExternal) { _Url = Url; _Title = Title; IsExternal = IsExternal; _ToolTip = ""; } public MenuLink(string Url, string Title, string ToolTip, bool IsExternal) { _Url = Url; _Title = Title; _ToolTip = ToolTip; _IsExternal = IsExternal; } public string Url { get { return _Url; } set { _Url = value; } } public string Title { get { return _Title; } set { _Title = value; } } public string ToolTip { get { return _ToolTip; } set { _ToolTip = value; } } [XmlAttribute] public bool IsExternal { get { return _IsExternal; } set { _IsExternal = value; } } } Creating a MenuManager
We now have classes for the individual items in a menu, but we have no way of managing the individual menu items as an entity, so that becomes your next task. You'll create a class called MenuManager that's responsible for managing the menu as a whole. This class needs to keep track of all the individual menu items, handle adding and removing menu items, and returning the full list of menu items as an array of MenuItem objects. It needs to have built-in methods for loading the menu by deserializing it from an XML file, and for saving the menu back out to an XML file. You'll store the individual menu items in an ArrayList object, providing wrapper methods for most of the ArrayList methods. However, the wrapper methods only accepts objects of type MenuItem, or any class that inherits from MenuItem .
Add a new class file called MenuManager to the XMLMenu project. Listing 10.6 shows the portion of the MenuManager code that handles the ArrayList , which stores the MenuItems .
Listing 10.6 A Partial Listing of the MenuManager Class
public class MenuManager { private ArrayList m_MenuItems; public MenuManager() { m_MenuItems = new ArrayList(); } public int Add(MenuItem item) { return m_MenuItems.Add(item); } public void AddRange(MenuItem[] items) { m_MenuItems.AddRange(items); } public void Remove(MenuItem item) { m_MenuItems.Remove(item); } public void RemoveAt(int index) { m_MenuItems.RemoveAt(index); } public void Clear() { m_MenuItems.Clear(); } public void Insert(int index, MenuItem item) { m_MenuItems.Insert(index, item); } public int IndexOf(MenuItem item) { return m_MenuItems.IndexOf(item); } public int Count { get { return m_MenuItems.Count; } } } As you can see, a private ArrayList field called m_MenuItems is followed by a series of simple wrapper methods for the built-in ArrayList methods, which differ from the ArrayList methods in that they accept only MenuItem objects. This gives our MenuManager class all the flexibility and performance of an ArrayList , while ensuring that only classes that inherit from MenuItem can be used with it. Now you can add code to the class specifically for the menu, and for serialization and deserialization. Start with a read-only Items property that returns an array of MenuItem objects (which can, in reality, be either MenuLinks or MenuSeparators ). The following code must be inserted into the MenuManager class after the Count property:
public MenuItem[] Items { get { return (MenuItem[])_MenuItems.ToArray(typeof(MenuItem)); } } Next, you need a method for saving the in-memory array of MenuItem objects to disk as XML. This is similar to the XML serialization already covered, except that this time, we're going to serialize an array. The following Save method must also be added to the existing MenuManager class:
public void Save(string path) { // Lock to prevent multiple instances of // MenuManager from saving to the same file // at the same time. lock (path) { if (File.Exists(path)) File.Delete(path); XmlSerializer serializer = new XmlSerializer(typeof(MenuItem[])); FileStream fs = new FileStream(path, FileMode.Create, FileAccess.Write,  FileShare.Read); XmlTextWriter writer = new XmlTextWriter(fs, Encoding.UTF8); writer.Formatting = Formatting.Indented; try { serializer.Serialize(writer, this.Items); } finally { writer.Close(); } } }
 The first thing that you'll notice about this method is that the entire thing is enclosed in a lock statement. The lock statement, briefly , makes sure that a section of code cannot be executed by multiple threads at the same time. In this case, because you're locking on the path string passed into the method as the location to save the menu to, you can ensure that multiple instances of the MenuManager class do not try to save to the same file simultaneously , which can result in a collision and one of those nasty, hard-to-reproduce errors that nobody wants in their applications.
The next important difference from the XML serialization code you've examined previously is that you're passing the Type object for an array of MenuItem objects into the XmlSerializer constructor. Recall that the XmlSerializer needs to know about the classes it will be expected to serialize, which, in this case, is an array rather than a single class. However, our array of MenuItem objects actually contains only objects that are inherited from MenuItem (either MenuLink or MenuSeparator ). If you tried to run this code as it stands, it wouldn't work because the XmlSerializer doesn't know anything about those two classes. To correct this, you must go back to the definition of the MenuItem class and add the following code:
using System.Xml.Serialization; [XmlInclude(typeof(MenuLink)), XmlInclude(typeof(MenuSeparator))] public abstract class MenuItem { } As you can see, two XmlInclude attributes have been added to the class definition, one for each of the derived classes that the XmlSerializer needs to know about. This is exactly what the XmlInclude attribute is for ”it notifies the XmlSerializer which derived classes it should recognize when presented with the base class.
Now you can return to the MenuManager class and create a method to deserialize the menu from an XML file into live objects with which you can work:
public MenuItem[] Load(string path) { XmlSerializer serializer = new XmlSerializer(typeof(MenuItem[])); FileStream fs = File.OpenRead(path); MenuItem[] loadedItems; try { loadedItems = (MenuItem[])serializer.Deserialize(fs); } finally { fs.Close(); } this.AddRange(loadedItems); return loadedItems; } In this method, you deserialize the XML file into an array of MenuItem objects and then load the array into the internal ArrayList of the MenuManager by using the AddRange method, as well as returning it from the method. Add one more method to this class, purely for the sake of moving the example along. Add a GenerateMenu method that simply populates the menu with a series of default hard-coded menu items. In a real application, this method would most likely be replaced with an administrative tool for adding new menu items and editing or removing existing items:
public void GenerateMenu() { this.Add(new MenuLink("  /Default.aspx, "Home", "Click here to return to the home page.", false)); this.Add(new MenuLink(" /ViewXML.aspx, "View XML Source", "Click here to view the XML source behind the menu.", false)); this.Add(new MenuLink(" /EditMenu.aspx, "Edit Menu", "Click here to edit the menu.", false)); this.Add(new MenuSeparator()); this.Add(new MenuLink("http://www.newriders.com", "New Riders", true)); this.Add(new MenuLink("http://www.microsoft.com/net", "Microsoft .NET", true)); this.Add(new MenuLink("http://www.gotdotnet.com", "GotDotNet", true)); this.Add(new MenuSeparator()); // the Url can be a client-side JavaScript call, as well as an actual URL: this.Add(new MenuLink("javascript:window.close();", "Close Window", "Click here to close this window.", false)); }
 Listing 10.7 shows what the menu created by the GenerateMenu method looks like when it's serialized to XML.
Listing 10.7 The Default Menu, Serialized to XML
<?xml version="1.0" encoding="utf-8"?> <ArrayOfMenuItem xmlns:xsd="http://www.w3.org/2001/XMLSchema" xmlns:xsi="http://www.w3.org/2001/XMLSchema-instance"> <MenuItem xsi:type="MenuLink" IsExternal="false"> <Url>
As you can see, serializing an array of derived objects is slightly different from serializing a single object. The root element of the XML document becomes ArrayOfMenuItem , while the individual menu items are not MenuLink and MenuSeparator elements; instead, they're all MenuItem elements with an xsi:type attribute that indicates what the true underlying object type should be.
If you reexamine the requirements for the XML-based menu, you have three main tasks left to complete: display, cache, and edit the menu.
Displaying, Caching, and Editing the Menu
Now that you're finished adding code to the XMLMenu class library project, the remainder of your work will be with the XMLSerialization web application project, which should have a project reference to the XMLMenu project.
You can take care of displaying and caching the menu by creating a UserControl , which has the additional advantage of making it easy to include the same menu in multiple pages on a site. You'll create a new UserControl in the XMLSerialization project, and call it Menu.ascx . Then, you'll place a panel control in the .ascx file and put all the code for loading the menu, caching it, and displaying it in the code-behind file for the control.
Here's the panel control into which the menu items will be inserted:
<asp:Panel runat="server" id="MenuPanel" BackColor="LightGray" BorderColor="Black" BorderStyle="Dotted" BorderWidth="1px" Width="150px" Style="padding:4px"> </asp:Panel>
This defines the visual look for the menu and can be modified to fit the design of most sites with minimal effort. The next step: Add the code that does the actual work in the control to the code-behind file, Menu.ascx.cs . In the event handler for the Page.Init event, you'll add the code to load the menu data from the XML file. In the following example, you're storing the menu data in a file called Menu.config because ASP.NET automatically denies access to browsers that attempt to download any file with a config extension ”you want people to view the menu, not download its XML source code:
private void Page_Init(object sender, EventArgs e) { // // CODEGEN: This call is required by the ASP.NET Web Form Designer. // InitializeComponent(); // attempt to retrieve menu contents from cache MenuItem[] items = (MenuItem[])Page.Cache["MenuItems"]; if (items == null) { // menu items were not in cache, so load from disk string filePath = Server.MapPath(" /Menu.config); MenuManager manager = new MenuManager(); items = manager.Load(filePath); // place into cache with a dependency on the file we just loaded Page.Cache.Insert("MenuItems", items, new CacheDependency (filePath)); } this.DisplayMenuItems(items); } This code is responsible for retrieving an array of MenuItem objects and passing that array to the DisplayMenuItems method, which you'll write later in this section. It also takes care of caching the loaded array of MenuItems in the ASP.NET Cache object.
The first thing this method does (after the call to InitializeComponent inserted by Visual Studio .NET) is attempt to load an array of menu items out of the cache object. If the returned value is null , the array you're looking for is not in the cache, so it must be loaded from disk. Instantiate the MenuManager class and call its Load method, passing it the path to the Menu.config file. When you have the deserialized array of menu items, insert it into the cache with a dependency on the file from which you just loaded. The cache dependency ensures that the moment the underlying XML file is modified, the cached array is invalidated, forcing it to be reloaded from the file.
This technique gives a good combination of performance and responsiveness because the XML file needs be parsed only once each time it's modified, with the menu being served from the in-memory cache of MenuItem objects at all other times.
The last step in this method is to pass the MenuItem array (whether loaded from disk or retrieved from the cache) to the DisplayMenuItems method. This method, shown in Listing 10.8, needs to be included directly in the Menu.ascx.cs file with which you are currently working.
Listing 10.8 The DisplayMenuItems Method
private void DisplayMenuItems(MenuItem[] items) { MenuLink thisLink; PlaceHolder holder = null; foreach (MenuItem item in items) { thisLink = item as MenuLink; if (thisLink == null) { // Current item is not a MenuLink, // so it must be a MenuSeparator. // Separators should only be displayed // if they are followed by a menu item, // so insert a placeholder for now and // keep a reference to it. holder = new PlaceHolder(); MenuPanel.Controls.Add(holder); } else { // Current item is a MenuLink object - create // a HyperLink and add it to the output. HyperLink link = new HyperLink(); link.NavigateUrl = thisLink.Url; link.Text = thisLink.Title; link.ToolTip = thisLink.ToolTip; // set external links to open in a new browser window if (thisLink.IsExternal) link.Target = "_blank"; MenuPanel.Controls.Add(link); MenuPanel.Controls.Add(new LiteralControl("<br />\n")); // if we have any current placeholders for a menu separator, // insert an HR tag into the placeholder if (holder != null) { holder.Controls.Add(new LiteralControl("<hr noshade color=\"#000000\" size=\"1\" />\n")); holder = null; } } } } The DisplayMenuItems method is simple in concept, but its execution bears explanation. Conceptually, this method loops through the array of MenuItem objects passed to it, figures out if each object is actually a MenuLink or a MenuSeparator , and adds an ASP.NET HyperLink control to the menu for each MenuLink and a horizontal rule for each MenuSeparator . First off, these two code lines declare some variables that are reused multiple times as you loop through the menu items:
MenuLink thisLink; PlaceHolder holder = null;
Next, you use the C# as operator to cast the current MenuItem to a MenuLink . The as operator works better for this operation than a normal cast because a normal cast would throw an exception if the underlying object were actually a MenuSeparator and you tried to cast it to a MenuLink . The as operator, however, simply returns null if the object that you're trying to cast to a MenuLink is actually a MenuSeparator . In this way, you can simply check to see if thisLink is null to determine what type of object you're working with. If it's null ,you have a MenuSeparator ; if it's not null , thisLink is ready to go with all the properties that you need to insert into the HyperLink control:
thisLink = item as MenuLink;
The rest of the code in this method is fairly straight forward, except for one detail. Rather than simply inserting a horizontal rule for each MenuSeparator that you encounter, you only want to display the separators that are followed by a MenuLink . This feature would be particularly useful if this example were extended in a real application so that MenuLink objects had additional properties that determined which users had permission to view certain links. In that case, a MenuLink between two separators might not be visible to some users. This code would prevent two consecutive separators from being displayed to those users. This is accomplished by inserting a PlaceHolder control into the output every time you encounter a MenuSeparator, holding onto a reference to that PlaceHolder, and inserting the horizontal rule into the PlaceHolder only when you next encounter a MenuLink .
You are now finished with everything that you need to display the menu. Using the completed Menu control requires only two lines of code on any page that needs a menu ”one line to register the control with a particular tag prefix:
<%@ Register TagPrefix="nr" TagName="Menu" Src="
and one line of code to insert the menu into the page in the location you want it to appear:
<nr:Menu runat="server" />
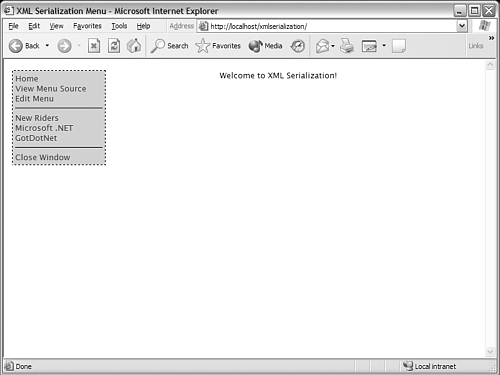
Figure 10.1 shows what the output from the menu looks like, using the default Menu.config that was generated earlier.
Figure 10.1. The completed menu control can be used on multiple pages.
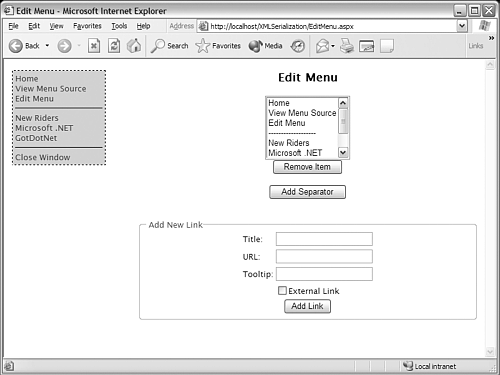
The only remaining feature from the requirements is the ability to modify the menu. You'll create a simple web-based interface for editing the menu, but for the sake of brevity, we omit the HTML code and focus on the code that actually manipulates the menu. You can download the full source code from this book's website, located at www.xmlandasp.net.
The menu-editing page consists of a simple list box with all the menu items in it: a button to remove the currently selected menu item, a button to add a separator to the menu, and a form to add a new link to the menu. You can see this interface in Figure 10.2.
Figure 10.2. A simple interface for modifying the menu.
The code to manipulate the menu consists of four methods. One method populates the list box (called CurrentMenu in this code) with the current menu items:
private void PopulateMenu() { // clear any items currently in the list box CurrentMenu.Items.Clear(); // instantiate a MenuManager and load the menu from the config file MenuManager manager = new MenuManager(); string filePath = Server.MapPath(" /Menu.config); MenuItem[] items = manager.Load(filePath); // populate the ListBox MenuLink thisLink; for (int i=0; i < items.Length; i++) { thisLink = items[i] as MenuLink; if (thisLink == null) { // item is not a MenuLink, so it must be a MenuSeparator CurrentMenu.Items.Add(new ListItem("-------------------", i.ToString())); } else { // add the title of the current link to the list box CurrentMenu.Items.Add(new ListItem(thisLink.Title, i.ToString())); } } } The second method removes the currently selected item in the list box from the menu:
private void Remove_Click(object sender, System.EventArgs e) { if (CurrentMenu.SelectedIndex != -1) { // instantiate a MenuManager and load the menu from the config file MenuManager manager = new MenuManager(); string filePath = Server.MapPath(" /Menu.config); manager.Load(filePath); // The index number for the menu and for the List Box should be // identical, so we'll simply remove the corresponding item // from the menu. manager.RemoveAt(CurrentMenu.SelectedIndex); // save our changes manager.Save(filePath); // repopulate the list box with our changes PopulateMenu(); } } The third method adds a MenuSeparator to the end of the menu:
private void AddSeparator_Click(object sender, System.EventArgs e) { // instantiate a MenuManager and load the menu from the config file MenuManager manager = new MenuManager(); string filePath = Server.MapPath(" /Menu.config); manager.Load(filePath); // add a MenuSeparator manager.Add(new MenuSeparator()); // save our changes manager.Save(filePath); // repopulate the list box with our changes PopulateMenu(); } The fourth and final method creates a new MenuLink object from the values entered into the form and adds it to the end of the menu:
private void AddLink_Click(object sender, System.EventArgs e) { // instantiate a MenuManager and load the menu from the config file MenuManager manager = new MenuManager(); string filePath = Server.MapPath(" /Menu.config); manager.Load(filePath); // create and populate a new MenuLink MenuLink link = new MenuLink(); link.Title = Title.Text; link.Url = URL.Text; link.ToolTip = ToolTip.Text; link.IsExternal = IsExternal.Checked; // add the new link to the menu manager.Add(link); // save our changes manager.Save(filePath); // repopulate the list box with our changes PopulateMenu(); } My Changes Didn't Show Up!If you downloaded the sample code to manipulate the menu and tried running it, you might have noticed that your changes are not immediately reflected in the live menu on the left (refer to Figure 10.2). The reason for this: The methods that modify the menu aren't executed until after the menu has been loaded in the sequence of events that make up the page execution life cycle. All subsequent page loads for yourself or any other user reflects the changes. |
Completing the Menu Editor
In a real application, you would probably want to further enhance the editing tool by allowing new items to be inserted at specific locations in the menu (by using MenuManager.Insert ) rather than always at the end, and also allowing the user to change the order of items in the menu (by using MenuManager.RemoveAt and MenuManager.Insert ). Alternatively, if the menu isn't expected to change often, you might be happy with simply manually editing the Menu.config file when it needs to be modified.
| only for RuBoard |
EAN: N/A
Pages: 184