Lens Fills
|
| < Day Day Up > |
|
Lenses don't get used often enough. FreeHand has had them since version 8, and it introduced artists to transparency in vector art. A lens fill can only be applied to open or closed paths. To clarify that statement, if you elect to use Show Fill for New Open Paths in the Preferences menu, a fill appears as soon as you draw the third point in a path. I keep this option turned off so I can see what I'm drawing, but if you have it turned on, you can have any type of fill you want, including another lens fill.
At any rate, the lens fill is capable of doing many things, and an object can be covered with Lens fill effects up to eight deep. The ninth lens fill negates the bottom fill in the drawing stack. These fills are usually placed above other objects in your drawing or layout because they affect anything beneath themselves. All lens fills convert spot colors to CMYK values for printing. This isn't a concern if you're working for the Web, but it's a good thing to remember if you're printing a map or brochure. Keep in mind that this is a very memory-intensive operation, and you can choke the best printer if you have too many effects going at the same time. You're better off thinking the project out a little and being efficient in your drawing. A lens fill can create any and all of the following effects:
-
Transparency — Using this fill gives the appearance of taking a sheet of colored cellophane or plastic and placing it over the other objects in your layout. You can choose any color you want, and adjust the amount of transparency — zero shows no effect at all, 100 percent is opaque color.
-
Magnify — This lens is great for enlarging areas of a drawing or map for clarity. You magnify objects under the lens by entering a number from 1 to 100 in the text field, or moving the slider. The results of a high enlargement will amaze you (see Figure 7-4).

Figure 7-4: The text above the heron's head on the right was 1.5-point before converting to paths. Notice how well it enlarges (700 percent) with the Magnify Lens fill. -
Invert — If you ever need to invert the colors of part of your drawing, choose this type of lens fill. It turns blue into yellow, red into green — simply changes colors to their complementary colors on the color wheel. Remember, this will be CMYK.
-
Lighten — You can use this lens as a device to create depth, brightness from an external light source, or in text that has been converted to paths and placed over elements in an illustration. A setting of zero creates no change; 100 percent creates a totally white overlay.
-
Darken — This lens adds black to colors (including the background color or white), darkening everything beneath the lens by the percentage you choose.
-
Monochrome — The monochrome lens fill changes everything under the lens to varying shades of the color you've chosen. A multicolored drawing will appear as if it were done in black and white and printed in your chosen color.
A lens fill cannot be applied to everything. You cannot get a lens fill effect on an EPS file, or on a clipping path. You won't see any difference if you apply a lens fill to live text. However, if you convert the text to paths, its fill can be a lens fill. Remember to keep a live version of the text somewhere safe on another page or on the Pasteboard in case you need to make changes or adjustments in fonts later.
In the Lens Fill panel, you have the following three options to check:
-
Centerpoint is a fairly easy concept to follow. When you choose a lens fill, you can decide to have the fill apply to objects immediately beneath the fill, or you can select an object elsewhere on the document as the subject of the fill. The first fill method uses the fill just as you would any other fill, but the second method requires the Centerpoint. Click this check box, and a small diamond cluster (identical to the Paste Inside centerpoint) appears in the middle of the object that is being filled. Use the Pointer tool to move the centerpoint over another area of the document, and that area appears in your lens-filled object — with the adjustments dictated by the type of lens you've chosen. You can see where the various centerpoints were placed on each of the eight lenses in Figure 7-5. After you apply a lens fill to an object using Centerpoint, you can move the object anywhere in the document and the centerpoint remains fixed; the image in the lens fill continues showing the image around the centerpoint.
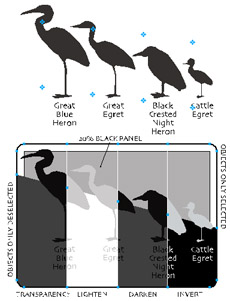
Figure 7-5: A screenshot of eight lens fills and their respective centerpoints -
Snapshot is a neat feature, but requires caution because changes to the original elements affected by the lens will not change in the lens fill — that's why it's called a snapshot. For example, consider that you are designing three boxes of wine, and the company wants to use vector art instead of photography. You could draw the first comprehensive layout (comp) with Chablis in the dynamically tilted wineglass, and place a lens fill on another page that will be printed for the client to discuss. Using the Centerpoint option to align the graphics and Snapshot, the wine in the lens fill remains Chablis as you make changes for the Rosé and Burgundy versions. Consequently, you could make changes in the name and color in the original comp, and have all three boxes (as snapshots) lined up for review. If you made a change in the comp — such as the client's new Blue Blush wine that will replace Rosé — just clicking the Snapshot option off, to deselect it, turns the lens back into a live lens.
-
Objects Only is a little tougher to explain, but easy to see. When this option is selected, only objects within the lens outline are affected — empty areas are transparent. A solid-colored background is considered an object; the document background is not. When it is deselected, the lens effect fills the entire lens area without regard to elements beneath the lens, as demonstrated in Figure 7-6. The birds at the top of the figure are printed at 85 percent black, and the text (converted to paths) is solid black. The rectangle at the bottom of the figure contains several elements. At the bottom of everything is a rectangle with a 20 percent black tone. The rounded-corner rectangle was drawn and divided into eight separate sections, with each section receiving a different lens fill combination. All have Centerpoint turned on to place the images correctly within the lens.
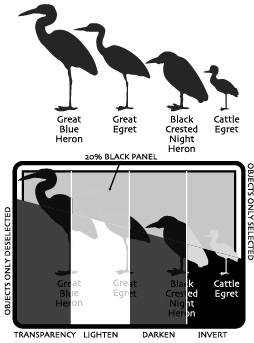
Figure 7-6: The effects of lens fill optionsThe top lenses are set with Objects Only selected, and you can plainly see the 20 percent tone in the background. This shows that only the objects in the area under the centerpoint have been used in the lens. The page's background appears transparent. The bottom lenses were built with Objects Only deselected. Here, you can see that the background area, as well as the objects, has been treated with the lens effect.
No gradient lens fills
As much as FreeHand artists would like to see it, a lens fill doesn't provide a way to get a gradient of any kind. Workarounds exist, but they stand a good chance of choking the printer, and aren't generally recommended. You can find workaround details at the FreeHand Source (www.freehandsource.com), where Ian Kelleiegh has compiled a large mass of FreeHand tricks.
I use the Lighten Lens to cover a photograph that I'm tracing. (I place it on a layer between the photo and my drawing and lock both the photo and Lens fill layers.) The reduced contrast makes it easier to see the paths that I'm drawing.
My friend uses Lens fills with Snapshot selected so she can make a dynamic master page layout of business cards. This would also work for disk labels or any other printing situation that requires duplicate multiple images.
-
Make a 2-inch by 3.5-inch page and lay out one business card with the information that is common to all the cards. Be sure to convert all text to paths, and keep a copy of the live text somewhere safe in the document in case you need to make changes later. You can also put guidelines where they're appropriate.
-
Add a letter-sized page, and place a vertical guideline at the center.
-
Draw a rectangular selection the same size as the business card, and give it the Magnify (set to 1), Lighten or Darken (set to zero), or Transparency (also set to zero) Lens fill.
-
Turn on Snapshot and Centerpoint.
Cloudy lens outlook?
You do stand the chance of ending up with an orphaned lens fill. That's when you have a document containing a lens fill, but the elements that make up the lens are not to be found. You can't ungroup it or split it, and a Cut Contents command does absolutely nothing. You can tell that there's a Paste Inside going on by the Centerpoint icon, but nothing seems to work. At that point, check the Fill panel and hope for a lens fill. Keep in mind that FreeHand enables you to export documents in older versions of FreeHand — even versions that didn't have lens fills.
Just export the orphaned lens as an older FreeHand file. Don't try to change the type of fill it is, or attempt to remove it — just choose File ® Export ® FreeHand 7. Because there were no lens fills at that time, the document works with what it has, which happens to end up being a simple clipping path. Open the new FreeHand 7 file in FreeHand 10, select the lens, and choose Edit ® Cut Contents. You get more than you bargained for — any element that was under the lens appears in this new document, and it is in its full, uncropped state. If the Magnify lens was used, the elements are enlarged to the extent the lens was set.
|
| < Day Day Up > |
|
EAN: 2147483647
Pages: 491