Side buttons
|
| < Day Day Up > |
|
Add the little buttons into the area you've been working on:
-
Draw an oval 22´22, no stroke, and a fill of dark gray.
-
In the Effects menu, choose Bevel and Emboss® Inner Bevel with these settings:
-
Bevel Edge: Smooth
-
Width: 4
-
Softness: 4
-
Angle: 134
-
-
Add an inner shadow with these settings:
-
Distance: 4
-
Softness: 3
-
Angle: 145
-
-
Use the Pen tool to add a small highlight at the top. Use the Air Brush Basic, size 2, white. Use the Path Scrubber Subtractive tool, and click each end once to taper it.
-
Clone, select the button, and the highlight and group. Position as shown in the following figure.

The buttons added and effects added to them -
For the inner sphere. draw an oval 13x13 with Basic, Soft Rounded stroke size 2, Edge 50, and black.
-
Use a Radial fill. Zoom in close. With the Pointer tool, select the object, and move the white portion to the top–left area.
-
With the Pen tool, draw a line, using a Basic Soft Rounded, white, size 3 stroke. Make the lines width 1 and place at the bottom of the sphere.
-
Clone the little line and change the stroke to 1 pixel and hard rounded. Set the width to 2. Make a clone and move it up to the top highlight area (see figure).

Highlights being added to the button -
Use the Pointer tool, drag around the sphere and highlights, and group them. Move into position in the document. Make a copy and position it on the right side.
The following figure shows the finished interface with a background added.
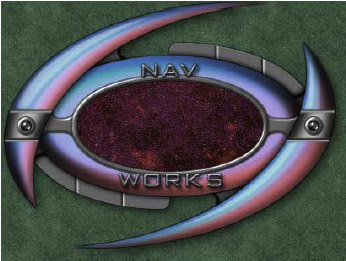
The finished interface
That's all you are going to do with this interface. By now, you should be able to add the buttons on your own.
|
| < Day Day Up > |
|
EAN: 2147483647
Pages: 491