Binding Data
|
| < Day Day Up > |
|
The purpose of your dynamic page is to allow partially undefined content to be defined on the fly by pulling selected content from a data source. In the case of a database, you must first create a recordset that includes any columns you need access to via the Applications panel group Bindings panel. The examples and exercises provided in the text files on the CD use a database but also make use of variables and form parameters.
Adding a recordset
Ideally, the logic required for your dynamic page has been carefully considered and planned. Recordsets are the result of queries, which can be simple or advanced. Dreamweaver makes either type of query easy to build, but you must know what you want to accomplish and what data columns you will need. For advanced queries, you must also plan whether data will need selective comparison. The type of query you build determines what data you'll have available in your page.
There are many methods to adding a recordset (resultset or dataset, as well) but the extensive scope of this book and the limited number of pages make examination of all an impossibility. Consult the program help files (Using Dreamweaver) for in-depth details and instructions. However, a typical simple scenario would be as follows:
-
Open your dynamic page.
-
In the Application panel group's Bindings panel click Add (+) to add a recordset.
-
Name the recordset.
Tip Typically, developers use the convention rsRecordName for easier code troubleshooting . You may use any name, but many developers use a name that reflects the function of the page, as in rsAddUser or rsViewMembers.
-
Select a connection from the Connection menu, or if you haven't already defined a connection string or DSN, click the Define button and do so.
-
Select a table from the Table menu, which is populated by all the tables in your database. (Remember that the connection string points to this database.)
-
Choose whether you need access to all the table columns, or just a selected set. If you choose a selected set, remove the unwanted columns by highlighting them and deleting. Figure 46-7 shows the Recordset dialog box with all data columns to be available.
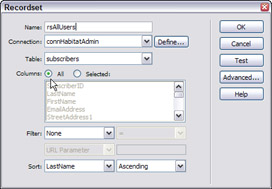
Figure 46-7: Making all data columns available to the pageTip You may select multiple contiguous columns by shift+clicking or noncontiguous columns by Control+clicking (Command-clicking).
-
If needed, you may filter or sort records; then click OK to close the dialog box.
On the CD-ROM See the exercise view_users.pdf in the chapter46_exercise files on the CD for steps to add a recordset to the
 view_users.asp page in the Administrative Intranet project site.
Filtering chooses records based on a specific column that is compared to another column from a URL parameter, form, session, or application variable or an entered value. A typical example might be filtering the data for records that match a ZIP code entered by the user, as you might to display only records that contain that specific ZIP code, or show only prices for a region that includes that ZIP code.
Sorting allows the data to be selectively displayed by one specific column in a chosen order, as in LastName, Ascending.
Advanced queries
More complex, advanced queries can be built in the Advanced screen of the Recordset dialog box. When the dialog box opens, click the Advanced button and add a name and select a connection. If you are familiar with using SQL to build queries, the SELECT, WHERE, and ORDER BY buttons can be used to build complex data sets. Figure 46-8 shows an advanced query that requests only records where the data field "AuthLevel" is equal to the value Admin. Advanced queries cannot be created in the Simple panel and after created, you cannot view the recordset in the Simple panel.
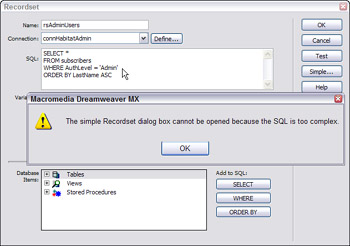
Figure 46-8: Complex queries built in the Advanced panel cannot be displayed with the Simple panel.
After you close the Recordset dialog box, you may view your data columns in the Bindings panel by clicking the Expand button next to the listed recordset. To copy a recordset from one page to another, first select the recordset in the Bindings panel or in the Server Behaviors panel. Right-click (Control+click) the recordset and choose Copy. In the destination page, open either the Binding or Server Behaviors panel, right-click (Control+click) and choose Paste. To remove a recordset, select it in the Bindings panel and use the Minus (-) button.
Form and URL parameters
Forms play a huge role in dynamic pages, enabling you to interact with or gather information from a site visitor. You can gather information from users and store it in the server's memory by submitting the form using either the POST or GET methods. A form sends the information either as form parameters or as URL parameters. If you set the form's method to POST, the browser includes the form's values in the body of the message sent to the server. If you set the form's method attribute to GET, the browser appends the form values to the URL specified in the action attribute and sends the information to the server when requesting the page.
| Cross-Reference | See Chapter 38 if you are unfamiliar with building a form. |
You can also send data to be stored in the server's memory by clicking a hypertext link. This creates a URL parameter.
How form and URL parameters work
Because each form object is named, form parameters pass data as objectname=enteredvalue. When a precise value is required, it is best to use a form object that does not allow the user to "decide" how to write the value. For example, if you need to have the two-letter "official" state postal abbreviation, don't let your visitor type it; provide a drop-down form menu object with a list of values that pass the exact (correct) value.
A URL parameter works by appending the name-value pair(s) to the URL of a requested page, taking the form of name=value. The parameter begins with a question mark (?) and each parameter is separated by an ampersand (&). Thus, a typical URL parameter might appear as follows:
http://server/path/document?firstname=firstvalue&secondname=secondvalue
You can use URL or form parameters in processing the requested page. For example, a cellular phone company might have users that want to see new plans offered on the Web site. If the company is national, it might offer different plans (with different phones and rates) depending upon where the user is located. The user's location can be determined with a ZIP code. The zip code parameter is passed containing the name-value (zipcode=value) which is stored (temporarily) in the server's memory. Processing of the requested "plans" page uses the URL parameter to choose and dynamically display plans (with the appropriate phones and rates) for the region which includes that ZIP code. A similar scenario can use form parameters to store a login name and password when a user accesses a restricted page.
Creating URL parameters
A URL parameter is created from form object values by using the GET method when submitting the form. Create your form, name your form objects, and set the form method to GET. In the Action field of the form, add the URL for the page that will use the URL parameters.
A URL parameter can be created from hypertext links by using the href attribute of the anchor tag. Add the URL parameters using the method given earlier, appending the URL with a question mark followed by a name=value parameter, as follows:
<a href="http://server/page.asp?name1=value1">choice1</a> <a href="http://server/page.asp?name2=value2">choice2</a> <a href="http://server/page.asp?name3=value3">choice3</a>
You can build the URL parameters in Code view or use the Property inspector to type the parameters.
| On the CD-ROM | See url_param.pdf for steps to create pages that first obtain a value as a URL parameter then use that variable to set the background color of an HTML page. |
Retrieving parameters
When you've stored the parameter(s) you can retrieve it on demand by defining variables. You must be sure that you have submitted the name-value pairs via the parameter.
To define a parameter for use in your page, open the Bindings panel:
-
Click the Add (+) button and choose one of the options available in the menu. For an ASP page, you would choose Request Variable ® Request.Form. For ColdFusion or PHP pages, Form Variable is used. A JSP page uses Request Variable.
-
The Form Variable box opens. Enter the name of the form variable and click OK. This is generally the name of the form object (field, and so on) used in the form that passed the parameter.
-
The Form Parameter appears in the Bindings panel, much as a recordset does. Use the Form Parameter as you would a database column to build dynamic content.
Session variables
In fact, you can store information from parameters as a session variable that is "remembered" as long as the user remains in the site or until the session is explicitly destroyed. Session variables make the stored parameters available to all the site's pages throughout the user's session and persist as the user moves from page to page. Session variables may be used to insert values into HTML page code, to assign a value to a local variable, or to provide a value to evaluate a conditional expression.
Before creating a session variable, you must first collect the data, as in creating a form or URL parameter and request a page. The server-side logic and the Web server you use affect the code you'll need to create to store and access the data as a session variable. For ASP and ASP.Net, you would use <% Session("variable_name") = value %> but for a ColdFusion site, you would use <CFSET session.variable_name = value> where the value expression is generally a server expression, such as Request.form("FormObjectName") or Request.QueryString("FormObjectName"). Actually, there are many other expressions you might use depending upon the server type and server logic used.
When you've stored a value in a session variable, you can use Dreamweaver to retrieve the value and use it in your Web application or insert it (as a value) into an HTML page. For the example of a session variable that stores the user's login name and password, you could prevent or enable access to restricted site pages by checking the user against a list of authorized users and/or insert the user's login name into text written dynamically in the page.
| On the CD-ROM | See validate_user.pdf for an exercise that uses a session variable to maintain the login name and password of the user throughout the user's visit to the Administrative Intranet site. |
Application variables
When using ASP or ColdFusion, you may use application variables for data storage and display. Application variables are maintained for the life of the application or until the Web server is stopped. Because of this longer-term persistence, they are ideal for maintaining information for all users, such as a date, a currency exchange rate, or other non-user specific information.
To define an application variable when using ASP, follow these steps:
-
Open your asp page.
-
Open the Bindings panel in the Applications panel group.
-
Click the Add (+) button and select Application Variable from the menu.
-
Type the name of the variable as defined in the application's source code.
-
Click OK. The variable appears in the Bindings panel.
To remove an application variable, expand the application variable in the Bindings panel, select the named variable and click the minus (-) button.
Server variables
Server variables are useful for storing information gathered from a variety of sources, from form and URL parameters, session and application variables, cookies, browser states and more. Server variable syntax varies depending upon your choice of server technology.
For ASP, you may use the following server variables as a source of dynamic content:
-
Request.Cookie
-
Request.QueryString
-
Request.Form
-
Request.ServerVariables
-
Request.ClientCertificates
To define a server variable for an ASP page, follow these steps:
-
Open the Bindings panel from the Applications panel group and click the Add (+) button.
-
Choose Request Variable from the menu.
-
Select one of the request collections available.
-
Click OK.
For ASP sites, the request collection you choose depends upon the nature of the data you need. For example, if you want to find and store the type of browser the visitor is using, use Request.ServerVariables ("HTTP_USER_AGENT"). If you're looking to access data from a form, use Request.FormVariables ("FormObjectName") instead.
-
QueryString Collection — Retrieves information appended to the sending page's URL using the GET method with a form or through values appended to the href attribute of a hypertext link.
-
Form Collection — Retrieves Form parameters created by passing name-value pairs via the POST method to the page listed in the Action field of a form.
-
Server Variables Collection — Retrieves values of predefined environment variables. For a complete list of ASP server environment variables, see your IIS or PWS documentation.
-
Cookies Collection — Retrieves values stored in cookies sent in an HTTP request. For example, a cookie called thissite_prefs is stored on the user's computer. On the server, the values of the cookie are stored in the variable Request.Cookies("thissite_prefs").
-
ClientCertificate Collection — Retrieves certification fields from an HTTP request sent by the browser. The certification fields are specified in the X.509 standard.
Binding data to the page
After you add a recordset by building a query or through passing a form or URL parameter, you can "bind" data in several ways by replacing static content, attributes, or form elements with one or more recordset columns or variables. Dreamweaver offers several methods to accomplish this, through the use of the Bindings panel. Typically, each involves selecting a content source and setting a dynamic attribute:
-
You may drag the data from the Bindings panel and drop it either in the page or onto a selected bit of text, form object (Design view), or into specific areas in the HTML code (Code view).
-
You may place your cursor where you want dynamic data to appear and select the data from the Bindings panel. Click the Insert button to add the dynamic data to the page.
-
You may select a page element, such as an image or form object, and highlight (by selecting) the data field in the Bindings panel. Use the Bind To menu of attributes to select which part of the tag will use the dynamic data. Click the Bind button to add the dynamic data attribute.
| On the CD-ROM | See the exercise dynamic_attribute.pdf in the chapter46_exercise files on the CD. The exercise shows binding the e-mail address data column to the mailto: href for users listed in the |
Dynamic text
You can replace regular text in your pages or insert a data source reference where you want the dynamic text to appear. Dynamic text can be formatted with HTML or CSS typographic styles.
Dynamic images
In Design view, place your cursor into the page where you want an image to appear. Choose Insert ® Image. Click the Data Sources option (PC) or Data Source button (Mac) and select a content source from the list that appears. The source should be a path to the image you want. The path may be absolute, root relative, or document relative.
| Note | Dreamweaver does not support binary images stored in a database. |
Another method for adding dynamic images is to insert a placeholder image into the page. Select the image; then use the Bindings panel to select the data column of a recordset (or form or URL parameter) and use the Bind To menu to choose img.src. Click the Bind button.
HTML page attributes
You can use the Bindings panel to set dynamic sources for your HTML page elements, too. For example, let's say you want to allow users to set the page background color for the duration of their site visit. In a Start page, you might ask the user to select the page color by offering a form menu with the color choices. When the user selects a color and clicks the Choose Color button, that information is passed as a URL parameter that is stored in temporary server memory.
In the page requested, a variable is set up that takes the parameter. You can then select the <body> tag using the Tag inspector and locate its bgcolor attribute and use the Dynamic Data button (the lightening bolt) to choose the request variable. When the user's browser loads the new page, it uses the bgcolor passed by the prior page.
| On the CD-ROM | To try this exercise, follow the steps in the file url_param.pdf to set the background color for a site page based on a choice the user makes. |
The Tag inspector
There are several methods for binding data to page elements but the Tag inspector is probably the easiest to use. This great new feature of Dreamweaver makes it possible to access every attribute of any element in your page. Simply open the Code panel group and click the Tag inspector tab. Scroll through the various page elements; the panel displays <head> and <body> tags. When you select a tag, use the bottom window of the panel to view the tag's attributes. If you cannot see the attributes, be sure to expand the panel by dragging on its borders, as shown in Figure 46-9.

Figure 46-9: The Tag inspector is a valuable tool when working with dynamic page attributes. Be sure to expand the panel fully to view the attributes.
|
| < Day Day Up > |
|
EAN: 2147483647
Pages: 491