Building Pop-Up Menus
|
| < Day Day Up > |
|
A pop-up menu is a set of links created on the fly or on demand when the users moves their mouse over or clicks a link. The pop-up menu is stored as a JavaScript array — an ordered collection of one or more pieces of data — and is powered by a complex set of functions stored in an external JavaScript (.js) file. The external file is named ![]() mm_menu.js. You can use Fireworks and Dreamweaver can be used to build a pop-up menu, but Fireworks can build one that uses a graphic background image stored as a CSS style. Dreamweaver can build only text-based pop-up menus.
mm_menu.js. You can use Fireworks and Dreamweaver can be used to build a pop-up menu, but Fireworks can build one that uses a graphic background image stored as a CSS style. Dreamweaver can build only text-based pop-up menus.
Pop-up menus have advantages. One major advantage is that the menus (and submenus) don't take up screen real estate until the user requests the menu by moving the mouse over or clicking a link. Another distinct advantage comes from the use of submenus; your navigation system can drill down into your site, giving users one-click navigation to the page of their choice, right from the home page of the site.
On the down side, pop-up menus use advanced JavaScript and Cascading Styles Sheets, so only version 4+ browsers may be used to view the menu. Not all browsers render CSS faithfully — as in the case of Netscape 4x (both Macintosh and Windows platforms) and Internet Explorer 5 (Macintosh platform).
If you decide to use a pop-up menu, take heart: Building these complex creatures is a lot easier in both applications and the JavaScript functions — Show and Hide Pop-Up Menu — are native to Dreamweaver, making editing your menu a snap.
There are three possible methods for creating a pop-up menu using the native Pop-Up Menu behaviors:
-
You can build your pop-up menu entirely in Fireworks, export HTML and images, and use the page in a Dreamweaver site.
-
You can build a menu in Fireworks, crop to the menu buttons, and export the HTML and images for later insertion in Dreamweaver MX using the Insert Fireworks HTML object.
-
You can build the entire menu in Dreamweaver. With this option, you are limited to text-only menus and cannot add a background image to the buttons of the menus or submenus.
Using a Fireworks pop-up menu
Fireworks MX If you design and export the entire pop-up menu from a Fireworks file, you can open the page in a Dreamweaver site and edit the menu. Fireworks pop-up menus have the option to use a background image for each table cell of the menu arrays. Dreamweaver doesn't offer this option because it cannot create images as Fireworks can: To edit the images used in a Fireworks pop-up menu, you have to edit in Fireworks. Fortunately, the integration between the two programs is tight and you can trigger the edit from Dreamweaver.
Editing the image-based pop-up menu
Fireworks MX An image-based menu uses a background image in the CSS for the button arrays. This image can only be edited in Fireworks. You can choose to open Fireworks and change the menu images and re-export the page. However, you can trigger this same option from within Dreamweaver. Select the menu button graphic and click the Edit in Fireworks button in the Property inspector. You can edit other properties of the pop-up menu in Dreamweaver. These properties are covered in the following paragraphs. Figure 40-5 shows the four screens you use within Fireworks to edit your menu.
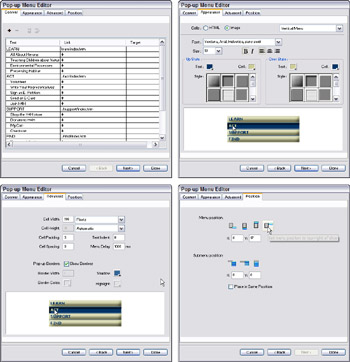
Figure 40-5: The Contents, Appearance, Advanced, and Position screens in the Fireworks Pop-Up Menu Editor are used to modify the menu items.
| Caution | You must have Fireworks installed to edit a Fireworks-based pop-up menu. |
Dreamweaver asks whether you want to edit the source file for the image or just modify the current .gif or .jpg file. Because you want to rework the images used in the menu, choose to open the entire file.
| Cross-Reference | See Chapter 20 for details about creating, modifying, and exporting a Fireworks pop-up menu. |
When you've located the source file, Dreamweaver launches the Fireworks application in Edit from Dreamweaver mode.
| Note | You must have Fireworks selected as the primary editor for images in your Dreamweaver preferences for the editing process to work. To set this up, choose Edit ® Preferences and select the File Types/Editors category. The PNG, GIF, and JPG file types should all have Fireworks as the primary editor. If you installed all the programs from the Studio MX CD, this is probably already set up. |
Inserting a Fireworks MX pop-up menu into an existing Dreamweaver page
Most developers will tell you that the main reason to build and export your pop-up menu from Fireworks is to be able to use the Images option, but you need not use the entire page. Like any other Fireworks-created elements, you can crop to only those elements and export as a separate page with graphics. Using the Insert Fireworks HTML object (button), you can insert the pop-up menu into your existing Dreamweaver pages.
Habitat Alert site In this section you add a pop-up menu to a sample Habitat Alert page to learn to add the Fireworks-based menu to your Dreamweaver page:
-
Open the page
 popup_test.htm from the Habitat Alert40\html\site folder.
 -
Insert your cursor into the table cell where the navigation buttons are normally found in the site pages.
-
Click the Insert Fireworks HTML, or choose Insert ® Interactive Images ® Fireworks HTML; then click Browse in the dialog box that opens to locate Chapter 40\html\site\popup_menus\popup_menu.htm. Leave the Delete option unchecked.
When the dialog box loses, check out your new pop-up menu by previewing it in a browser. This menu's links aren't set up and won't work, but you should be able to trigger the menu and submenus by rolling your cursor over the site menu button.
-
Close the browser and return to Dreamweaver. To insert the menu into another page, repeat the process.
| Tip | When building your pop-up menu in Fireworks, don't add the URLs to pages. It isn't likely that you know the correct paths anyway, and it is far easier to select the proper pages in Dreamweaver. In any case, the paths are contained within the arrays in the head of each page using the menu. The path structures added in Fireworks would not be correct unless every Dreamweaver page using the menu is at the level within the site's directory structure. |
Editing a Fireworks-based pop-up menu in Dreamweaver
Fireworks MX To edit everything except the images used in an image-based pop-up menu or to edit a text-based menu made in Fireworks, use the Show Pop-Up Menu behavior attached to the menu's button(s). Select the button for the pop-up menu and double-click the Show Pop-Up Menu behavior. The resulting dialog box is similar to the Pop-Up Menu editor in Fireworks but does not contain the option to use images.
To edit the text for the menu choices, edit in the Contents screen, as shown in Figure 40-6. To edit an item, select the item, and change its text in the Text field. To change the location of an item, select the line and press the up/down/ arrows to reposition the item. This is different than the method used in Fireworks Pop-Up Menu editor where you simply select the item and drag it up or down in the menu.
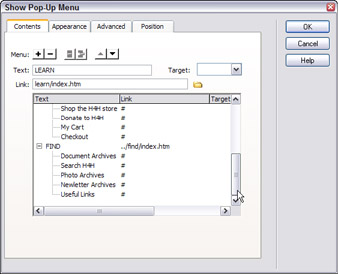
Figure 40-6: The Contents screen is where you edit menu items, including their URLs.
Changing the URL link
Another difference you'll see when editing a Fireworks pop-up menu in Dreamweaver comes when changing the URLs for your menu items. In Fireworks, you must hand-code the path structure or have a URL library available to select the path from the menu given. In Dreamweaver, you edit the URL by selecting the item in the Contents screen and clicking the small folder icon (Browse for Folder button) next to the Link field.
You can also hand-edit the code to change the link for any of your pop-up menu's items. The URLs are contained in the arrays used to generate the dynamic menus and are found in the head of the page containing the pop-up menu. Figure 40-7 shows where to look for the URLs for your main items; the URLs for the submenu items are easy to spot.
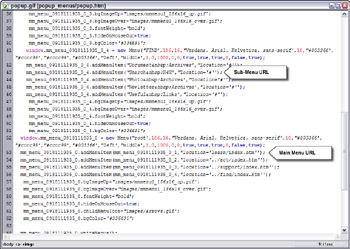
Figure 40-7: The arrays contain the URL for each menu item, among other properties.
If your menu is used in pages that are at different levels in your site, you will have to edit each menu to have the correct path structures.
Using an inserted menu in a template
Because template operations rely on document-relative path structures, using a pop-up menu in a Dreamweaver template is a difficult and limited process. However, it is possible if you understand the restrictions:
-
Fireworks pop-up menu elements (the HTML page, images, and external
mm_menu.js file) should all be exported to the root level of your site. -
The template file in which you insert the pop-up menu using the Insert Fireworks HTML object does not display the pop-up menu properly. However, pages based on the template, which must all be saved in the same folder as the original exported Fireworks page and external .js file, should behave as expected.
Building a pop-up menu in Dreamweaver
If you don't plan to use an image as the background for your pop-up menu items, building the pop-up menu in Dreamweaver MX is easy. You use the Show Pop-Up Menu behavior. A text or graphic button is used to trigger the pop-up menu.
To build a pop-up menu, follow these steps:
-
Click the Trigger button.
-
Click Add (+) in the Behaviors panel to add the Show Pop-Up Menu behavior.
-
In the dialog box, add the items you need for your main menu and any submenus, as seen in Figure 40-8. To create a main menu item, type the item's text into the Text field. Add the next item by clicking the Add (+) button. To make an item part of a submenu for a main item, use the Indent button. To outdent an item, use the Outdent button.

Figure 40-8: The Contents screen in the Show Pop-Up Menu dialog box lets you enter the text and format your main menu and submenu items. -
To move an item's location, select it, and press the up/down arrows. Submenu items associated with a main menu item move when the main menu item is moved.
-
To select the page called when the user clicks a menu item, click the Browse for Folder icon located to the right of the Link field.
-
To change the text, link, or target of an item, select the item and make the changes. Tabbing or clicking another menu item forces the update in the list of menu items.
-
When your menu items are set, click the Appearance tab to enter the Appearance dialog box, where you set the formatting of your pop-up menu, choosing font, size, alignment, and color options. You also have the option to create a vertical or horizontal menu. An approximate preview helps you decide how to format the menu.
-
Click the Advanced tab when you are satisfied with the appearance of your pop-up menus. This dialog box offers a wide range of controls for your pop-up menu. You can let the size of your menus be automatically set (default) or set the width and height in pixel values. You can also determine cell padding or spacing, control the indent and timing of the menus, and set border properties.
-
Click the Position tab when you are finished setting the advanced menu properties. You set the menu positions by clicking one of the four position buttons. Although it's not entirely clear, the blue-green element in the examples displayed represents the pop-up menu, and the boxy element is the button. You can also position the menus by entering x,y values.
-
Click OK when the menu(s) are positioned.
-
Save and test your menu in a browser.
|
| < Day Day Up > |
|
EAN: 2147483647
Pages: 491