Building a Simple Frameset
|
| < Day Day Up > |
|
When building your framed site, you may start from scratch if you have no existing pages, or build a frameset to house existing pages. Dreamweaver enables you to work within the frameset so you can see how the pages will appear within the browser window. To work with framesets and frames, you use the Document window, Property inspector, and the Frames panel. To try the exercises given in this chapter, you need to define a new site. Name the site Chapter 39 and add the files from the chapter39_exercise folder.
Rows or columns?
The first thing to decide when building a framed site is the orientation of the frames used. A simple frameset can contain as many frames as you'd like, but all must share a common orientation of rows or columns. Rows divide the browser window horizontally; columns divide it vertically. Figure 39-1 shows the most common frameset options to use all rows, all columns, or a mix of both. When you opt to use rows and columns together, the frames are read by the browser from top to bottom, left to right. It's also possible to combine rows and columns in only one of the frames; this is called a nested frameset, which is covered later in the chapter.
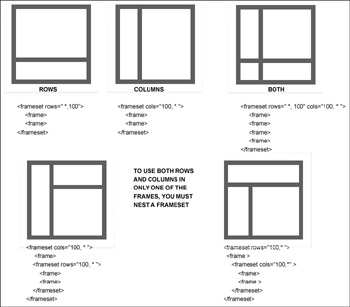
Figure 39-1: Simple framesets include rows only, columns only, or a shared row/column layout. Nested framesets are used when you want to vary the total rows and columns between frames.
To start a frameset document, follow these steps:
-
Choose File ® New and create a new basic page. Don't save the page yet.
-
Click View Options ® Visual Aids ® Frame Borders. Turn on the visibility of Frame Borders. Depending upon whether you want rows or columns, you click and drag to create a horizontal or vertical frame division. Drag from the top or bottom to create a row. Drag from the left or right to create a column.
-
If you want more than two frames, drag again from the appropriate side to create the new frame.
To undo adding a frame, use Edit ® Undo, Control+Z (Command+Z) shortcut for undo, or drag the frame border to the edge of the document until it disappears.
Navigating the documents in a framed site
When building a framed site, you work with multiple documents in the Dreamweaver application window and need to access different documents to set up the properties of those pages. To work successfully and efficiently, it is critical to understand how to select the correct document. Open the Frames panel in your Panel Dock. By default, the Frames panel is grouped with Layers in the Advanced Layout group. You access it through the Window ® Others menu. The Frames panel shows a small version of your current frames layout.
To set frameset properties, you must first make the frameset tag active. To access the frameset, you can:
-
Click the outer border in the document window.
-
Click the outer border simulation in the Frames panel.
-
Click a frame displayed in the Frames panel, and select the <frameset> tag shown in the Tag selector.
Dreamweaver provides a visual clue that the frameset is currently selected by outlining the entire frameset with a dotted line.
To work with a frame, click and select the desired frame in the Frames panel to make it active. A dotted line outlines the active frame to let you know which frame is selected. The Property inspector displays the properties of the active frame.
To work with a document displayed inside a frame, use the document window to select the desired page. Click the frame that contains the document page. The document's <body> tag displays in the Tag selector. Working with an HTML page inside a frame is like working with a page outside of a frame; you have access to all the standard tags, techniques, and methods you would normally use.
Setting frameset properties
When you've set up the layout of your rows, columns, or both, you can set values that determine the dimensions of the frames and whether there is a visible division or border between each frame. Some of these properties may be set at the frameset level or the frame level; others are strictly controlled by the frameset tag. Properties controlled at the frameset level affect all frames. If your frames will not share properties but have individual values for each setting, you may opt to determine those values at the frame level. Borders can be set at either level.
Borders
By default, borders outline individual frames; because frames share common sides, they also share border properties. Borders can be useful when you use many frames, but most developers prefer to turn off border visibility and let their page design mark the various regions of the site.
Follow these steps to turn off borders for all frames:
-
Be sure you have the frameset active by clicking the outer border of the document window or Frames panel. The <frameset> tag is bolded in the Tag selector.
-
Use the Property inspector to choose No from the Borders menu.
-
Add a zero in the Border Width field. This is required to explicitly remove all borders.
To set a shared border value for all frames, follow these steps:
-
Choose Yes from the Border menu.
-
Add the desired value to the Border Width field.
-
Choose a border color, if desired, by clicking the color box to access the standard Dreamweaver color palette. Click a color sample from other documents, or click the System Picker icon to access those options to choose a color.
Setting frame dimensions
One of the trickier tasks involved when building a frameset is determining the dimensions of each frame. The size of all frames is controlled at the frameset level, using the mini version of your frame layout shown in the Property inspector, as shown in Figure 39-2.

Figure 39-2: The mini-layout lets you select which frame to size.
Frames can use a specific pixel dimension, a percentage dimension, or be set to take up any available remaining space. This last option is called relative, although technically, a percentage dimension is also relative. The relative setting is similar to a wild card setting; it really means "whatever is left" after the set values are displayed.
Because the overall width of the user's browser window is not known, using only pixel values is impractical. Generally, you use a combination of set pixel values with at least one relative value or use percentage values exclusively. The layouts shown in Figure 39-2 use pixel values in combination with the relative (*) setting. This allows the frame or frames with specific values to be rendered first, then gives any remaining space in the browser window to the relative frame. The relative frame is "stretchy" and expands or collapses as the browser window is resized, leaving the fixed-pixel widths of the other frame(s) untouched.
When using percentage values for frame sizes, it is best to use them for all frames and to make the total settings add up to 100 percent.
Follow these steps to set frame sizes:
-
Select the frameset tag to bring up the frameset properties in the Property inspector.
-
Click one of the frames displayed in the mini-version of your current frames layout in the Property inspector.
-
Choose Pixels, Percentage, or Relative from the Units menu.
-
If choosing Pixels or Percentage, add a value in the Value field. If you choose Relative, a number is displayed in the Value field. You don't need to set it or change it, because the real value that will be added is the asterisk (*) sign to indicate that this frame is to use any available space.
-
Click into the next frame and set its values.
Saving a frameset
Saving your work as you build a framed site is tricky, and the way you do it depends upon whether you are starting from scratch (with no existing pages) or are using existing pages within your newly created frames. In all cases, you must first save the frameset.
To save a frameset, follow these steps:
-
Make the frameset tag active.
-
Choose File ® Save Frameset As. If the frameset is not active, you will not see this option.
-
Navigate to your site root folder and save the frameset page. Because the frameset document must load first, it is common to name this document using index or default so that it autoloads.
Dreamweaver must know where the frameset is saved to be able to build a relationship to the pages that display within the frameset's frames. With the frameset saved, you can work with framed pages without fear of losing any work.
|
| < Day Day Up > |
|
EAN: 2147483647
Pages: 491