Defining Template Regions
|
| < Day Day Up > |
|
Templates require editable regions — areas that may be modified in pages based on the template. This makes sense because your content will vary from page to page, even if the interface remains the same. By default, all portions of the template are locked; to add an editable region to your template, choose a containing element (table, cell, multiple cells) or make a selection; then choose Insert ® Template Objects ® Editable Region or press Control+Alt+V (Command+ Option+V). You can also work with the Templates toolset in the Insert bar and create the new region by clicking the small button with the Pencil tool, as shown in Figure 37-5.
![]()
Figure 37-5: The Templates toolset in the Insert bar contains all the functions found in the Template Objects of the Insert menu.
There are four types of regions in templates:
-
Editable — This is an unlocked area in the template and pages based on a template. All templates should contain at least one editable region to be useful. Changes made to the editable region in the template will not result in updates to these regions in pages based on the template. However, they affect any subsequent pages created from the template.
-
Repeating — This is a portion of the page that is set to repeat to accommodate additional content, as needed. For example, many data-driven pages have content that varies based on the current state of a data source (database) where the content is added server-side. A repeating region isn't editable in the document unless you specifically add editable regions within the repeating region.
-
Optional — An optional region is just that — optional. This is a portion of the page, such as a sidebar area, an image, or even a navigational element that is used on some pages but not others. Optional regions are controlled by conditional statements and may be set so that the region is editable or not.
-
Editable tag attributes — Setting editable tag attributes allows certain properties of tags, such as alignment, background color, width, and so forth, to be editable even though the tag or element itself can't be removed. An example of this would be a table cell that contains an image. The cell itself can be locked (along with the image inside), but giving the cell editable attributes allows the properties of the cell to change in pages based on the template.
Adding an editable region
A successful template depends on careful and logical selection of editable regions. To add an editable region, select an HTML tag or make a selection in your content. Using a container selector allows additional selectors to be added in the container. Using content selections limits editing of the region to the replacement of the current content. For example, if you choose a table cell as the editable region, you can add additional HTML tags within the structure of the table; choosing the text within the cell allows only that text to be replaced.
| On the CD-ROM | Save the Habitat Alert37 folder from the chapter37_exercise folder to your hard drive. Define a new site. |
Habitat Alert site In this section you, define regions in the Habitat Alert Basic Page template. You should still have the ![]() Basic Page.dwt template open; if you don't, open the template from Template Assets by double-clicking it, or locate and double-click the file in the Templates folder through the Site panel.
Basic Page.dwt template open; if you don't, open the template from Template Assets by double-clicking it, or locate and double-click the file in the Templates folder through the Site panel.
Because the page still needs scripting, much of it will be left locked so that later update of pages based on the Template is possible.
-
Place your cursor into the main content area. This area changes in every page, so it should be an editable region.
-
Select the <td.maincontent> tag for this area using the Tag selector. Activate the Templates toolset in Insert bar, and click the Editable Region button.
-
Name the new region Main Content and click OK, as shown in Figure 37-6.
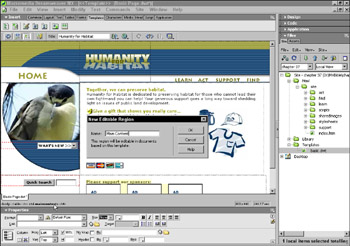
Figure 37-6: You may use spaces but not special characters when naming the new editable region. -
Click the cell with the ad banners. This cell contains a library item. Regions containing library items should not be locked. Make this cell an editable region, too. Name the region Bottom Ad. Save but don't close the file yet, this exercise continues in the next section.
Setting editable tag attributes
Another awesome new feature of Dreamweaver templates is the option to set only the tag attributes for an element to be editable. For example, you may require that an image of a specific width and height be present in a set location but allow for different images to be used.
Habitat Alert site The following steps set up some editable tag attributes for the image that displays the current section. In the Habitat Alert template, this image currently reads HOME.
-
Select the
 location_home.gif image. Choose Modify ® Templates ® Make Attribute Editable.
 -
In the Editable Tag Attributes dialog box, choose SRC from the Attribute menu and enable the Make Attribute Editable option, as shown in Figure 37-7.
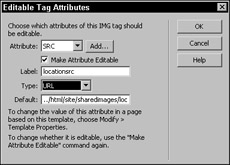
Figure 37-7: The Editable Tag Attribute dialog box -
Label the attribute locationsrc. From the Type menu, choose URL. Click OK. The HOME image now shows as a broken image.
Tip Attributes that are present in the current tag will be displayed in the Attribute menu; to add a new attribute, use the Add button and type any needed attribute. One amazing option would be to add a usemap# attribute so that you can use different image maps. To access the Attribute menu select Modify ® Templates ® Make Attribute Editable. To determine the attributes of any tag use the Tag inspector in the Code panel group. When you select a tag, its attributes display at the bottom of the panel.
Dreamweaver replaces the file source (SRC) for this image with @@(locationsrc)@@ to mark it as an editable attribute of an otherwise locked region. To modify an attribute in a page based on the template, use Modify ® Template Properties.
Caution To remove an editable tag attribute from a template, reapply the attribute (Modify ® Templates ® Make Attribute Editable) and uncheck the Make Attribute Editable option. However, the code placed in the head of the page above the <body> tag is not removed; you must remove it by hand from Code view.
Adding an optional region
Optional regions allow the template developer to include elements (with or without scripting) in the template that might be needed in pages based on the template.
Habitat Alert site The circle area of the layout will be scripted as a slideshow that displays in many of the site's main pages, but not in all. DHTML scripting will be added later, so it makes sense to include it in the template so that you can update it in all pages later. But not all pages need the slideshow, so making this an optional region is the perfect solution. Follow these steps:
-
Select the heron image in the circle area (sidebar) and choose Insert ® Template Objects ® Optional Region or use the Optional Region button found in the Templates toolset of the Insert bar.
-
Name this new optional region Sidebar Image. Leave the Show by Default option checked.
In Code view, special markup, as follows, is placed around the optional region:
<!-- TemplateBeginIf cond="sidebarImage" --><!-- TemplateBeginEditable name="EditRegion5" --><!-- TemplateEndEditable --><!-- TemplateEndIf -->
In the head of the document this code is inserted:
<!-- TemplateParam name="Sidebar Image" type="boolean" value="true" - ->
Editing to show or hide an optional region is done from Code view in a document based on the basic Template.
Adding editable optional regions
When an optional region is disabled or hidden in documents based on a template, other elements can replace it. The content may vary, so an editable region is needed. It's useful to develop potential content in the template so that any scripts needed are included in all pages based on the template. Setting an editable optional region is the best solution.
| Tip | You can define an optional region and later insert an editable region between the optional region markup. |
Habitat Alert site So you can use different jump menus (menu lists with an arrow to select options) as needed in pages built from the template, the following steps show you how to add an editable optional region to the circle area above the What's New jump menu:
-
Select the What's New jump menu in Design view and use the Tag selector to select the <form> tag. Press left arrow to move the cursor in front of the form code.
-
Choose Insert ® Template Objects ® Editable Optional Region. In the dialog box that opens, name the new region Other Jump Menus. Uncheck the Show by Default option. Click OK. The following code is placed into the page where the cursor is located:
<!-- TemplateBeginIf cond="_document['Other Jump Menus']" --><!-- TemplateBeginEditable name="EditRegion5" --><!-- TemplateEndEditable --><!-- TemplateEndIf -->
In the head of the page just above the <body> tag, an additional reference to the optional area is added:
<!-- TemplateParam name="Other Jump Menus" type="boolean" value="false" -->
-
To finalize this area, select the form for the What's New jump menu and make it an optional region named Whats New. Leave it showing by default. Figure 37-8 shows the labeled regions.
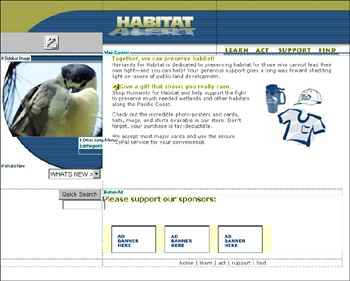
Figure 37-8: The regions showing their labels -
Save the template and close it.
|
| < Day Day Up > |
|
EAN: 2147483647
Pages: 491