Working with the Text Tools
|
| < Day Day Up > |
|
Macromedia Fireworks MX enables you to work with text in new ways. In earlier versions of the application, The Text Editor was used to manipulate text, choosing font settings and adjusting alignment, kerning and other options. In Fireworks MX, text is handled on-canvas and the text properties, which include many new options, are applied via the Property inspector.
Use the Property inspector to set the font, size, color, leading (space between lines), kerning (space between letters), and alignment of your text. You may also choose text orientation and paragraph options, such as paragraph spacing and indentation (see Figure 18-1).
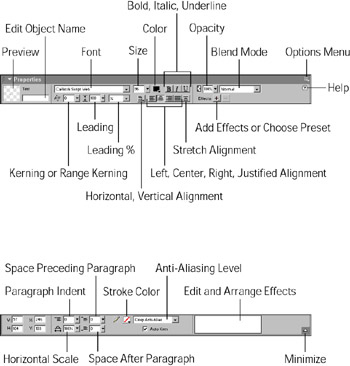
Figure 18-1: The Property inspector contains tools for controlling text and paragraph properties.
The Text menu contains many of the options available from the Property inspector. It also provides access to the Text Editor, if you prefer to use it. You must first create a text box to access the Text Editor as you'll see shortly.
The Text menu also contains a few special text-handling techniques, including tools to attach and control text along a path. Fireworks also offers a Spell Checker in the Text menu.
Adding text to a document
To add text to your document, select the Text tool and click the canvas. Click and drag if you want to build a text box that constrains the width of the text block. Type to add the desired text. You may select your font and size and other values prior to typing or wait until after you add the text. To set text properties after you've added text, select the text using the Pointer tool and adjust the settings in the Property inspector. Use the Pointer tool to move and position your text. To edit an existing text block, double-click with the Pointer tool. The Pointer tool changes to the Text tool, inserted into the text block at the point you clicked.
Controlling text spacing
After you select the Text tool or some text, you'll see the various options available. Some are common options, such as alignment and paragraph indents that you've probably used before, but there are also several options (presented in the following sections) that you may not be familiar with.
Kerning
Kerning determines how close letters are to each other. Kerning enables you to add more or less space between characters. Place your cursor between the characters you want to adjust and move the slider to set your spacing. You can go from 1–100 or -1–100.
Range Kerning
To use Range Kerning, select the letters or text that you want to change. Entering a new value affects all the text selected.
Leading
Leading is used when you have multiple lines of text and want to control the space between the lines. The percentage of leading you choose is based on a percentage of the text size. If you choose 100%, you get a single-spaced line. Choosing 200% creates a double-spaced line.
Baseline Shift
Bottoms of most text are normally aligned. But what happens when you want to add a trademark symbol, subscript, superscript, or a footnote? You can place letters above or below the default baseline. A negative value places the word or letter below and a positive value places it above.
Horizontal Scale
Horizontal Scale stretches or shrinks the selected text. Move the slider up or down to adjust the scale. The default is 100%.
Enhancing text
Text in Fireworks is flexible. By default text contains a solid fill and no stroke. But you can add a stroke just like you can any other vector object. Select it and choose the stroke size, type, color, and texture. Strokes are outlines and textures are added to fills. You can also alter the stroke orientation. To select the stroke's color, you click the stroke color box. In this dialog box at the bottom a drop-down menu gives you the choice of putting the stroke outside the path, inside the path, or centered on the path. There is also a Fill Over Stroke option that draws the fill over the stroke.
You can select text and the select one of the Transform tools to scale, skew, and distort. Even after transforming it, it will still be editable. You can highlight one letter and make it larger or change its color, baseline, or stroke. This can produce some interesting text. Figure 18-2 shows text using the techniques discussed in this section.
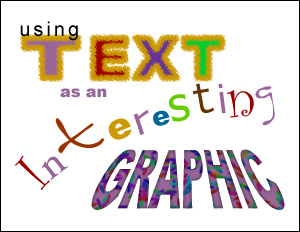
Figure 18-2: Text (from top to bottom) with a stroke, kerning, scaled, rotated, distorted, and using a baseline shift
Using text as a placeholder
Many times a designer will design a layout in Fireworks to present as a mockup to the client. To simulate how the text will look in the Web site, you can use a text block for the mockup. It's a good idea to use the font that you'll use in Dreamweaver, such as Verdana or Helvetica. Set the edge of the text to Alias because that's the way HTML text is formatted. You'll want to simulate the real look as much as possible. If you use anti-alias text, stylized and so on, the clients will be disappointed when they see the HTML text because it won't look like the mockup.
Converting text to a path
Text in Fireworks is editable at all times, whether it is grouped, transformed, or has applied effects. Editable text is powerful, but there will be times that require converting editable vector text objects to vector paths. You want to convert text to a path to two common reasons:
-
You are giving a file to someone and they may not have the fonts used in the file.
-
You want to edit the appearance of the text in a way that requires manipulation of one or more letterforms.
Text may be scaled, skewed, distorted, or rotated using the Transform tools, but you cannot make any changes to the individual letters themselves. To modify a letter in the font, you must first convert the text to paths using Text ® Convert to Paths. Words converted to paths are grouped to make it easier to keep the letters together. To access individual letterforms, select the text and choose Modify ® Ungroup (Figure 18-3). To edit a letterform, select a letter with the Subselection tool.
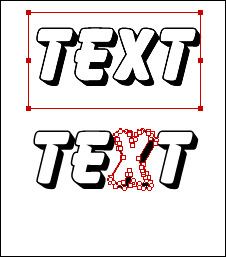
Figure 18-3: Converting normal text to paths enables you to modify the text outlines. Here, the letter X is selected with the Subselection tool to reveal its points and line segments.
Using text as a punch
Use Modify ® Combine Paths ® Union to convert several text letterforms to a single path. This saves time and effort when you want to cut text from another image or object.
When the text paths are converted to a single path, it may be used like a cookie-cutter. To use text as a cookie-cutter, follow these steps:
-
Open a new document 500 ¥ 300 with a white background.
-
Draw a rectangle to fill the canvas. Add a fill using a color different than the canvas.
-
Type some text to use as a cookie-cutter. A thick font, like Arial black, works best.
-
Select the text and choose Text ® Convert to Paths. Each letter now is a path. Select the grouped letters with the Pointer tool and choose Modify ® Ungroup.
-
Shift+select each letter with the Subselection tool and choose Modify ® Ungroup. To form a single path from all the letters, choose Modify ® Combine Paths ® Join.
-
Shift+select the text and the rectangle with the Pointer tool and choose Modify ® Combine Paths ® Punch.
-
The punched object is a compound path. You may add effects or manipulate the points of the object, if desired.
|
| < Day Day Up > |
|
EAN: 2147483647
Pages: 491