| Now that you have successfully installed Crystal Reports, it is time to open the application and familiarize yourself with the design environment. This section briefly introduces you to the following components of the application interface: Report sections Application toolbars Application menus Although creating a useful Crystal Report is not a difficult task, we will defer actually building a report with data until Hour 4, "Using the Default Report Wizards."  | Upon first opening the application, you might be required to register your installation if you did not do so during the installation process. Complete this task if necessary. |
Assuming that you have already registered your installation, you should first be presented with the Welcome to Crystal Reports screen, as shown in Figure 2.7. This screen provides quick access to existing Crystal Reports files while also allowing you to begin designing new reports via the Report Expert Wizard or from a blank report template. In order to provide a quick introduction to the layout of the design application, the remainder of this hour is focused on selecting the As a Blank Report option from the Welcome screen. Figure 2.7. The Welcome screen provides quick access to existing Crystal Reports files as well as the Report Expert Wizard.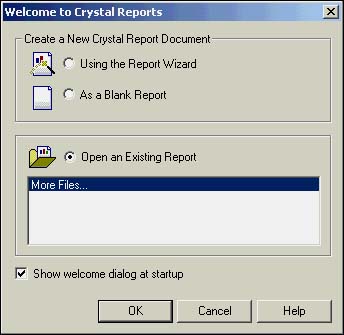
Learning About Report Sections From the Welcome dialog window, select Using the Report Wizard item (listed under Create a New Crystal Report Document) and then click OK. You should now see the Crystal Report Gallery dialog select As a Blank Report and click OK. At this point, you'll see a window labeled Data Explorer click Cancel. If the Field Explorer window is also displayed, click Close. You are presented with a blank report template that is divided into numerous report sections. As Figure 2.8 illustrates, report sections are identified by name on the left side of the design area. These sections segment the Crystal Reports design environment, and hence a report, into logical areas to facilitate more intuitive report creation, including the Report Header, Page Header, Details, Report Footer, and Page Footer sections. Each of the various sections has unique properties and printing characteristics that you can modify. When creating reports, you will place objects, such as a corporate logo image or data field, into various sections and organize the objects based on your report design requirements. If a report object, such as an image, is placed in the Report Header section, the image will display and print only once per report, on the first page. If the same image is placed in the Page Header section, the image will then display and print once per page. The same holds true for custom sections, such as Group Headers and Group Footers. The Details section implies that whatever is placed in this section will display and print once for each and every row retrieved from the data source. Figure 2.8. Report sections provide for an intuitive way to create and organize your data when designing reports.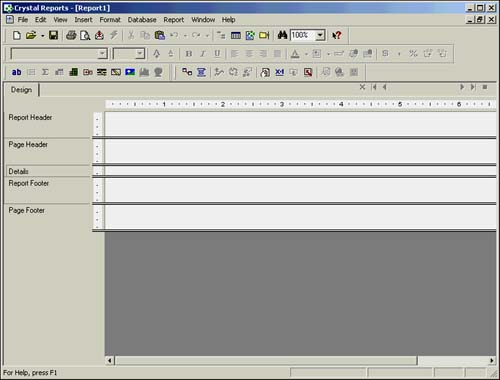
| Although Crystal Reports is commonly used for Web reporting initiatives, the design environment is built on a paper metaphor with pages as a concept to facilitate the presentation of information. |
Report sections can contain a variety of different object types, including database field, text, picture, chart, and map objects. Additional objects, such as formula and sub-report objects, are also positioned within report sections and will be covered later in the book in greater detail. The Section Expert is used to view or modify the properties of the report sections. To access the Section Expert, perform one of the following actions: Right-click on the section's label (or name, located on the left sidebar) you want to work with, and then select Section Expert from the pop-up menu. Click on the Section Expert button. Select the Section Expert option from the Format menu. | When designing reports, you should consider the following items when working with report sections: It is good practice to print a test page of each report you are designing. Consider keeping all font sizes the same within each section. Print preprinted forms on the same machine to avoid discrepancies in the interpretation of the report layout by different print drivers and printers. |
Crystal Reports also provides for some more advanced section formatting options, reviewed later in the book, such as underlaying and suppressing sections based on certain criteria (formulas). These features are accessible from the Section Expert dialog. Using Toolbars and Menus Toolbars are the graphical icon bars at the top of the Crystal Reports application environment, containing various buttons that you can click to activate the most frequently used application commands. Toolbars act as shortcuts to access commonly needed functions of the design application, and they can be enabled and disabled to appear at the top of the application area by selecting Toolbars from the View menu, which is located in the upper-most area of the application. As Figure 2.9 shows, there are four main toolbars that you can use within the Crystal Reports design environment: Standard The most commonly used application functions, including New, Open, Save, Print, Preview, Export, Copy, Cut, Paste, and Help. Formatting Functions that pertain specifically to modifying object properties with regard to Font, Font Size, Bold, Italics, Underline, Alignment, Currency, and Percentage formats. Insert Tools Quick access to report-enhancing and advanced features. The items found on this toolbar are consistent with the commands listed under the Insert menu. Expert Tools Functions that allow you to quickly access the main application experts, such as the Database, Group, Select, Section, Formula Workshop, and Highlighting Experts. Figure 2.9. The Toolbars dialog provides for an intuitive way to enable quick and easy access to commonly used application commands during report design.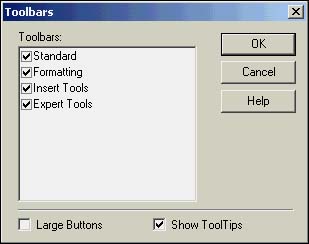
| ToolTips are pop-up descriptions that appear when your cursor rests over any of the toolbar buttons. To view ToolTips on your toolbars, select the Show ToolTips check box from within the Toolbars dialog. ToolTips are enabled by default. |
In much the same way that the toolbars offer quick and easy access to commonly used commands, the Menu items at the top of the application environment provide listings to virtually all the application functions available in Crystal Reports. The Menu items act as shortcuts to all the commands within the design application, and they include the following items: File menu The File menu includes file-specific commands to create a new report file, open an existing report, close a current report, save a report, save a report as an alternative filename, export to a different file format, save the current data set with a report, and secure a report so that it cannot be opened by other users. In addition, the File menu contains commands that enable you to preview a report before printing, send a report to a printer, select a specific printer, modify the page setup and margins, and add summary information to a report. Edit menu The Edit menu includes commands used to modify various aspects of a report, including commands to undo and redo actions, as well as to cut, copy, and paste report and OLE objects. Additionally, you can edit fields, formulas, summaries, and sub-report links. | Object Linking and Embedding (OLE) enables you to insert objects (OLE objects) into a report from other applications and then use those applications from within Crystal Reports to edit the objects if necessary. If Crystal Reports did not make use of OLE, you would have to exit Crystal Reports, open the original application, change the object, return to Crystal Reports, delete the object originally inserted, and then insert the newly revised object. |
View menu The View menu includes commands used to customize the user interface of the Crystal Reports application. The View menu commands enable you to navigate between the application's Design and Preview views, access the three main explorers (Field, Report and Repository Explorers), access the Toolbars dialog, zoom in and zoom out of a report, as well as to turn on and off the application rulers, guidelines, grids, and group tree from both the Design and Preview views of the report. Insert menu The Insert menu includes commands used to insert text objects, summaries (counts, sums, medians, and so on), groups, sub-reports, lines, boxes, pictures, charts, maps, and other objects into your report. The Insert menu becomes very convenient when designing reports that will include a variety of objects, such as a corporate logo and summary figures. Format menu The Format menu provides easy access to a variety of commands useful in formatting your reports for presentation purposes. This menu includes commands used to change the characteristics of the objects in a report. The Format menu provides quick access to commands for modifying font properties (color, size, borders, background color, and drop shadows for example), chart and hyperlink properties, and formatting for entire sections of the report. The Format menu also provides commands to arrange report objects (move, align, and size) and to specify desired highlighting characteristics via the Highlighting Expert. Database menu The Database menu includes commands used to access the Database Expert: from which you can add and remove data source tables for use within reports, specify links between data source tables, and modify table and field alias names. This menu also provides easy access to the set database location, log on and off SQL and ODBC servers, browse field data, and display and edit the report SQL syntax. In general, the Database menu allows you to maintain the necessary specifications for the report with regard to the data source(s) the report interacts with. Report menu The Report menu includes commands used to access the main application Experts (also referred to as wizards), identify the desired records or groups to be included in a report via the Select Expert and Selection Formulas (often referred to as applying reports filters), construct and edit formulas, create and view alerts, specify report bursting indexes, modify grouping and sorting specifications, refresh report data by executing the query to run against the database, and view report performance information. Chart menu The Chart menu is only visible after selecting a chart or map object and includes specific commands used to customize your charts and maps. Depending on the type of chart you select, the Chart menu includes commands to zoom in and out of charts; apply changes to all instances of a chart; discard custom changes made to the chart; save the chart template to a file; apply and modify template specifications for the chart; change the titles, numeric axis grids, and scales of the chart; and auto-arrange the appearance of the chart. After selecting a map object, the Chart menu then includes additional commands used to configure the overall style of the map, reorganizing the layers of report elements, changing the geographic map, and hiding or showing the Map Navigator. Window menu The Window menu includes commands used to rearrange the application icons and windows, as well as providing a list of report windows that are currently open and a command that allows you to close all report windows at once. Help menu The Help menu includes commands used to quickly access the Crystal Reports online help references, commands to register Crystal Reports and locate the Welcome screen, and quick access to the About Crystal Reports dialog and several key Crystal Decisions Web sites for technical support and product information. | Many application commands that are available from the Toolbars options can also be located from one of the menus. In these cases, the respective icon for these commands is presented within the Menu listing to the left of the command name, indicating that it can also be found on one of the application Toolbars. |
|