| Now that you have examined the Generator workflow, you are ready to create some simple examples that demonstrate a couple of server-side techniques. For the first example we will use Generator to process some data and then use that data to dynamically create a Flash 3 based application that displays sports scores. The second example shows how to use Generator to place dynamic XML data within a Flash movie. ActionScript can then manipulate the data at runtime to create dynamic content. Server-Side Dynamic Flash for Devices The first technique we will examine revolves around creating dynamic Flash content entirely on the server. We will create a simple application that shows sports scores. The final file will be published as a Flash 3 movie and as an animated GIF. This ensures that the content will be able to be viewed on virtually any device regardless of the Flash Player version present, or whether there is even a player available. -
Create a new Flash movie and name it sportsa.fla . -
Open the Publish Settings windows (File, Publish Settings) and be sure that both Flash (SWF) and Generator Template (SWT) are checked. This tells Flash to create a Generator template in addition to a Flash movie.  | Whenever you are creating a Generator template, make sure that both Flash (SWF) and Generator Template (SWT) are checked in File, Publish Settings. |
-
Click the Flash tab in File, Publish Settings. Set the version number to Flash 3. You can publish your movie as a Flash 3 file because all the dynamic content generation is being done on the server, and thus does not rely on ActionScript. This is useful, as it ensures that you can display your movie on just about any device that has a Flash Player (for example, some versions of the Sega Dreamcast only support Flash 3). -
Press the OK button and close the Publish Settings window. Open the Movie Properties window (Modify, Movie) and set the width to 230 and the height to 255. You can leave the frame rate at the default of 12. Now that you have configured the basics of your movie, you need to step outside of Flash and create the data source that Generator will use to create the Flash movie. Generator recognizes two data source formats. The first allows name/value pairs to be passed to Generator. The second, called a column data source, allows sets of related information to be passed to Generator, and is similar to a database result set. You will be using a column data source to pass the sports score data to Generator. We will not spend a lot of time examining Generator data sources however, we will take a quick look at an example data source just so you can get a basic understanding of its format. homeTeam, homeScore, visitorTeam, visitorScore, time, notes "Washington", "78", "New York", "79", "final", "Johnson scores 23 on 8 of 9 shooting" "Phoenix", "102", "Seattle", "98", "1:05 4th Quarter", "Phoenix has won 4 straight." This data source contains three rows, two of which contain sports data. The first row contains the column names that the data in each subsequent row will be accessed by. The second and third rows contain sets of related sports data. Notice that the data is wrapped in double quotes, and a comma separates each section of data. Each piece of data corresponds to a column name in the first row, and each row is separated by a line return. The data is wrapped in double quotes to prevent commas that are part of the data from confusing Generator. If you want to display double quotes within your data, you can escape them by placing a backslash (\) in front of the double quote you want to display. This tells Generator that the double quote is part of the data to be displayed.  | You can also escape backslashes with another backslash. |
For example: "Mike Said, \"Isabel likes to eat\"" Notice that backslashes are placed before the inside double quotes, so that the quotes will remain part of the data. -
Now that you have had a crash course in Generator column data sources, you can create one for our movie. In the same directory that contains the FLA for the movie, create a new text file and name it sports_data.txt . -
Open the sports_data.txt file with a text editor and enter the following data: homeTeam, homeScore, visitorTeam, visitorScore, time, notes "Washington", "78", "New York", "79", "final", "Johnson scores 23 on 8 of 9 shooting" "Phoenix", "102", "Seattle", "98", "1:05 4th Quarter", "Phoenix has won 4 straight." "Dallas", "109", "Atlanta", "107", "Final", "Smith scores his 10,000th career point." "Toronto", "105", "Portland", "98", "Final", "Pearson has career high 19 rebounds." This is a simple column data source that contains information about basketball games.  | For this example we are using a simple text file to hold the data. However, as you have probably already realized, this is not very dynamic. In a production environment, you would probably have some middleware such as Java, ColdFusion, ASP, or PHP to dynamically create the data source. Instead of loading the text file, Generator would connect to the middleware, which would in turn send the up-to-date dynamic sports data directly to Generator. |
-
Save the text file, and switch back to Flash. -
Now that the data source has been created, you are finally ready to begin putting together your Flash movie. First you need to create the Movie Clip that actually displays the sports data. Create a new Movie Clip symbol and name it scores tween . This Movie Clip holds the Movie Clip that contains the actual sports data. -
Create a second Movie Clip and name it data . This Movie Clip contains Generator variables that will be replaced with the data from your data source when the Flash movie is created. -
The data source that you created contains the following variables: homeTeam , homeScore , visitorTeam , visitorScore , time , notes . These variables will be used to display data within your Flash movie. Using the Text tool, place each Generator variable on the stage within the data Movie Clip. This is done by surrounding the variable name with curly brackets (see Figure 10.4), like so: {homeTeam} . Figure 10.4. Data Movie Clip with Generator variables. 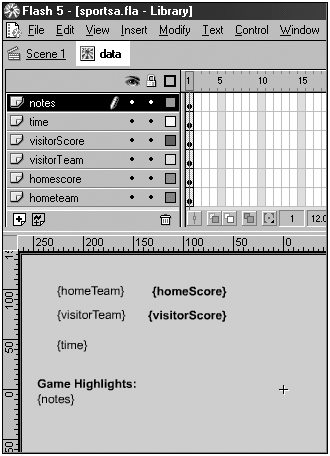 The font properties and position that you use for the variables will be inherited by the data when it is displayed.  | It is a good idea to place each variable on its own layer. This helps to organize the Movie Clip and can make it easier to work with, especially if the clip becomes complex. |
-
After you have placed all the variables inside of the data Movie Clip, open the scores tween Movie Clip, and place an instance of the data Movie Clip into it. You want the scores to automatically cycle through each set of scores by fading in and out. By placing the Movie Clip with the Generator variables inside of another Movie Clip, you can use an alpha/visibility tween to transition between scores. -
Select the data Movie Clip on the timeline of the scores tween Movie Clip. We are going to set its alpha to 0%, tween it to 100% and then tween it back to 0%. Generator creates a Movie Clip instance for each set of data and places them back-to-back. When the movie plays, the scores will transition seamlessly from one to another. -
With the data Movie Clip selected on the timeline open the Effects panel (Window, Panels, Effects) and set the alpha to 0% (see Figure 10.5). Figure 10.5. Effects panel with Alpha set to 0%. 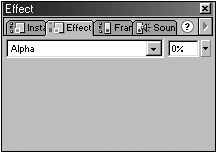 -
On the timeline, select frame 5 and add a new keyframe (Insert, Keyframe). Select the Movie Clip instance on frame 5, and set the Alpha to 100% using the Effects panel. -
Select frame 15 and add another keyframe. This is the point where the Movie Clip begins to fade out. -
Select frame 20 and add another keyframe. Using the Effects panel, set the Alpha of the Movie Clip to 0%. -
Now that you have added the keyframes and alpha changes, you need to add the tweens to the timeline. Select frames 1 5, and create a motion tween (Insert, Create Motion Tween). -
Repeat step 17 for frames 15 20. At this point, if you scrub the timeline back and forth you should see the Generator variables fade in and out (see Figure 10.6). Figure 10.6. Scores tween Movie Clip timeline with tweens. 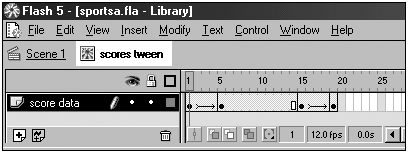 -
Switch to the main timeline and place an instance of the scores tween Movie Clip onto the stage. -
With the scores tween Movie Clip instance selected open the Generator panel (Window, Panels, Generator) and select Replicate from the drop-down menu. Replicate is a Generator command that copies a Movie Clip for each row of data in a data source and then strings all the frames of the Movie Clips together, one after the other. -
After replicate has been selected, its settings will appear in the Generator panel. For the Data Source setting, enter the name of the data source you created earlier (sports_data.txt). You can leave the Expand Frames setting to true.  | When using a relative path, the path is relative to the location of the Generator template. |
 | For a more thorough discussion of relative versus absolute paths, see the following resources at Macromedia.com: For document-relative, site root-relative, and absolute paths, see http://www.macromedia.com/support/flash/ts/documents/relative_urls.htm. For target paths, see http://www.macromedia.com/support/flash/action_scripts/nesting_movies/nesting_movies05.html. |
-
That's all you need to do to create the movie. To view the movie select Control, Test Movie. You should see the sports scores fade in and out (see Figure 10.7). Figure 10.7. Final movie created by Generator. 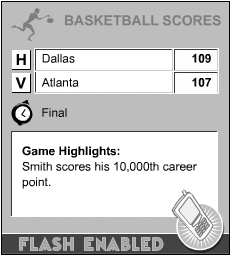  | If the scores transition too quickly, you can adjust the speed by adding or removing frames in the scores tween Movie Clip. |
Generator took the scores tween Movie Clip and copied its frames for each row of data in the data source. It is important to remember that our movie is a Flash 3 movie, which can be displayed on virtually any device with a Flash Player. Of course, you could have just as easily created a Flash 4 or 5 file using Generator, but if you do not need the added features and functionality provided by those players, there is really no need to publish at the higher version. But what if you wanted to display the file on the widest range of devices, yet also desired some functionality and features provided by Flash 4 or 5 ActionScript? The solution is to create a stub movie with the added functionality that loads the Flash 3 movie. When displaying on devices with a Flash 4 or greater Player, the stub movie would load the Flash 3 movie (using loadMovie), and provide greater functionality. However, if displaying on a device with a Flash 3 Player, you could simply load the Flash 3 file directly. Another advantage of using Generator is that you can create other graphic formats from the same template and data from which the Flash movie is created. Generator can automatically create an animated GIF file that displays all the scores. This makes it possible to serve your content to a device even if it does not have a Flash Player.  | At the time that this was written, JGenerator could only output Flash movies, and could not dynamically create other graphic formats. |
-
Using the same file that you created in the preceding example, open the Publish Settings window (File, Publish Settings) and check GIF Image (.gif). -
Open the GIF settings by clicking on the GIF tab. This is where you can specify all the settings for the GIF file that Generator creates. For this example, you just need to be sure that Playback is set to animated. This tells Generator to create an animated GIF. -
Click OK, and publish the movie (File, Publish). If you look in the directory that contains your FLA, you will find an animated GIF file named sportsa.gif that displays all the sports information. If the template is served from a Generator server, you can dynamically choose whether to create a Flash movie or a GIF file on-the-fly by specifying the file type desired in the URL when the template is requested. sportsa.swt?type=gif Using this capability in combination with some simple detection scripts would ensure that your content could be viewed by virtually any device, regardless of whether it contained a Flash Player. Advantages of server-side dynamic content for devices include the following: Works on Flash 3 Players and above. Allows dynamic content to be synced and then played on a non-network connected device. Can deliver non-Flash graphic content based on same template and data if Flash Player is not available. Modular development allows tiered functionality based on Flash Player present on device being targeted. Disadvantages are Requires a server to deploy. Once raw data has been processed, it is not automatically available to ActionScript for further processing or manipulation on the client side. If you need to refresh the data, you will need to reload the SWF containing the dynamic content, which will almost certainly be larger than just loading the data. A Client/Server Architecture for Dynamic Flash Content In the previous section you used Generator to create dynamic content entirely on the server side. Not only did this allow you to create a Flash 3 based movie, but it also allowed you to create an animated GIF from the same template from which you created the Flash movie. However, this technique has the disadvantage that once the content has been created from the data, the data is no longer available to ActionScript. This prevents ActionScript from being able to manipulate the content and data at runtime. This leads us to our second technique, which uses Generator or JGenerator to embed the data into the Flash movie at the time that it is synced/transferred to the device, and then use ActionScript to manipulate that data at runtime. There are a number of different ways you could structure the data in this approach: Because you are transferring complex structured data, and you can use Flash 5, you will use XML to represent your data. You will use Generator to dynamically place the XML into a Flash ActionScript XML object. When the Flash movie runs, it can then parse through the XML and use it to display the information. The benefit of this is that it allows you to use the advantages of Flash 5 ActionScript to manipulate dynamic data even if the Flash movie is viewed in a device that is not connected to a network. -
Create a new Flash movie and name it sportsb.fla . -
Open the Movie Proprieties window (Modify, Movie) and set the width to 230 and the height to 255. -
Be sure that in File, Publish Settings, both the Generator (SWT) and Flash (SWF) tabs are checked. Open the Flash tab, and make sure that the movie is set to publish as a Flash 5 movie. You can now create the data source that Generator will use to insert the XML into the Flash movie. First, let's look at what the sports data will look like represented as XML: <xml> <game> <homeTeam>Washington</homeTeam> <homeScore>78</homeScore> <visitorTeam>New York</visitorTeam> <visitorScore>79</visitorScore> <time>Final</time> <note>Johnson scores 23 on 8 of 9 shooting</note> </game> <game> <homeTeam>Phoenix</homeTeam> <homeScore>102</homeScore> <visitorTeam>Seattle</visitorTeam> <visitorScore>98</visitorScore> <time>1:05 4th Quarter</time> <note>Phoenix has won 4 straight.</note> </game> <game> <homeTeam>Dallas</homeTeam> <homeScore>109</homeScore> <visitorTeam>Atlanta</visitorTeam> <visitorScore>107</visitorScore> <time>Final</time> <note>Smith scores his 10,000th career point.</note> </game> <game> <homeTeam>Toronto</homeTeam> <homeScore>105</homeScore> <visitorTeam>Portland</visitorTeam> <visitorScore>98</visitorScore> <time>Final</time> <note>Pearson has career high 19 rebounds.</note> </game> </xml> This is just a simple XML document that uses the same sports data used in the previous example. You need to embed this XML into the Flash movie. You will do this on the server side with Generator by embedding the XML string into a Generator data source. As we briefly discussed in the previous example, Generator has two data source formats, name/value, and column. You used the column format in the previous example. Because you only need to create one Generator variable that contains the XML, you will use the name/value format for this example. Let's take a quick look at the name/value Generator data source format, which, as its name implies, is used to send name/value pairs to Generator. Here is an example: name, value firstName, "Squish" occupation, "Kitty Cat" The first line tells Generator that this is a name/value data source. The subsequent lines are name/value pairs. Each pair is separated by a line return, and the name is separated from the value by a comma. This example creates two Generator variables, firstName and occupation, that can be used to insert the data into the Flash movie created by Generator. For this example, you need to store the entire XML data within a single Generator variable. This may sound complicated, but it is actually quite simple. Here is what your data source will look like: name, value sportsXML, "<xml><game><homeTeam>Washington</homeTeam><homeScore>78</  homeScore><visitorTeam>New York</visitorTeam><visitorScore>79</visitorScore><time>Final</ homeScore><visitorTeam>New York</visitorTeam><visitorScore>79</visitorScore><time>Final</  time><note>Johnson scores 23 on 8 of 9 shooting</note></game><game><homeTeam> Phoenix</ time><note>Johnson scores 23 on 8 of 9 shooting</note></game><game><homeTeam> Phoenix</  homeTeam><homeScore>102</homeScore><visitorTeam>Seattle</visitorTeam><visitorScore>98</ homeTeam><homeScore>102</homeScore><visitorTeam>Seattle</visitorTeam><visitorScore>98</  visitorScore><time>1:05 4th Quarter</time><note>Phoenix has won 4 straight.</note></ visitorScore><time>1:05 4th Quarter</time><note>Phoenix has won 4 straight.</note></  game><game><homeTeam>Dallas</homeTeam><homeScore>109</homeScore><visitorTeam>Atlanta</ game><game><homeTeam>Dallas</homeTeam><homeScore>109</homeScore><visitorTeam>Atlanta</  visitorTeam><visitorScore>107</visitor Score><time>Final</time><note>Smith scores his 10, visitorTeam><visitorScore>107</visitor Score><time>Final</time><note>Smith scores his 10,  000th career point.</note></game><game><homeTeam>Toronto</homeTeam><homeScore>105</ 000th career point.</note></game><game><homeTeam>Toronto</homeTeam><homeScore>105</  homeScore><visitorTeam>Portland</visitorTeam><visitorScore>98</visitorScore><time>Final</ homeScore><visitorTeam>Portland</visitorTeam><visitorScore>98</visitorScore><time>Final</  time><note>Pearson has career high 19 rebounds.</note></game></xml>" time><note>Pearson has career high 19 rebounds.</note></game></xml>"  | The data source is actually just two lines (although the line is too long to fit on a single line in the book). |
Basically, the data source looks like this: name, value sportsXML, XML Data Here This stores your entire XML string into a single Generator variable named sportsXML. First, all the formatting white space (extraneous tabs, spaces, and line returns not part of the actual data) has been removed from the XML. This makes the data easier to work with in Generator, and also makes the data easier to work with within Flash as we do not have to worry about white space being treated as an XML node. Second, the entire string of XML is wrapped within double quotes. Just as in the previous example, this is done to escape any line returns or commas within the XML data. If the XML contained double quotes, then you would have to escape those double quotes with a backslash. Also keep in mind that you are using a text file to keep the example simple. In a production environment, the Generator data source and the XML it contains would most likely be dynamically created by some middleware such as Java or ColdFusion. -
Create a new text document and name it sports_xmldata.txt . Place the data source shown previously into the text file and save it into the same directory as the Flash movie. In the previous example you loaded the data source directly into a Generator command. However, for this example, you are not using an object, but rather dynamically inserting data that will be used by ActionScript. Because of this, you need to use the Generator environment variable button to load the Generator data and make it available on the main timeline, as well as all its children timelines (see Figure 10.8). Figure 10.8. The Environment variable button.  -
Open the Set Environment window by pressing the Generator Environment variables button (see Figure 10.9). It is located at the top right of the Flash authoring environment. Figure 10.9. The Set Environment window with data source specified. 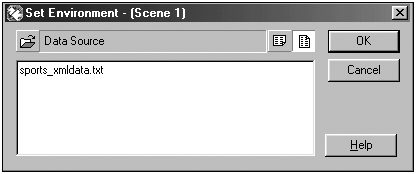 -
Type the name of the Generator data source that contains the XML, "sports_xmldata.txt" into the window. Make sure that the "Name/Value data layout" button is selected (see Figure 10.10). Figure 10.10. Set Environment window with Name/Value data layout button selected. 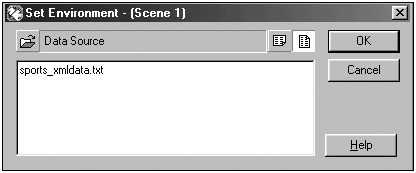 At this point when the movie is tested, any name/value pairs within the data source will be available to the entire Generator template. Using this data, you can now insert the XML from the Generator data source into an ActionScript XML object. -
Select frame one on the main timeline and open the Frame Actions panel (Window, Actions). Remember that the XML is stored in a Generator variable called sportsXML (as defined in the data source). You need to transfer the XML into a Flash XML object by placing the Generator variable within an XML constructor. scores = new XML("{sportsXML}"); Be sure that you add the double quotes around the Generator variable. This is necessary because all data inserted from a Generator variable are treated as strings by ActionScript. This ActionScript code creates a new XML object called "scores" that contains all the XML sports score data. You can now access this data and do what ever you like with it using standard Flash 5 ActionScript. Best of all, this will work even if the Flash movie is run on a device that is not connected to a network.  | The XML is not actually parsed into an ActionScript XML object until it is loaded into the player. Because of this, the same general guidelines discussed earlier in the book concerning performance and optimizations when using XML apply. |
-
You can check to be sure that the XML was added to the XML document by tracing the contents of the XML object: trace("The XML data is : \n" + scores); This prints out the contents of the XML document to the output window. -
Test the movie (Control, Test Movie). The output window should pop up and print the contents of the XML object (see Figure 10.11). Figure 10.11. The Output window with trace of XML inserted by Generator.  Because the main emphasis of this example is using Generator to get the data into Flash, we will not look at how to actually use the data once it is within Flash. Utilizing the XML inserted by Generator simply involves parsing and manipulating the XML with standard ActionScript. The advantages of this technique are as follows: Allows dynamic Flash content creation even when the movie is run on a non-connected device. Allows dynamic data and Flash content to be contained within one file. Data can be manipulated by ActionScript at runtime. The disadvantages are as follow: Requires at least Flash 4 Player, and Flash 5 for use of XML. Depending on amount of data, and processing speed of device, can be CPU intensive. |


