| Changing a symbol instance's alpha isn't much different from moving an instance around the Stage and is pretty much the same as changing its brightness level, which you did in the previous exercise. As you read in earlier lessons, alpha refers to the amount of opaqueness (or transparency) that an object has. If an object's alpha is set to 0, it is fully transparent and invisible on the Stage. If an object has a visibility of 100%, it is completely visible. Using the alpha property of a symbol instance with a motion tween produces fade in and fade out effects. Note Fading in and out with alpha should be used sparingly because it is very processor-intensive. Down right hungry for it, in fact.
In the following example, you will use motion tweens to fade the glow that is animated behind the logo and then to change the scale of the graphic. You are still working with the bookstore9.fla file where you left off from the previous exercise. 1. | Select grGlow and convert it to a movie clip symbol named mcBookGlow. Then rename Layer 1 to glow animation.
Make sure that you are on the main Stage by clicking Scene 1 in the edit bar, if necessary.
Find the instance of the grGlow inside mcLogo. The easiest way to do this is to either double-click mcLogo in the library, or double-click it on the Stage. Either will get you into symbol-editing mode, in which you can then select the grGlow instance and press F8 to convert it into a movie clip symbol called mcBookGlow. You need to change the graphic symbol into a movie clip because the animation you add needs to loop repeatedly. Make sure that the pageTurn and logo layers are locked so you can select the grGlow instance. Double-click mcBookGlow to open the instance and rename the default layer from Layer 1 to glow animation. You are now three Timelines deep (see figure on the next page).
 | 2. | Create keyframes on Frame 35 and Frame 70 of the glow animation layer.
Select Frame 35 of the glow animation layer and add a new keyframe. This procedure copies the contents of Frame 1 into the keyframe on Frame 35.
Insert another keyframe on Frame 70 on the glow animation layer. You will next change the alpha and size of grGlow across the sets of frames.
| 3. | Resize grGlow using the Transform tool.
Select Frame 35 on the glow animation layer. Select the Transform tool from the Tools panel and drag one of the corner handles toward the center of grGlow to make the instance smaller. To prevent the symbol from distorting and to maintain the symbol's aspect ratio while you resize it, press and hold Shift while dragging the mouse. Resize the instance so it is mostly hidden behind grLogo, as seen in the figure in Step 4. grLogo is visible below grGlow, just dimmed-out because it is in a different Timeline (if you are in edit-in-place mode, that is).
Tip You can also select the scale option in the Options section of the Tools panel with the Free Transform tool selected. When the scale option is chosen, an object's proportions are constrained when you drag any of the corner handles. | 4. | Change the alpha of grGlow using the Property inspector and motion tween.
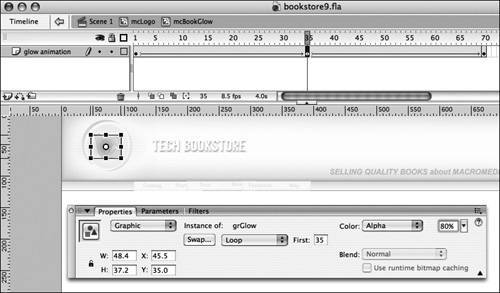
You have changed the size of the graphic on Frame 35. Now change the alpha of the instance. Select the instance on Frame 35, again by using the Selection tool. Select Alpha from the Color drop-down list in the Property inspector's Properties tab and move the Alpha slider from 100 to 80 percent.
 If you find the amount doesn't look quite right on your screen, modify the new alpha value you gave the instance. If you find the amount doesn't look quite right on your screen, modify the new alpha value you gave the instance.
Tip Remember that the changes you are making to the instance on the Stage do not affect the symbol in the library. You can pull another copy of grGlow from the library, and it appears on the Stage as it originally appeared before you made the modifications. | 5. | Add motion tweens to scale the graphic and then scrub the Timeline to view the animation.
Click on any frame between Frame 1 and 35 and expand the Property inspector. Change the Tween drop-down list from None to Motion. Follow the same steps for a frame between Frame 35 and 70. The movie clip should now scale the glow larger and fade it out slightly before returning to its original state when you view it on the Timeline. You can also test this individual movie clip (and not the entire SWF file) by moving your playhead to Frame 1 of the mcBookGlow symbol and selecting Control > Play from the main menu.
| 6. | Move mcBookGlow into the Movie Clips folder in the library. Save the FLA file before proceeding to the next exercise.
|
|