| Dynamic loading of an image is one of the more important features to understand in Flash because images are often used to display catalogs of products or photo galleries of some sort. Because images tend to be big, importing all the images you would need to display for galleries or product catalogs would make your Flash application a little on the large side. Add to that the fact that the images often have to be sorted based on some kind of interaction with the user so that some images display and others are ignored, and you have a recipe for a bloated application that would take roughly two thousand years to download off the web (hyperbole intended). Keeping your images external and retrieving them only when needed really takes care of this problem for you. It also makes your Flash file kind of like a shell that can be easily updated or repurposed to meet changing needs because most of your visual content is externalized. Flash 8 Basic and Professional both have the ability to dynamically load JPEG, PNG, and GIF formatted images at runtime (when the SWF is loaded in the browser and runs, that is to say). Tip Flash 8 Basic introduces the ability to load progressive JPEGs as well as standard JPEG images. Progressive JPEGs draw as they are loaded, which is a good visual cue to an end user that something is in fact happening in the application.
When you load a JPEG, GIF, or PNG image using ActionScript, you have to put it in something for display. You can't really load it into the main document Timeline because it will force all the other content out in favor of the newly loaded image. Even if you did, the image would display at the upper-left corner of the Flash document and wouldn't be able to be repositioned because images are not ActionScript objects and therefore can't be controlled. To gain control of those unruly images, you'll need to load them into individual movie clip instances, which, by the way, have to be named. Movie clips, buttons, components, and nonvisual ActionScript objects (which you will use in Lesson 9) can accept instance names, which are essentially used to boss the aforementioned objects around. Tip You can also load JPEG, GIF, or PNG images into Loader components. You will load PNG images into Loader component instances in Lesson 9.
As you will discover in this exercise, instance names are necessary to target the movie clip and button symbols you placed in your Flash document. You have to give the movie clip instances a name so Flash knows what object to manipulate when you add ActionScript to tell something what to do. You can add instance names using the <Instance Name> field in the Property inspector, or you can provide an instance name when you add behaviors. However, it's a better practice to name them in the Property inspector because the option to give something an instance name when you add a behavior is really only there in case you forgot to name it to start with. No getting sloppy now. You will give an instance name to a movie clip so you can load an image file into that movie clip in this exercise. 1. | Open bookstore9.fla from your TechBookstore directory or from the lesson06/start directory on the CD-ROM and save a new version of the file as bookstore10.fla.
Save the new version of the file into the TechBookstore folder on your hard drive.
| 2. | Copy the Macromedia Press logo from the lesson06/assets directory on your CD-ROM and paste it into your TechBookstore folder.
There is a file named mmpresslogo.jpg located within the lesson06/assets folder on your CD-ROM. This is the image that you will use a behavior to load. Placing it in the root directory of your TechBookstore folder will make it easier to do this exercise, but in the real world, you can place it in any folder you want, as long as your directory structure is maintained from your development computer to your web server.
| 3. | Select the home layer in the pages layer folder and create a new rectangle on the Stage. Convert the rectangle into a movie clip and give it an instance name.
Select the home layer that is within the pages layer folder on the Timeline. Make sure that the playhead is at Frame 1. Select the Rectangle tool from the Tools panel and set the stroke color to No Color and the fill color to black (#000000). Draw a rectangle on the Stage and change its dimensions to 128 pixels wide by 96 pixels high in the Property inspector.
Double-click the rectangle that you created and then press F8 to convert it into a symbol. Name the symbol mcMMPressLogo and then click the Movie clip radio button. Set the registration point for the symbol to the upper-left corner (click the upper-left black square in the grid) and click OK. On the Property inspector, give the new movie clip the instance name mmPressLogo. Move the movie clip near the lower-right corner of the Stage, similar to the following figure.
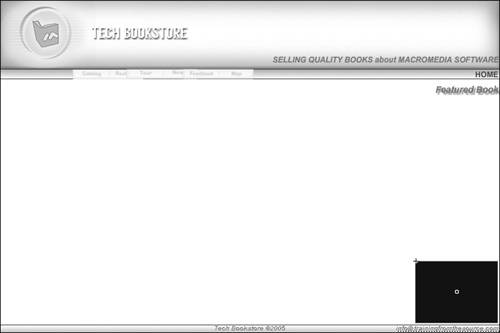 Tip The instance name of the movie clip and the library name are not the same thing. The instance name is what ActionScript needs to be able to refer to the object on the Stage. The library name is what you use to organize your document's assets. You'll be using this movie clip as a container for the image that you're going to load dynamically when the SWF file runs. The black graphic will be replaced by the mmpresslogo.jpg image, so it's serving as a placeholder for the actual content in this circumstance. That way, you know where to place it.
| 4. | Add a new layer called actions to the Timeline and add keyframes for each page.
Select the labels layer and press the Insert New Layer button. Rename the new layer actions. It should be the top layer on the stack of layers in the Timeline.
When you finish creating and naming the layer, select the frame above each label and then press F6 to insert a new keyframe, as shown in the following figure. This is where your actions will eventually be placed for each page. For now, you are concerned only with the actions on the home page.
 | 5. | Add a behavior by using the Add (+) menu to load mmpresslogo.jpg into the SWF file.
There are two different places where you can add a behavior: on a keyframe or on the instance itself. The behaviors that you can add depend on what it is you have selected. For instance, some behaviors can't be added to frames, so they won't be available. Others can only be associated with buttons. You'll see what you can add when you press the Add Behavior (+) button and make choices from the drop down and fly over menus.
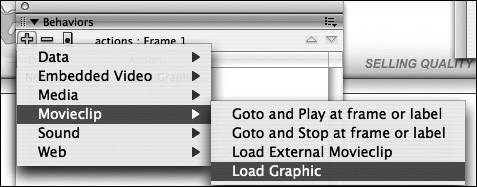
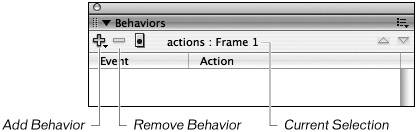 The behaviors are arranged by category. When you press the Add Behavior button, you'll get a menu of choices that displays these categories. Loading an external graphic image is a special feature of movie clips, so the behavior you want is in the Movieclip category.
Select Frame 1 of the actions layer and open the Behaviors panel. If it is not already open, select Window > Behaviors. With Frame 1 selected, click the Add Behavior button in the Behaviors panel and select Movieclip > Load Graphic from the Add Behavior menu.
In the Load Graphic dialog box, type assets/mmpresslogo.jpg into the upper text field, and select the mcMMPressLogo movie clip from the tree below both text fields listing the instances available. Click the Relative radio button, which refers to the kind of address used to target the image outside of the SWF file. Ultimately, you're specifying which image should load, and where it should go when you load it in. Apart from that, don't worry about the fine details just yet. You will learn about absolute and relative addressing of instances in Lesson 9. Press OK again to return to the main Stage.
 | 6. | Save the changes you made to the document.
At this point, you can't yet effectively test this functionality because you haven't added the ActionScript that stops the Timeline from moving beyond the first frame. You will test the FLA file later on in the lesson as well, and you'll also take a look at the ActionScript that the Behaviors panel just added on your behalf.
Choose File > Save to save your changes before moving on.
|
|