| Once you have finished all the other steps in this process, you have to import your content into CMS. Importing your content (or content conversion, as it is sometimes called) is the process of creating postings within CMS and filling the placeholders within those postings with the content in your existing site. Since most sites are rather unique, it would be difficult to describe what you specifically must do to convert your content. However, there are two general approaches to migrating your content: an automated import and a manual import. Automated Import If your current site is already in a structured format (e.g., in a database or using templates), then it may be possible to directly import your content. The following code sample demonstrates, in C#, how to programmatically create a posting, populate the placeholders, and submit it for approval. [View full width] using System; using System.Collections; using System.ComponentModel; using System.Data; using System.Drawing; using System.Web; using System.Web.SessionState; using System.Web.UI; using System.Web.UI.WebControls; using System.Web.UI.HtmlControls; using Microsoft.ContentManagement.Publishing; using Microsoft.ContentManagement.Publishing.Extensions.Placeholders; using Microsoft.ContentManagement.Web.Security; namespace botsconsulting.ContentImport { /// <summary> /* This page allows for an automated import of structured content The file assumes that you have two server controls on your ASPX file: - A list box called lstImportList - A button called btnGo This is meant to be a template file, associated with a TGI. Once you've created your template, you must create a posting to run the code. */ /// </summary> public class ContentImport : System.Web.UI.Page { protected Microsoft.ContentManagement.WebControls.RobotMetaTag RobotMetaTag1; protected System.Web.UI.WebControls.ListBox lstImportList; protected System.Web.UI.WebControls.Button btnGO; private void Page_Load(object sender, System.EventArgs e) { if (CmsHttpContext.Current.Mode != Microsoft.ContentManagement  .Publishing.PublishingMode.Update) { Response.Redirect(CmsHttpContext.Current.Posting.UrlModeUpdate); } if (!this.IsPostBack) {this.AddLogEntry("Current CMS Publishing Mode: " + CmsHttpContext .Current.Mode);} } private bool CreatePosting(string strPostingName, string strTitle, string strByLine, string strTeaser, string strBodyCopy) { // CreatePosting handles the work of creating the new posting. It takes the necessary parameters to create // the new posting, but assumes the channel and template. This code could be expanded to include those // items as well. // Create a reference to the channel where the posting will be created Channel objRootChannel = CmsHttpContext.Current.RootChannel; try { // Make sure that the current user can add postings to the channel if (objRootChannel.CanCreatePostings) { // Create a reference to the template you're going to use with the new posting Template objArticleTemplate = (Template)CmsHttpContext .Current.Searches.GetByPath("/Templates/Insight/HTMLArticle"); // Create the new posting in the channel Posting objNewPosting = objRootChannel.CreatePosting (objArticleTemplate); // Give the posting a name, display name and fill in the placeholders objNewPosting.Name = strPostingName; objNewPosting.DisplayName = strTitle; HtmlPlaceholder objPlaceholder = (HtmlPlaceholder)objNewPosting.Placeholders["strArticleAuthor"]; objPlaceholder.Html = strByLine; objPlaceholder = (HtmlPlaceholder)objNewPosting .Placeholders["strArticleTeaser"]; objPlaceholder.Html = strTeaser; objPlaceholder = (HtmlPlaceholder)objNewPosting .Placeholders["strArticleBodyCopy"]; objPlaceholder.Html = strBodyCopy; // Put an entry in the list box indicating you've successfully added the posting this.AddLogEntry (objNewPosting.Name + " added successfully."); // Commit the change to the CMS repository CmsHttpContext.Current.CommitAll(); // Submit the new posting for approval objNewPosting.Submit(); // Return a successful import return true; } else { // If the user does not have sufficient rights, add an entry to the list box this.AddLogEntry("User did not have sufficient rights to add a posting."); return false; } } catch { // If an exception is thrown, simply add an entry to the list box this.AddLogEntry("An exception was thrown when trying to create the posting."); return false; } } private void ImportContent() { // Add two entries to the list box, indicating the process has begun and who is logged on this.AddLogEntry("Starting import."); this.AddLogEntry("User logged on: " + CmsHttpContext.Current.User .ClientAccountName.ToString()); // Try to create the posting, passing in the appropriate values. While this call // only passes a single argument, you can pass in multiple argues by looping through // a recordset or other data source. if (!CreatePosting("MyPageName","My Title","First placeholder value" ,"Second placeholder value","Third placeholder value")) { this.AddLogEntry("Import failed."); } else { this.AddLogEntry("Import succesful."); } } public void AddLogEntry(string strLogEntry) { // This is a simple progress log that adds items to the list box ListItem lstItem = new ListItem(); lstItem.Text = System.DateTime.Now + " :: " + strLogEntry; lstImportList.Items.Add(lstItem); } #region Web Form Designer generated code override protected void OnInit(EventArgs e) { // // CODEGEN: This call is required by the ASP.NET Web Form Designer. // InitializeComponent(); base.OnInit(e); } /// <summary> /// Required method for Designer support - do not modify /// the contents of this method with the code editor. /// </summary> private void InitializeComponent() { this.btnGO.Click += new System.EventHandler(this.btnGO_Click); this.Load += new System.EventHandler(this.Page_Load); } #endregion private void btnGO_Click(object sender, System.EventArgs e) { ImportContent(); } } } .Publishing.PublishingMode.Update) { Response.Redirect(CmsHttpContext.Current.Posting.UrlModeUpdate); } if (!this.IsPostBack) {this.AddLogEntry("Current CMS Publishing Mode: " + CmsHttpContext .Current.Mode);} } private bool CreatePosting(string strPostingName, string strTitle, string strByLine, string strTeaser, string strBodyCopy) { // CreatePosting handles the work of creating the new posting. It takes the necessary parameters to create // the new posting, but assumes the channel and template. This code could be expanded to include those // items as well. // Create a reference to the channel where the posting will be created Channel objRootChannel = CmsHttpContext.Current.RootChannel; try { // Make sure that the current user can add postings to the channel if (objRootChannel.CanCreatePostings) { // Create a reference to the template you're going to use with the new posting Template objArticleTemplate = (Template)CmsHttpContext .Current.Searches.GetByPath("/Templates/Insight/HTMLArticle"); // Create the new posting in the channel Posting objNewPosting = objRootChannel.CreatePosting (objArticleTemplate); // Give the posting a name, display name and fill in the placeholders objNewPosting.Name = strPostingName; objNewPosting.DisplayName = strTitle; HtmlPlaceholder objPlaceholder = (HtmlPlaceholder)objNewPosting.Placeholders["strArticleAuthor"]; objPlaceholder.Html = strByLine; objPlaceholder = (HtmlPlaceholder)objNewPosting .Placeholders["strArticleTeaser"]; objPlaceholder.Html = strTeaser; objPlaceholder = (HtmlPlaceholder)objNewPosting .Placeholders["strArticleBodyCopy"]; objPlaceholder.Html = strBodyCopy; // Put an entry in the list box indicating you've successfully added the posting this.AddLogEntry (objNewPosting.Name + " added successfully."); // Commit the change to the CMS repository CmsHttpContext.Current.CommitAll(); // Submit the new posting for approval objNewPosting.Submit(); // Return a successful import return true; } else { // If the user does not have sufficient rights, add an entry to the list box this.AddLogEntry("User did not have sufficient rights to add a posting."); return false; } } catch { // If an exception is thrown, simply add an entry to the list box this.AddLogEntry("An exception was thrown when trying to create the posting."); return false; } } private void ImportContent() { // Add two entries to the list box, indicating the process has begun and who is logged on this.AddLogEntry("Starting import."); this.AddLogEntry("User logged on: " + CmsHttpContext.Current.User .ClientAccountName.ToString()); // Try to create the posting, passing in the appropriate values. While this call // only passes a single argument, you can pass in multiple argues by looping through // a recordset or other data source. if (!CreatePosting("MyPageName","My Title","First placeholder value" ,"Second placeholder value","Third placeholder value")) { this.AddLogEntry("Import failed."); } else { this.AddLogEntry("Import succesful."); } } public void AddLogEntry(string strLogEntry) { // This is a simple progress log that adds items to the list box ListItem lstItem = new ListItem(); lstItem.Text = System.DateTime.Now + " :: " + strLogEntry; lstImportList.Items.Add(lstItem); } #region Web Form Designer generated code override protected void OnInit(EventArgs e) { // // CODEGEN: This call is required by the ASP.NET Web Form Designer. // InitializeComponent(); base.OnInit(e); } /// <summary> /// Required method for Designer support - do not modify /// the contents of this method with the code editor. /// </summary> private void InitializeComponent() { this.btnGO.Click += new System.EventHandler(this.btnGO_Click); this.Load += new System.EventHandler(this.Page_Load); } #endregion private void btnGO_Click(object sender, System.EventArgs e) { ImportContent(); } } }
In Figure 37-4 you can see how this automated import process works. The interface is rudimentary but serves its purpose. Figure 37-4. View of the template as a posting 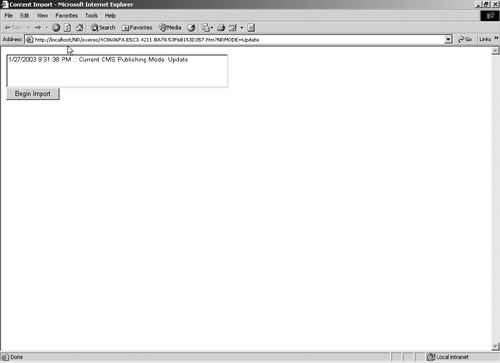
Manual Import (Copy-and-Paste Method) Frankly, most Web sites are not very structured. If your Web site is like most, it would be difficult or impossible to extract content from HTML files (primarily because it would be difficult to distinguish between HTML for formatting and HTML that is necessary for the content). As a result, manually copying and pasting content from your old site to the new one is what a lot of firms end up doing. Ultimately, you will probably end up using a combination of the automated and manual methods. There will probably be a number of pages that have some regular structure to them. These pages may be imported through some scripted import, since they follow some regular pattern (developers like consistency). However, the vast majority will likely follow an inconsistent format. As a result, it will be impossible to extract the content in an automated way. On the upside, these inconsistent pages do make for a great training exercise for your content contributors (see the next section). |