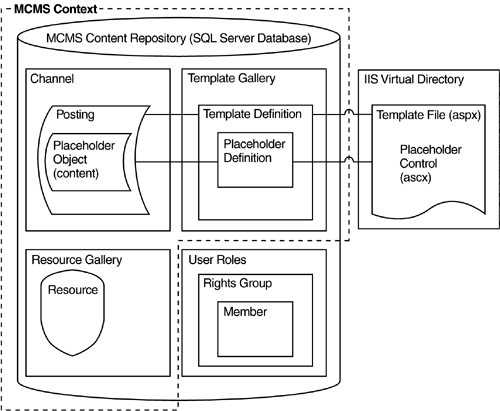
| Figure 24-1 depicts the boundaries of a CMS Context. Figure 24-1. CMS Context 
From the CMS Context we can, given sufficient user rights, access and manipulate all channels, including the current channel (if there is one); access and manipulate all postings, including the current posting (if there is one) and the placeholder objects that they contain; access and manipulate both the template gallery and the resource gallery, including everything that they contain; and access and manipulate templates and their placeholder definitions. We can only access a few characteristics about the current user, and, unfortunately, we cannot manipulate the CMS security structure. NOTE: We cover setting up user rights in detail in Chapter 17.
It is also possible to create temporary PlaceholderControls, but template files cannot be permanently altered through PAPI. The two types of Context we explore in this chapter are CmsHttp Context and CmsApplicationContext. Scratchpad You are going to need a way to see the results of the code we write throughout Part VI. Sometimes it helps to simplify the environment so that you know everything that went into its creation. Most of what we do in these chapters will be the equivalent of using a scratchpad to do math problems. In the end, it isn't what is on the scratchpad that has any value; it is the principles that you learned from what you did on the scratchpad. Anything that is done of any consequence can be readily ported to your real project. Steps for creating the Scratchpad posting used throughout Part VI: Create a new channel. (See Chapter 16 for help with creating channels.) Using Site Manager as a CMS administrator, create a new channel called Scratch. Just take all the defaults. In the Properties of the new Scratch channel, select the Publishing tab and remove all text, if any, from the Script URL text box in the Channel Rendering section.
Create a new VS.NET project. (See Chapter 10 for help with creating projects.) Using VS.NET, create a new C# project called http://localhost/vsScratchpad using the MCMS Web Application template. When prompted, authenticate as a CMS administrator.
Create a new template file. (See Chapter 12 for help with creating a template file.) Using the VS.NET Solution Explorer, add a New Item called ScratchpadTemplate.aspx using the MCMS Template File template. In the Properties of the new ScratchpadTemplate.aspx, change the pageLayout from GridLayout to FlowLayout. Drop the following Web Form controls onto the ScratchpadTemplate.aspx Design palette: TextBox, Label, ListBox, and Button. Use the Enter key after each control to place each control on its own line. Change the width of the TextBox, Label, and ListBox to 600px. Drop the DefaultConsole.ascx from the Console directory onto the ScratchpadTemplate.aspx Design palette after the Web Form Button control. Double-click the Web Form Button control to create the Button1_Click function in the code-behind window.
Create a new template definition. (Again, see Chapter 12 for help with creating a template definition.) Using the VS.NET MCMS Template Explorer, create a new template called ScratchpadTemplate. In the TemplateFile property of the new ScratchpadTemplate, enter the text "/vsScratchpad/ScratchpadTemplate.aspx" or select the ScratchpadTemplate.aspx file. Select Build Solution from the VS.NET Build menu.
Create a new posting based upon the new template in the new channel. (See Chapter 5 for help with creating a posting.) Using Internet Explorer, browse to the Scratch channel: http://localhost/Scratch. When prompted, authenticate as a CMS administrator. If you get the Homeport page instead of the channel Welcome page, you forgot to remove the Script URL in step 2 when creating the channel. You can do it now. Click the Switch to Edit Site link, click the Create a New Page link, click the Templates link under the Template Gallery column, and select the ScratchpadTemplate. Click the Save New Page link. In the resulting dialog, enter "Pad" into the Name text box and click the OK button. Click the Approve link and then close Internet Explorer.
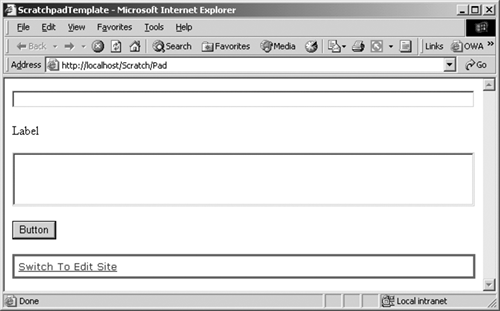
Open Internet Explorer and browse to http://localhost/Scratch/Pad to see the Pad posting (Figure 24-2) we created. You may be required to authenticate. Figure 24-2. Scratchpad in Internet Explorer 
Now we can repeatedly enter code into the Button1_Click function of the underlying template file, refresh the browser, and see the results of that code in this posting. Sweet. |
|

