Managing Data Connections
The BDC allows you to connect your data sources to all Web applications without writing any code. To manage the BDC data connections, you need to perform the following administrator tasks:
-
Deploy the metadata package.
-
Set access permissions, auditing, and authentication settings. (Security was detailed in the previous section.)
-
Configure Single Sign-On if required.
-
Deploy custom business data solutions if any have been created.
To complete the first two administrator tasks, you will use the Shared Services Administration Web page, shown in Figure 12-4, to view, add, modify, and delete application definitions, as well as to configure permissions and edit the profile page template.
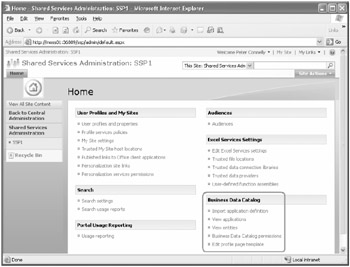
Figure 12-4: Shared Services Administration Web page
Note that the administrative interface describes business data sources as applications, although the metadata describes data sources as LOB systems.
Deploying Metadata Package
As already stated, the key to a successful solution based on the BDC is the metadata defined in the ADF, which you upload into a Shared Services database. The data then becomes available to all the Web applications. To import a metadata package, also known as adding an application definition, follow these steps:
-
On the Office SharePoint Server 2007 Central Administration Web site, in the left navigation pane, click the name of the Shared Services Provider where you want to import the metadata package.
-
In the Business Data Catalog section, click Import application definition to display the Import Application Definition page shown in Figure 12-5.
-
Either click the Browse button to navigate to the ADF or type the location of the ADF in the text box and then click the Import button.
The Application Definition importing Web page is displayed. The import process parses the file and validates it. If errors are found during the import process, the Web page will display additional information. Information can be found in the Windows event logs and the Windows SharePoint Services log file located at %ProgramFiles%\Common Files\Microsoft Shared\web server extensions\12\LOGS, where the relevant messages will be in the Business Data category. You might have to pass this information back to the developer of the ADF. The SDK contains more information on troubleshooting metadata exceptions and interpreting the log files.
A successful import will result in an "Application definition was successfully imported" message. The import process can identify deficits that the ADF may have, in which case, an "Application definition was successfully imported" message appears, together with any warnings issued, similar to the Web page shown in Figure 12-6.
-
Click OK to display the View Application: <application name> Web page, as shown in Figure 12-7. On this page, you manage permissions, export the application definition, or delete the application.
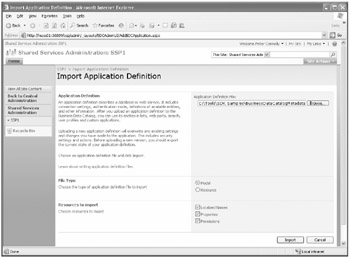
Figure 12-5: Import Application Definition page
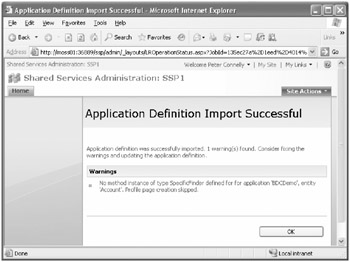
Figure 12-6: Application definition imported successfully with warnings
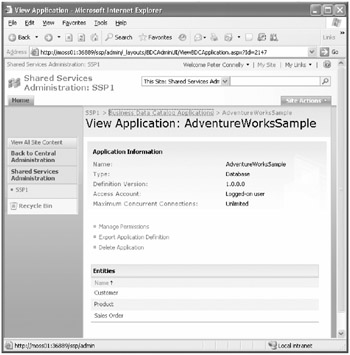
Figure 12-7: View Application page
After you have imported an ADF, you should view the entities and give appropriate access rights according to your requirements, especially if you have chosen at the BDC permission level to copy all permissions to descendants in the BDC.
When the ADF is imported, a profile page is created for each entity, which you can use to view an entity instance. A business data action will be added to any instance of an entity pointing to this profile page. See Figure 12-12, for an example of a profile page populated with data from an entity instance. These are virtual Web pages created from the business data profile template within the Content subsite of the Shared Services Administration Web site. The profile template can be customized by clicking the Edit Profile page template link on the Shared Services Administration Web page. By default, the profile page template contains one Web Part: the Business Data Item Web Part. For an entity profile page to be created, the metadata must have a SpecificFinder method for that entity.
| Planning | Because the profile page is exposed from a subsite of the SSP administration Web site, you should not use a random port number for the Web application that hosts the SSP, especially if you are implementing an Internet site. Firewalls are not usually configured to allow requests to Web sites on ports other than port 80. |
If you have errors in your ADF and need to make amendments, before you re-import the ADF, change the version number within the ADF or delete the LOB application by first clicking the View Applications link on the Shared Services Administration Web page. Then, from the drop-down menu for the appropriate application, click Delete Application as shown in Figure 12-8.
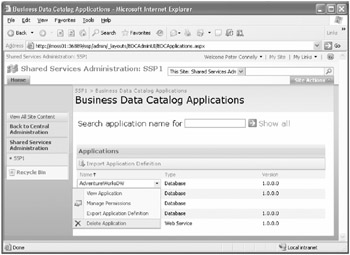
Figure 12-8: Deleting the business data catalog application
| Best Practices | You should not rely on the import process validation checks to identify errors in the ADF. You should check that the business data features-such as the business data Web Parts and business data actions-include a business data column in a list and that the crawl process can function correctly. |
After the ADF is imported, you can change the following values at the application level, using the Administrator Web pages:
-
Authentication mode, labeled as Access Account.
-
Connection throttling-that is, you can limit the number of concurrent connections.
-
For Web services business applications: Web Service URL, Web Service Definition Language (WSDL) Retrieval Account, and proxy server.
-
For database business applications: Data Provider, connection stringProxy server address.
Business Data Actions
Actions provide a link to the back-end data source, usually for write-back scenarios. Actions are URLs that are usually defined in the ADF on a per-entity basis. You can add more actions, modify existing actions, or delete existing actions after you have imported the ADF, and you can do this without the need to delete the application and re-import the ADF. To add actions, follow these steps:
-
On the Shared Services Administration Web page, click View entities. The Business Data Catalog Entities Web page displays a list of all the entities imported into the BDC. From here, you can manage the permissions of an entity or view an entity.
-
From the drop-down menu for the entity for which you want to add a new action, click View Entity. The View Entity: <Entity Name> page is displayed as shown in Figure 12-9. Scroll down the page, and the existing actions are listed in the Actions section.
-
Under the Actions section, click Add Action.
-
On the Add Action Web page shown in Figure 12-10, type a name for the action, type the URL, specify whether to launch the action in a new browser window or not (default), add parameters to the URL if required, and add the icon to display next to the action. You can choose from the Delete, Edit, or New actions, or you can choose your own image.
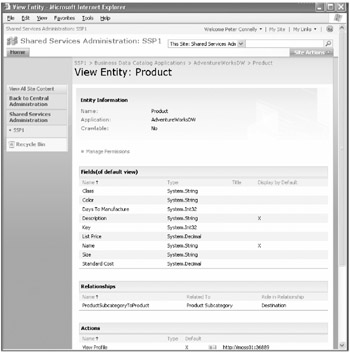
Figure 12-9: View Entity page
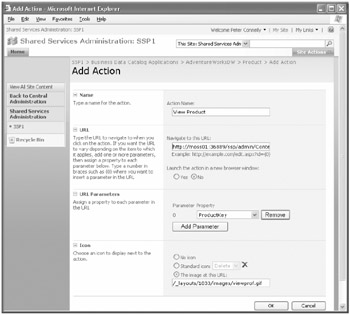
Figure 12-10: Add Action page
Wherever an instance of an entity is displayed, the actions will be visible and presented as a drop-down list of the default column. If a SpecificFinder method is defined for an entity, then the entity has at least one action: the action to display the profile page, as shown in Figure 12-11.
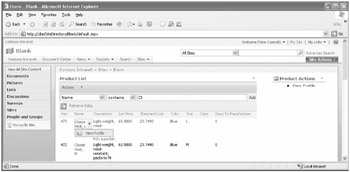
Figure 12-11: Business data actions
When the View Profile action is selected, the profile page is displayed, as shown in Figure 12-12.
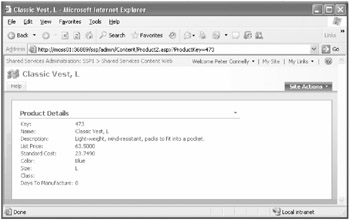
Figure 12-12: A populated generated profile page of an entity instance
Although actions are limited to a URL, you can open a client application from a URL. Two ways to do this are by either writing a Web Part that opens the client application using ActiveX or writing an Internet Explorer pluggable protocol handler.
EAN: 2147483647
Pages: 299