Internet Security Systems RealSecure
Internet Security System s RealSecure
Internet Security Systems (ISS) has been the market leader in intrusion detection software for the better part of a decade now. With the original creation and release of Real Secure, ISS had grabbed the technological advantage for a small, but quickly growing, niche within the security market. According to the 2003 Information Security magazine IDS report, ISS owned nearly 36 percent of the entire IDS market. At press time, Real Secure was on its seventh major release, also known as Real Secure 7.0. All of the following information, screen shots, and tips are for Real Secure 7.0.
The chapter is divided into five main areas. The first area is an overview of the product, Real Secure’s history, its capabilities, and its inherent issues. The second areas is installation, and architecture tips and recommendations. The third area covers location and deployment. As with all intrusion detection systems, these are key because information that isn’t collected can’t be analyzed. In the fourth area, the chapter dives right into a collection of configuration tips and tricks that can and, quite frankly, should be implemented to ensure all crucial attacks are identified and reported. And, in the fifth area, the chapter describes the different reporting options and methods to enable attack signatures or even create custom attack signatures.
Installation and Architecture
One of RealSecure competitive advantages over other commercially available intrusion detection products is its inherent flexibility and scalability for technically diverse networks. RealSecure comes with the capability to be installed on numerous platforms to include multiple versions of Windows server-based platforms, multiple flavors of Linux, Solaris, and Nokia appliances. Whether it be remote or manual, Windows’ installations are the most complicated and detailed installations compared to other platform installations. This, in part, is because of the intricacies within Microsoft platforms, creating Windows services, and the general complexity of the file system and registry in comparison with Linux and Unix systems. At the end of this section, you should be able to install RealSecure quickly and automatically, in a somewhat customized fashion. You also learn how to automate the installation process, so multiple sensors can quickly be deployed throughout your environment.
| Note |
Installation procedures for installing RealSecure on Nokia appliances will not be covered. Please refer to ISS documentation for installation procedures on network sensor installation and gigabit installation with Nokia at http://documents.iss.net/literature/RealSecure/RS_NetSensor_IG_7.0.pdf. |
Architecture Considerations
As with every other intrusion detection system, intrusion-detection system location is the most critical aspect when planning an intrusion-detection system deployment. RealSecure is no different, yet the management systems designed for use within RealSecure’s deployment could prove to be somewhat different, especially when compared to something like the freeware version of Snort. Snort uses a three-tier architecture to capture, manage, and access the stored data on the RealSecure sensor, as seen in Figure 8-1. The first tier is the RealSecure sensors themselves, the second tier is SiteProtector, and the third and near-virtual tier is the management consoles. These management consoles include security and network administrator stations that are used to access SiteProtector. You should consider management communications when you deploy these systems within the environments.
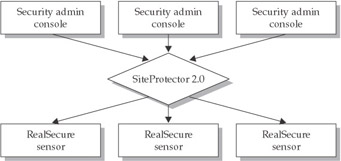
Figure 8-1: RealSecure and SiteProtector architecture
While it is true most communication occurs over HTTP and HTTPS, TCP ports 3998 and 3999 are also used for communication between SiteProtector and the RealSecure Sensors. Firewalls, routers, and VLANs should be configured to ensure the proper communication channels are opened, but that holes haven’t been created to weaken the overall security posture of the network. One popular configuration is to have a security management network to house all security management devices and administrator systems, and then enforce access control lists (ACLs) throughout your network to disallow direct traffic to the security devices, unless it was initiated on the security network. The only downside to this type of configuration is a spoofed attack from a system residing in the route may be able to sniff or collect sensitive data between the sensors and management console.
Because you already learned about network locations IDS sensors, we assume you understand the benefits, advantages, and disadvantages of deploying your sensor inside the network’s outmost perimeter versus outside. Refer to earlier chapters if you have any questions about sensor placement.
Network mapping tools are excellent resources that can lessen some of the burden during the initial architecture-design periods for deployment. Logical and geographical network maps can be used to determine how many sensors are needed and combined with network administration statistics on bandwidth consumption. This may also prove helpful with identifying hardware requirements for the individual sensors. One last note before moving forward, geographical locations are an extremely useful guide to assisting with device naming schemas.
Windows Installation
If you’ve ever installed a Windows application, the typical sensor installation is straightforward. In this section, the focus is on the intricacies of going through a potentially atypical or custom installation on Windows systems. The graphical interface appears like any other Windows installation walkthrough and, with the corresponding directions, navigating through the installation quickly should be easy.
After you ascertain the main setup.exe program, double-click it and the installation will start. The installation GUI should pop up and begin to lead you through the installation program. Click Next to begin, and then accept the software license agreement to proceed to the rest of the installation.
Once the actual setup program begins after the license agreement, click Custom. Even if you don’t want a custom installation, this provides you with the knowledge of what is being installed on your sensor and what options you can modify from the onset. Plus, if you use the Autorecord and Autoinstall features, you will only have to do this once. After you select the RealSecure Network Sensor option, you must enter a sensor name. As a reminder, there is no specific requirements for a sensor’s name but, as nearly every IT department has learned, naming schemas is key to keep your administrator’s sanity intact.
RealSecure enables you to modify the default location for the sensor programs (C:Program FilesISSissSensors etwork_sensor_name). In general, there is no reason to modify the installation directory unless, for some reason, you want to put it on another drive or you implemented an atypical directory structure for your Windows’ systems. The daemon location can also be modified from the default location at C: Program FilesISSissDaemon.
The next portion of the installation procedure is to configure your sensor’s authentication. The recommendation is that you implement a secure management communication tunnel for all traffic to and from your sensors. Select Yes on the dialog box, and then proceed to import the desired key you want to use. As a side note, if you intend to manage this RealSecure system with the SiteProtector suite, this option is required. Importing the keys is made easy through the Allow Auto-Import key feature.
ISS has conveniently built local system hardening into the installation process for sensor and daemon deployment. A good idea is to use their hardening guidelines as a first step in locking down your system, but this should only be the first step! Supplement their hardening techniques with that of your enterprise-hardening policies. Both SANS www.sans.org and the NSA www.nsa.gov have good security best-practice guides, although each may seem a bit over the edge at times.
| Note |
Local security-hardening techniques for the network sensors and management can, and should, be frontloaded onto any intrusion-detection deployment plan. |
Public key administrators can be added and, in nearly every production installation, only one key administrator needs to be added. Addressing this issue now is best because, if you wait, you will have to reinstall the entire module. The last item to configure during installation is the cryptographic provider, in addition to archiving the private keys. In general, this should not have to be modified. Archiving the private keys is critical to ensure you have keys in the case of a disaster. Make certain you don’t lose the passphrase you use to protect the folder that contains these keys.
The last screen should have appeared now, so click Finish and call it a day. Take the following steps to quickly install Windows:
- Run the RealSecure setup.exe program.
- Agree to the Software License Agreement, and then click Custom.
- Select RealSecure Network Sensor, and then click Next.
- Enter a sensor name with standard alphanumeric characters, dashes, or underscores, and then click Next.
- Enter installation folders for the Sensor and Daemon, respectively.
- Use secure communication and authentication for the sensors and console.
- Determine if you want to autoimport the keys.
- Lock down the system using ISS’s autolock-down feature.
- Add the administrator’s public key.
- The cryptographic provider is secure and should be fine.
- Archive the private keys, as appropriate.
Voila! You’re finished
Automating the Windows Installation
The three types of systems being covered and addressed in this RealSecure chapter— Windows, Solaris, and Linux—each come with different mechanisms for automating installations. These automation techniques only recognize their true value if more than one sensor is being deployed in your environment, however. Obviously, you will realize more return on the investment in creating custom install files using the Autorecord and Autoinstall programs included within RealSecure.
| Note |
The National Security Agency created a set of .inf security templates for all major versions of Microsoft Operating Systems in 2001 that are freely available at www.nsa.gov. |
Two chief steps are required to automate the process for installing sensors. The first requires that you use the Autorecord feature to save your installation configurations into the ISS response file. Then you use that response file within the Autoinstall process to restore the configurations of the first installed system on to the other to-be-installed sensors. These Microsoft configuration files will look alarmingly similar to .inf files that have a range of uses to include housing configuration settings for other Windows applications or even Local Security Policy settings for a particular system.
| Note |
AbortIfNoHotFix, Trace, and Upgrade configurations are not stored within the generated response files during the Autorecord process. All hope is not lost though. You can use any text-based editor to open the file and append the desired corresponding lines to the end of the file. If you are a command line guru, you could also use the command echo AbortIfNoHotFix = 1 >> myResponseFile.rsp from Microsoft’s command prompt. |
Take the following steps to autorecord:
- Locate your setup.exe file from your Microsoft command prompt (usually CMD or COMMAND from the Start | Run prompt.
- After you locate the file, enter the following command, and then click OK:
C:ISSsetup.exe –pC:Windows empmyResponseFile.rsp
- The Installation wizard for RealSecure pops up and, from here, you want
to Record the remainder of the installation for later use on other sensor installations. - At the completion of the installation, you will have a Response file that can
be used via the Autoinstall feature to decrease the installation time for the remaining sensors.
Take the following steps to autoinstall:
- Similar to the Autorecord command, you must first locate the setup.exe file again on the sensor.
- After you locate the file, enter the following command, and then click OK:
C:ISSsetup.exe –gC:Windows empmyResponseFile.rsp
- That’s it. The remainder of the installation should be completely automated.
To verify if the installation was successful, check the autoinstall log.
During the installation and setup of RealSecure, differing applications automatically create log files with unique names. Table 8-1 displays the log filenames for the major applications used within the RealSecure product suite.
|
Application Name |
Log Filename |
|---|---|
|
Network Sensor |
RealSecure_Network_Sensor_7.0_X…X_install.xml |
|
Server Sensor |
RealSecure_Server_Sensor_7.0_X…X_install.xml |
|
Workgroup Manager |
RealSecure_Workgroup_Manager_7.0_X…X_install.xml |
|
RealSecure Utilities |
RealSecure_Utilities_7.0_X…X_install.xml |
|
*The … stands for a continuation of a variable amount of characters that could be included within the filename depending on the major and minor version of the product and service packs installed. |
|
Solaris Installation
The Solaris installation comes with a few more installation options and, as a user, you should realize a significant decrease in the time required to install RealSecure compared to a Windows platform. As the most popular Unix operating platform, Solaris installations are quite popular within large commercial and government organizations. For nearly a decade, Solaris was the operating system (OS) of choice within the Department of Defense and it still has a healthy following. Like the installation of most applications on Unix systems, this is rather straightforward and quick. In general, with the release of RealSecure 7.0, five options are available for configuration during the installation process. The following are the five configuration options.
- RealSecure Daemon to Automatically Import Communication Keys
- Daemon Installation Path
- Daemon Cryptographic Provider
- RealSecure Sensor Key Management
- Sensor Location Directory
These five options provide the basic capabilities during installation, such as where the files should reside and key management issues. Notice the similarity to the options available that are during the Windows installation.
| Note |
It’s pertinent for you to assess and verify that you have a properly working system (local and network responses achieved successfully) before you install RealSecure. |
When you are ready to install RealSecure, you must untar, or uncompress, the tar file that contains the two bundled packages and installation shell script. The following command will untar the file, while displaying the contents of the file to the screen in a list format. The Xs represent version-specific information included within the file schema that ISS ships.
Command: tar –xvf rsns7.0.XXXX.XXX-sparc-solaris.multi.tar
After you uncompress the file, you will be left with three files on your local file system. The two large files are the actual installation packages to be used to install the sensor and the daemon on the IDS box, while the third file is a quick bash shell script created to help automate sensor installations by combining the sensor and daemon installation. This is different from automating Solaris installations, which is covered in the section “Automating the Solaris Installation.”
- pkgISSXnsinstall.sh Automatically install the daemon and the sensor
- pkgISSXdmn Only install the daemon
- pkgISSXrsns Only install the sensor
The pkgISSXnsinstall.sh script automatically installs both the sensor and daemon packages. As root, run the script from its local directory by typing in .pkgISSXnsinstall .sh at the shell prompt, and then press ENTER. Next, type in the same command but, this time, add the word “all” to the end of the command line, so it reads .pkgISSXnsinstall .sh all, and then press ENTER again. You will then be prompted with a message asking if you want to accept the RealSecure license agreement and to install the packages with the default options. We recommend installing the packages with the default options initially because, then, you have the capability to go back and add other key management systems later if you choose. Options outside the default options are rarely implemented within production environments. Type Y for yes, and then press ENTER to continue.
The installation script will continue to install the packages by running multiple scripts that complete single tasks. If the system has never before had RealSecure installed on it, you will be prompted to see if it is okay to create the installation directory of opt/ISS. Accept by entering Y for yes. We recommend installing all the packages shipped with RealSecure’s daemon. Once the daemon finishes installing, another license screen appears, asking if you agree to the Sensor license agreement. After you enter Y, the package will continue to install several binaries and text files to your file system. Depending on the speed of your system, this may take a few minutes but, if you purchased a “beefy” system, that should knock this out quickly.
Finally, you will now have the capability to create additional key management administrators for your system. If you choose to create additional administrators, type Y and create the names for these administrators. Any name will suffice. Just make sure you pick one that makes logical sense for your environment. After this, or if you typed N for additional key administrators, the installation will run through its clean-up cycle. The installation program will remove all the temporary files and directories created throughout the installation program before reminding you, in one final note, that you should run the keyadmin_setup.sh script to configure your administrative key.
The entire installation process for the Solaris installation for a single sensor with the daemon should take under ten minutes, if you have a server with a good amount of memory and processing capability. Take the following steps to install Solaris:
- Prepare for installation with appropriate files.
- Run pkgISSXnsinstall.sh script (you will install both the sensor and the daemon).
- Accept the license agreement and default parameters.
- Allow directory creation and install all files.
- Accept the license agreement.
- Rename the sensor to reflect the enterprise-naming convention.
- Add additional key administrators.
Automating the Solaris Installation
Even with the evolution and advanced in relational-database computing, text-based configuration files seem to maintain their popularity in commercial application installations. The RealSecure installation for Solaris enables you to create what ISS refers to as a text response file to save all your configuration information by using the pkgask command. This response file will be used and distributed to the other sensors on which you want to install the RealSecure sensor and daemon.
| Note |
If this is your first time installing the sensor or daemon on this particular platform, you must first untar the two packages, using the command stated at the beginning of this section. |
Before we begin creating the response files for the sensor and daemon, let’s first create the Admin file necessary to house the data. The following three lines are the only required lines in the admin file gabriel_admin_file for the quick installation.
gabriel_admin_file

 action=nocheck
 conflict=nocheck
 instance=overwrite
After the admin file is ready, installing the daemon only takes two commands to complete the execution. The first command generates the response file with a filename that corresponds to whatever is supplied in the myResponseFile variable location. The second command must use the same filename specified in the first command, plus the name of the admin file created previously.
Daemon Step 1: pkgask –r myResponseFile –d ./pkgISSXdmn
Daemon Step 2: pkgadd –n –r myResponseFile –a gabriel_admin_file –d
./pkgISSXdmn all
As with every RealSecure network sensor, it is highly recommended that you always install the daemon before you install the sensor. The sensor installation does not require you to create a new admin file, but it does require the serial execution of three commands using the response and admin files created during the daemon setup. By default, the first command installs the temporary sensor data in the /tmp/ directory, and then the second command creates the response file. The command that follows “Note:” on line 2 removes the temporary file in case you need to remove the files abruptly during installation. The last command installs the sensor package, using the original admin file and the newly updated response file.
Sensor Command 1: pkgadd –n –a gabriel_admin_file –d ./pkgISSXrsns
Note: pkgrm ISSXrsns
Sensor Command 2: pkgask –r myResponseFile –d ./tmp/pkgISSXns
Sensor Command 3: pkgadd –n –r myResponseFile –a gabriel_admin_file –d /tmp/pkgISSXns all
| Tip |
Keep the names of the response and admin files the same throughout the sensor and daemon installations. This should decrease the time required to install a single sensor to under a few minutes, including unpacking and installation time. |
Linux Installation
Yes, we saved the easiest for last. For all intents and purposes, the Linux installation is the most straightforward RealSecure installation when dealing with single sensor installations that you can find. Let’s hope all your sensors are lucky enough to be Linux.
As with any system, first prepare your Linux system for the RealSecure installation by backing up any business-critical data, verifying the proper drivers and hardware specifications are as recommended, ensuring kernel and supporting applications are running the most current versions, and testing basic connectivity and activation before you attempt to install. These should be in addition to any custom system checks that seem appropriate based on your custom configuration. After the system is ready for installation, the first step is to install the Common Library.
| Note |
All of the following package installations must be done with root privileges. |
The RedHat Package Manager (RPM), also known as the RPM Package Manager (RPM), was designed to assist with the quick installations of software on Linux systems. It only takes one command to install the ISS Common Library RPM file for RealSecure 7.0. This command is as follows:
rpm—Uvh ISS-RealSecure-common-lib-7.0-XXXX.XXX.i386.rpm
After ISS’s Common Library is installed, you need to install the ISS daemon using a similar command, as shown here:
rpm—Uvh ISS-RealSecure-ns-daemon-7.0-XXXX.XXX.i386.rpm
The last package that must be installed is the ISS sensor package. This is the main package and it may take several minutes to install. After the program completes its installation, it informs you that you must now run the ./setup.sh script for additional configuration and policy creation.
rpm—Uvh ISS-RealSecure-ns-sensorx-7.0-XXXX.XXX.i386.rpm
After you take these steps, you will have a fully installed RealSecure sensor that is all but useless. Only after properly configuring this sensor is it of any use or benefit within your environment. The following is a quick recap of the Linux installation procedures:
- Prepare to install.
- Install the Common Library.
- Install the ISS Daemon (issDaemon).
- Install the ISS Sensor (issSensor).
- Continue to configure your sensor.
Automating the Linux Installation
The Linux installation is cut-and-dry regarding the steps required to automate the typical installation process. Because the Linux installation is only three commands that have to get executed on the remote system, these commands can be easily put into a shell script to run and install serially. Another route you could take is simply to pipe each command on to the end of the first, and then run them all from a Linux shell.
#!/bin/sh
rpm –Uvh ISS-RealSecure-common-lib-7.0-XXXX.XXX.i386.rpm;
rpm –Uvh ISS-RealSecure-ns-daemon -7.0-XXXX.XXX.i386.rpm;
rpm –Uvh ISS-RealSecure-ns-sensorx-7.0-XXXX.XXX.i386.rpm;
Configuring RealSecure
Congratulations, you are now well on your way on to setting up your RealSecure intrusion-detection infrastructure deployment. Now that you have installed at least one RealSecure network sensor, you are ready to move on to configuring that monster.
Configuration of your sensor will take a significant investment of your time to ensure it is configured in the most efficient and accurate method possible. Anything—from configuring the proper alerts, to minimizing false positives on attack signatures, to increasing the efficiency of your logging policy, to the use of certain protocols, to the decision on how much data should be collected for any given event—will prove important as you move forward. The “little things” can certainly make your IDS deployment a giant hole that constantly requires resources in terms of hours of maintenance costs to monitor and investigate insignificant alerts. Or, those little things can make your IDS deployment one of the most important tools, which quickly alert you and take action on malicious traffic heading inbound for your environment, of your security organization.
Increasing Efficiency
One of the easiest methods for increasing the performance of you sensor is to purchase more than you need. Let us explain. If your network has a 100MB backbone that can spike at rates near 80 to 90 percent saturation then you may want to get a gigabit sensor. With the release of RealSecure 7.0 came the first true commercial gigabit-capable network IDS sensor. Also, if you believe a beefy single CPU with 1Gb of memory will suffice, spend a little extra money to buy the dual CPU 4Gb of memory system. This type of overkill may seem unrealistic initially, but during network traffic spikes is when the most malicious traffic and attacks seem to go unnoticed by the IDS systems because of dropped packets or packet loss.
Another route to increase the potential workload for your IDS sensors is to install multiple sensors in a cluster via a load balancer. RealSecure 7.0 comes with the capability to create multiple similar sensor deployments with the automatic installation procedures. Coupled with the option-implementing load balancers, any environment should have the option of being safe and secure. By purchasing “extra” hardware via a single strong system or multiple lesser systems in a cluster, you will have the capability to avoid dropped packets.
Outside of hardware considerations, features such as the Protocol Anomaly Detection (PAM), traffic filters, event filters, and upfront network configurations can be set to ensure that only the appropriate traffic is capture and analyzed. This allows the sensor to spend its CPU processing power on the packets that matter.
Enabling PAM
RealSecure PAM can be used to ensure that network services residing or using atypical ports for communication do not get missed by the analysis engine. For instance, if a rogue HTTP server was using port 62, instead of port 80, it is quite possible some of your signatures relying on HTTP analysis may miss attacks on this server. Another example is that internal FTP servers use port 22 instead of 21, in addition to changing their banners to mimic Secure Shell (SSH) servers. This type of technique currently throws off nearly 98 percent of all network port and vulnerability scanners, and it has a high potential to misconstrue your IDS signatures if it is not accounted for properly.
Table 8-2 lists the default values configured within PAM. Each module has a name, a value type, a value, a priority, and an administrative description. You will soon learn the available options for creating new PAM rules to add to this somewhat small default coverage.
|
Name |
Value |
Description |
|---|---|---|
|
pam.http.heuristic |
true |
Identifies HTTP traffic via proprietary anomaly-detection techniques looking for HTTP requests and responses on atypical ports. The value can only be true or false. |
|
pam.login.any |
Ex: foster:foster, testuser:password |
An extremely useful module, login.any enables you to enter general authentication credentials. The module then detects if these credentials are used for any type of remote service logon. |
|
pam.login.maxpass |
100 |
Aids with password attacks leveraging long password strings. The default numerical length is 100, which can be modified via the creation of another module. |
|
pam.login.vnc.count |
4 |
A specific module that monitors the number of VNC remote authentication failures for any given session. If the number of failures is greater than the numerical value entered, an alert is generated. |
|
pam.tcpport.ftp |
21 |
This module defines the one port used as a trigger to analyze FTP traffic. The default value is 21. |
|
pam.tcpport.http |
80 |
The default configuration, or port number, for the HTTP service and web server communication. |
|
pam.tcpport.pop3 |
110 |
The default configuration, or port number, for the POP3 server. |
|
pam.tcpport.smtp |
25 |
The default configuration, or port number, for the SMTP server. |
RealSecure’s PAM has one extremely significant downside as far as the product feature is concerned: only one port or value can be assigned to each name. For instance, if you want to analyze FTP traffic or data on ports 21, 22, 23, and 92, then you must create four different rules on your sensor, instead of allowing multiple values specified within a single rule. That alone could make this feature more tedious and allow it to become a maintenance nightmare, instead of providing true administrative value.
Creating new PAM rules should be done with the knowledge that each additional rule can affectively decrease overall system performance. These rules take a good deal of CPU resources during packet analysis and should only be implemented if you concretely know that your at-risk internal services reside on atypical or custom ports.
Take the following steps to configure custom PAM modules:
- Click the Tuning tab within the policy for the sensor that you want to modify.
- From this window, you now have two options. You can either Add a new module or Edit an existing module. Remember, you can only edit custom modules you created.
- After entering the desired data into the rules, press ENTER twice, and then go on to saving and applying the new or modified rules.
Table 8-3 lists some additional PAM modules that can be created to enhance the overall effectiveness for identifying HTTP services running on the common atypical ports. These ports often house custom vendor-specific management interfaces for a range of network devices. Such devices include wireless access points, switches, mail relays, DNS servers, and custom application servers to name a few. Plus, one rule is at the bottom to identify Telnet traffic destined for the common SSH port of 22.
|
Name |
Value |
Description |
|---|---|---|
|
pam.tcpport.http |
7001 |
Additional port for HTTP modules |
|
pam.tcpport.http |
7070 |
Additional port for HTTP modules |
|
pam.tcpport.http |
8001 |
Additional port for HTTP modules |
|
pam.tcpport.http |
8080 |
Additional port for HTTP modules |
|
pam.tcpport.http |
9000 |
Additional port for HTTP modules |
|
pam.tcpport.http |
9001 |
Additional port for HTTP modules |
|
pam.tcpport.Telnet |
22 |
Additional port for Telnet modules |
NMAP Can Help!
The latest version of NMAP (www.insecure.org/nmap) comes with what is quickly becoming known as remote service identification, which can be leveraged to find services residing on atypical ports on target systems. While this feature may seem somewhat valuable for attackers or hackers, it can also prove extremely valuable for network and security administrators. Capturing snapshots of your network in a regular cycle can be used to ensure your sensor is properly configured to identify what RealSecure defines as protocol anomalies.
If the command is
C:
map
map.exe –sV –P0 www.mcgraw-hill.org
Then the output would be
Starting nmap 3.45 ( http://www.insecure.org/nmap ) at 2003-10-28 05:28 Pacific Standard Time
Interesting ports on 198.45.18.151:
(The 1655 ports scanned but not shown below are in state: filtered)
PORT STATE SERVICE VERSION
80/tcp open http Netscape Enterprise httpd 6.0
Nmap run completed -- 1 IP address (1 host up) scanned in 260.695 seconds
The previous NMAP usage ran a port scan against www.mcgraw-hill.org with two flags specified via the command line, as seen prefacing the domain name. The -P0 flag tells NMAP not to rely on the ping responses when port-scanning the system. This ensures every default gets scanned, even if perimeter devices are blocking ICMP or the standard ports used for NMAP’s TCP ping sequence. The second flag—-sV—stands for version scan. In addition to looking for common open ports, sV also conducts tests on the service for the remote system to identify the underlying protocols, in addition to grabbing any available application banners.
NMAP with service detection is relatively new, and it is in the process of being enhanced via the signature database and bugs within compilation. We recommend visiting Insecure.org to retrieve the latest information on NMAP’s version scanning feature.
Customizing the Sensor for Your Environment
Customizing the sensor for your environment is absolutely critical because every large organization is bound to be different. A combination of custom applications, network topology, and the onslaught of available commercial applications can also make an environment unrecognizable from other networks. Two RealSecure features stand out as being excellent resources for customizing general traffic that is transmitted across the wire. The first feature focuses on customizing the network protocols used in your environment. The second feature focuses more on atypical services or applications that may be implemented within your environment.
Configuring custom ports to be associated with protocols is extremely simple, given the graphical nature of RealSecure. The following Quick Guide walks you through the necessary appropriate steps to add or remove target port associations with a corresponding protocol:
To modify protocol ports take the following steps:
- Open the Network Events tab from within the policy you want to modify for your environment. Unfortunately, you can only modify or edit one policy at a time.
- After you select the group of protocols you want to edit, a list will appear and enable you to select the particular protocol you want.
- Select Edit.
- Enter the additional ports you want associated to that protocol. You also have the capability to remove any ports you do not want specifically associated with that protocol. This is not a recommended practice, however. Just because your network may not use certain ports for communication, for example, if you do not use 7070 for HTTP communication, this does not mean you should disassociate that port from the HTTP protocol. Ports can be added to the configurations in one of two methods. The first method enables you to add the ports one at a time separated by single spaces. The second method lets you specify a port range with a single dash or a hyphen.
Example of #1: 80 443 7001 7070 8001 8080
Example of #2: 32200-33400 - Click OK twice to return to the policy editor.
- Apply these new settings for your protocols to ensure the new settings take place.
- Repeat steps 1 through 6 for any other protocol policies that need modification.
The second major option you have when configuring your sensor to become more appropriately tied to your environment is within the network services feature. As you just learned, you have the capability to modify the ports associated with a protocol. Yet, to take that feature one step further, RealSecure also provides you with the capability to add or edit a network service: for all intents and purposes, this is a protocol. In terms of RealSecure 7.0, a network service associates a defined service name with a combination of a protocol and at least one port. The procedure instructs you to add a new network service to your sensor policy. Note, this will only take effect on the policy you are modifying.
To create a new network service follow these steps:
- Select the appropriate event or filter for the network service you want to edit from within the Sensor Policies window.
- Click the proper Connection Events or Packet Filters tab, select the service or ICMP type, and then click Add.
- If you selected a TCP or UDP service, you must now distinguish between the two of them.
- Select a suitable name for this custom service. For example, fosters_worm.
- Now, enter the port or ports this service will use in the same way you create custom ports (separated by single spaces or with a hyphen).
- Click OK and Save until you are presented with the next screen, which lets you Apply the policy to your sensor.
- Applying the policy to your system will take effect in real time, yet there will not be any signatures that use this service.
After you create custom network services, you may require the capability to modify them later. RealSecure does enable you to change the settings of any custom service, yet it does not let you modify any default services found within the product to include popular services, such as Telnet, FTP, or HTTP.
The following abbreviated steps are required to modify a custom network service:
- Select the appropriate event or filter for the network service you want to edit from within the Sensor Policies window.
- After clicking Customize, click the Connection Events or Packet Filters tab.
- You now have the capability to modify the source address for the service or
the protocol (ICMP, IP, TCP, or UDP). - Save the configurations, and then Exit.
Implementing Filters
RealSecure filters were created to minimize the amount of unnecessary packets being analyzed by the analysis engine, as well as to make the alerting engine more effective and accurate. Numerous scenarios exist where the potential for false positives or false negatives can be realized. These bugs or issues within a RealSecure sensor can completely make or break the maintenance process of your IDS deployment.
Two core types of filters are implemented within RealSecure: specifically packet filters and event filters. If you have been in the IT community a while or if you are familiar with network technologies, packet filters should sound familiar. RealSecure packet filters, different from Berkeley Packet Filters (BPF) implemented within numerous programs to include the popular TCPDUMP (www.tcpdump.org), enable administrators to assign a special action to occur on packets analyzed and flagged with corresponding source and destination addresses. Event filters are completely different from their seemingly similar packet-filter counterparts because they process events the sensor has triggered after the packet-analysis phase. In case an event filter is triggered, it will disregard the corresponding event that would normally have taken action.
Creating and Implementing Packet Filters
RealSecure packet filters can leverage and filter packets based on certain values and flags within the IP, TCP, UDP, and ICMP protocols. The TCP/IP suite of options available to use outside the ICMP extensions are standard-packet filter options. Note, understand these filters only disregard packets that match the configurations specified and there is no place to customize or specify a different output or action once a filter is created. Those type of desired actions can be configured within the product using IDS signatures. Table 8-4 details the types of filters with their corresponding protocols that can be implemented within RealSecure.
|
TCP |
UDP |
IP |
ICMP |
|---|---|---|---|
|
Source, destination, network, or range of IP addresses |
Source, destination, network, or range of IP addresses |
Source, destination, network, or range of IP addresses |
Source, destination, network, or range of IP addresses |
|
Source, destination service, or port |
Source, destination service or port |
Destination ICMP code |
|
|
Source ICMP type |
The RealSecure packet filters get executed before the signature engine is launched to analyze the current queue of packets. This is critical because any packets generated from trusted sources can automatically be taken out of the equation and lessen the burden on the CPU during analysis. Other areas commonly focused on for creating packet filters include outbound traffic generated from SMTP, DNS, and even FTP servers.
After you determine the parameters you want to use in creating one more multiple packet filters, the next step is to learn to create and implement or apply them. From within your RealSecure console, select the Properties from the Sensor menu in the Managed Assets window. You should now be presented with a tab titled Packet Filters. Click Add, type in the name for the new packet filter, and then click OK to move onto the next step.
Now, you are ready to configure the packet-filter payload-match criteria. You have no reason to worry about adding too many packet filters because the CPU resources used to parse and check these filters are far less than those required to parse and analyze against thousands of attack signatures. As you know, the only real concern is disregarding malicious packets. To start with the match criteria, first select the protocol you want to use for the filter: you can only select one protocol per filter. Depending on the protocol, you can now enter the corresponding types, codes, or addresses for the filter. Don’t forget, the key here is to test these rules and deployments with a plethora of network tests and simulated attacks from ranging source and destination addresses.
After the match criteria is entered, save the configuration from the File menu and close the current window.
The following guide can be used as a high-level reference to assist in the process of creating new packet filters:
- Select the desired policy.
- Click Customize, and then Add from within the Packet Filter tab.
- Decide on, and then enter the filter name.
- Enter packet filter option-specific data (such as, source IP address – 10.0.3.203).
- Save and apply the new filter configurations.
Caution RealSecure packet filters only disregard packets and can not be made to invoke alerts!
Table 8-5 displays a variety of custom packet filters that are commonly implemented in enterprise-class intrusion detection systems. These configurations can be used as additional references when it comes time to customize and localize your sensor to run more accurately within your environment. Examples are provided for each of the four protocol options that you have as an administrator within RealSecure.
|
Name |
Protocol |
Type & Value |
Description |
|---|---|---|---|
|
Dns |
TCP |
Source IP: 10.0.*.* and |
Disregard internal traffic going toward our DNS server. |
|
dmz_email |
TCP |
Source IP: 10.0.*.* and |
Disregard internal traffic going toward our DMZ e-mail server. |
|
outbound_ping |
ICMP |
Source IP: 10.*.*.* and |
Disregard outbound ICMP echo requests. |
|
ip_trusted_net |
IP |
Destined: *.*.*.* |
Disregard all IP traffic to include both TCP and UDP from the trusted administrator network. |
|
icmp_trusted_net |
ICMP |
Destined: *.*.*.* |
Disregard ICMP traffic from the trusted administrator network. |
|
10-3-0-203 |
IP |
Source: 10.3.0.203 or |
Disregard all IP traffic to and from a particular IP address. |
|
a_snmp_net |
UDP |
Destination Port: 161 |
Disregard all UDP traffic traveling across the common SNMP port: 161. |
|
intranet_http |
TCP |
Source IP: 10.*.*.* |
Disregard all TCP traffic destined toward our internal intranet web server for both HTTP and HTTPs. |
|
*IP address ranges are depicted using asterisks for space and aesthetic purposes. You should assume the address 10.0.1.* is the same as 10.0.1.1–10.0.1.255. |
|||
The ip_trusted_net filter uses the IP protocol because its underlying goal is to disregard both TCP and UDP protocols. Remember, the TCP/IP suite of protocols communicates over multiple layers of the OSI model. Specifically, TCP and UDP use the underlying IP protocol to encapsulate their payloads.
Creating and Implementing Event Filters
Event filters help administrators sort through the tons of “useless” alerts that can quickly become a nuisance. These filters should be created for systems you know consistently produce false positives. For instance, you may notice a huge increase in attack-alert false positives because of the setup of your test network and the recent installation of a particular peek-a-booty server. This issue could be remediated in multiple ways to include a packet filter or an event filter.
Take the following steps to create an event filter on your RealSecure sensor:
- After opening the policy you want to add an Event Filter to, click the Event Filter tab, and then click Add.
- Enter a filter name, and then open that filter from within the Filters list.
- From within the Filter properties, modify the corresponding protocol, intruder, and victim information as appropriate.
- Save and Apply these filters.
Removing and customizing event filters is almost identical to the process of creating event filters. Instead of clicking Add, click Customize or Edit, and then modify the corresponding properties for that event filter. The properties could be anything from an alert for a given IP address or network range of IP addresses.
Handling Network Devices
Network devices to include DNS, FTP, Database, and SMTP servers are ever-increasingly becoming more tedious to maintain because of the increase in application functionality and overall number of differentiating implementations by vendors. Most commonly, these types scenarios are handled in one of four ways.
- Create a packet filter. Packet filters are probably your best bet, but realize these are potentially the riskiest because all packets that satisfy your match criteria will be ignored and will not be passed to the attack-signature analysis phase.
- Create an event filter. An event filter parses all the traffic as normal, but it suppresses any event action that would normally be triggered by a particular network packet or packet sequence.
- Create a special rule. Special rules, aka custom signatures or rules, are easily created within RealSecure to enable you to trigger rules on particular responses, and then report on them in a selection of your choice.
- Modify the action for a particular rule. The final option is to modify the action
or reporting for a particular rule. Such a response could be used to send the output to a different logging mechanism.
Getting Acquainted with Your Network
One last bit of advice for when you put the finishing touches on your sensor configuration. Run NMAP over your entire address space (during off-peak hours), so you can find the specifics of your network and so certain realized vulnerability alerts don’t come as a shock. The best option for running this scan is to scan for common ports using a stealth TCP SYN scan with the timing set to Aggressive and an output selection of your choice.
Typically NMAP Usage:
nmap –sS –T Aggressive 10.*.*.* > myOutput.txt
Using SiteProtector for Central Management
ISS’s RealSecure uses the SiteProtector management console to centralize a management for large deployments containing multiple sensors or deployments that want to use the advanced correlation features included within the vulnerability assessment line of products. Their vulnerability assessment products include the popular Internet Scanner, and Wireless, System, and Database Scanners. The major benefits of SiteProtector include the capability to manage all your sensors from one console to include automatic product installs and updates, view real-time reporting trends for an entire enterprise network, correlate vulnerability data with intrusion attempts, integrate vulnerability identification with intrusion prevention, and manage any of ISS’s new Proventia security appliances.
Complementing Your Deployment with Proventia
The Proventia appliance series created by ISS includes everything from vulnerability assessment systems to intrusion detection boxes to the new all-inclusive network perimeter appliance that houses antispam technology, firewall capabilities, vulnerability assessment, intrusion detection and prevention, and antivirus.
So what’s the difference between the Proventia’s RealSecure appliance and a software installation conducted by my engineering team? The ISS marketing department will tell you a significant difference exists in configuration and speed to deployment and potentially performance. The real-world differences that would be noticed by an organization are few, but direct. Deployment costs and time-to-implementation are significantly reduced because the appliances come preloaded and configured on Linux platforms with hardened kernels, a local firewall, and multiple other local security-hardening techniques. Point blank, even with minimal IDS experience, these systems can be up and running in under 15 minutes. And, if you’re unlucky, they can be connected to the SiteProtector appliance and functional in an hour or two! That said, if you or your team have the hardware and experience to install RealSecure on a Linux systems, then it is quite possible you can replicate nearly everything included on this appliance for less cost, but not much less. The real questions are as follows:
How much time do you have to spend on deployment?
Do you want to buy ISS’s hardware or use what you already have?
Reporting
ISS has always been a market leader in technology, reporting to include all their legacy product lines: Real Secure, Internet Scanner, and System Scanner. In general, each of the ISS flagship products come with three levels of reporting. The highest level is geared for executives who are not intimately familiar with the daily operations or technology. The second option and, often the most useful level, is designed to be informative for technical managers. Security managers, CISOs, administrators, and engineers can use these reports for quick analysis purposes. These reports are also commonly used for trending purposes. The third, and last, general reporting level is the technical reports, which are for those people who are intimately familiar with intrusion detection technology.
| Note |
Reporting is significantly different from attack alerting. Understanding the differences is critical because even the lowest level of reports is geared toward a higher level of understanding than those of the detailed packet-specific alerts. |
Executive Reporting
Several reports are generated with high-level graphs and diagrams that can be easily integrated into executive reports or presentations. In general, these reports are excellent mediums for communicating security trends from your IDS sensors and can be used to help strategize for future architectural deployments. Figure 8-2 details attack trends for a seven-quarter analysis period with the count equaling the number of realized “high-rated” attacks directed toward the three different organizations within a large organization. The red line is the Tech_grp and, as you can see, they have consistently had the highest volume of attacks although, in general, perimeter security appears to be slowly improving.
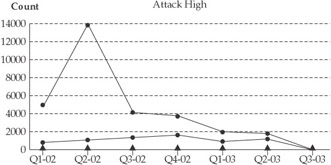
Figure 8-2: Attack trends
Technical Management
RealSecure’s centralized management system—SiteProtector—provides the bulk of the analytical, trending, and correlation CPU-processing capabilities and responsibilities. Within the Enterprise Dashboard, numerous graphs and charts can present daily attack trends for any given environment. In particular, the dashboard is an excellent medium for technical managers, such as security managers, intrusion detection management, or even a broader perimeter security group. Two of the most valuable metrics for any security organization are to measure how well vulnerabilities are managed and the number of successful attacks. The image in Figure 8-3 graphically shows the number of the attacks directed at vulnerable systems within a one-week time period. This is an extremely useful metric for weekly status reports.

Figure 8-3: Attack Dashboard
Engineering Reports
Now for the nitty-gritty of the reporting families. The more technical reports can assist in a multitude of initiatives. They can track employees who are testing the new hacking tool they found on the Internet, monitor abuses by an individual that can be used as a reference for an incident response case, become reference guides when adding to the packet filters on the outermost perimeter devices, or any other of a large range uses. Figure 8-4 lists a group of attackers and the corresponding attacks that were identified and logged from a particular source system. The source is sorted and displayed by its IP address.
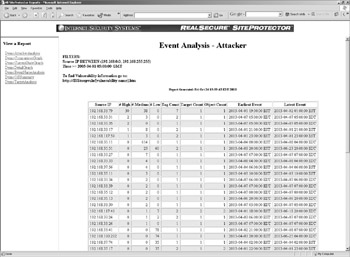
Figure 8-4: Attacker event analysis
The last report to cover here is somewhat unique in that RealSecure provides you with the quick capability to list the number of unique OSs that were attacked. This could prove important in a real-world environment if you know a new vulnerability was just discovered in one of your Unix systems but, because of time constraints and prioritization issues, the systems have not been compromised. A sudden spike in attacks by OS could be caused by anything from automated malicious code, such as worms or viruses, to exploit code being released for a major vulnerability that has been in the mainstream. Figure 8-5 is an example of the OS report that SiteProtector can provide to you in a near real-time situation.
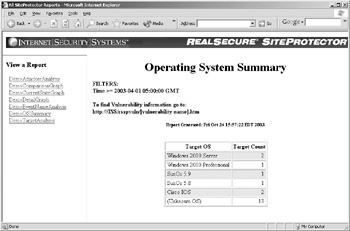
Figure 8-5: OS summary report
Signatures
As you probably knew before you opened this book, the intrusion detection signatures are the core modules for all IDS products. Reporting, trending, varying alert mechanisms, interfaces, and even correlation to vulnerability scanners should be considered nice-to- have add-on features but, if the signatures implemented within the product are of poor quality, nothing else matters. Poor-quality attack signatures will yield inaccurate attack results, false positives on attacks, slow responses, and, worst of all, missed attacks. This should be unacceptable to a security engineer, manager, or C-level executive when discussing intrusion detection networks.
Throughout this section, we cover the details of creating custom attack signatures and implementing these signatures within RealSecure 7.0. The emphasis is on the implementation of the custom signatures, yet a few tips and tricks from the pros might teach you something about creating these from scratch. As any signature engineer will tell you, the research leading up to the signature is the hard part. Creation and implementation is easy after you have done it more than a few times.
| Note |
RealSecure has almost double the attack signatures of ISS’s product acquisition NetworkICE. These increases in product signatures have given more customers the capability to trust the comprehensive nature of RealSecure over every other product, including the freeware power player, Snort. |
In most cases, the creation of an accurate attack signature requires you have access to the exploit, a vulnerable system, and an invulnerable system. Yet, as with most technological theories, there is the proper way, an easier way, and a “potentially risky, but it may get the job done” way. In the realm of IDS signatures, the last and most risky choice is by far the easiest. Depending on the application being attacked, it is potentially possible to profile the remote system, and then determine what the anticipated response may be for a vulnerable system to determine if an attack was successful.
The easiest type of attack to fingerprint or create a signature for is known as static attacks. These static attacks come in the form of novice attackers using prewritten public exploits, worms, viruses, and scanners. These attacks are extremely simple to replicate because the source or binary, depending on the tool, is usually available for download. The following is our custom signature creation methodology:
- Ascertain the malicious code.
- Set up the vulnerable and invulnerable systems.
- Adequately prepare and start a network sniffer.
- Launch the attack.
- Analyze the malicious traffic.
- Analyze the response differences between the vulnerable and invulnerable systems.
- Find the unique tokens in the attack traffic to create the initial attack signature.
- Determine if the unique tokens are available within the compromised system’s response to create a compromised alert signature.
- Create and document the signatures.
- Implement the signatures into production systems.
Implementing Custom Rules
ISS’s X-Force research group creates intrusion detection signatures for all critical vulnerabilities, although some of these signatures could take more time to create, test, and deploy than your organization is willing to wait. Other reasons you may want to create custom attack signatures can range from custom applications with known vulnerabilities, malicious activity from an internal user that needs to be monitored, or even vulnerabilities that could be important to your organization, yet deemed unimportant for most other organizations. RealSecure enables users to create custom attack signatures in two methods. The first method is through their Graphical Attack Signature wizard and the second method enables you to import Snort rules as the signature.
Throughout this section, the focus is on the first option, creating signatures using RealSecure’s graphical engine. We also briefly touch on implementing Snort rules within RealSecure. For a more comprehensive solution on creating Snort-formatted rules, please refer to Chapter 10.
Creating RealSecure Signatures
As advanced as the capability may seem, the capability to create and implement custom attack signatures has always been a mainstream feature within the IDS product industry. Why? The answer is simple. Snort has been an extremely tough competitor within the intrusion detection community even though it is a freeware product, has fair technical documentation, and, in general, has always lacked enterprise scalability, yet it provided users with the capability to create attack signatures easily and implement other publicly available signatures from Day 1. Any commercial vendor that truly desired to enter the market did not have an option to do this.
Whether you are managing one or 50 network sensors, it is still possible to have multiple IDS policies on an individual system. You must first open the policy you want to create the new signature for, and then open the Policy Editor window. After opening that window, you will presented with multiple tabs to include the one that should be selected: the User-Defined Events tab. When you navigate to this point, click the Add button that lets you create a blank custom signature. Enter the desired name for this new signature, and then click the OK button to indicate you finished entering the name. You should now be able to notice the new signature has been added to the signatures list on the current page displayed.
Open the new signature you created, so you can now edit the signature specifics in the right pane of the window, known by ISS as the signature properties. After setting the priority of the signature (completely dependant on how important this is in your environment), you must choose which part of the packet should be analyzed and used for matching purposes.
As mentioned earlier, the hardest part of creating any new attack signature is determining what the unique tokens or identifiers within a malicious packet should be. This can be entered into the RealSecure signature in one of two forms: a ASCII text search string or a regular expression. The last step is to decide on is the response the sensor should take after it detects this attack or anomaly. For instance, you need to set the property to e-mail you, log the packet, generate an alert, and so forth. Enter the desired response, and then save the signature and apply these settings to the sensor or sensors you want to affect.
Take the following steps to create a signature:
- Within the Policy Editor window of the desired policy, select the User-Defined Events tab.
- Click Add, and then type and enter the desired signature name.
- Navigate to User Defined Signatures and open signature.
- Set Priority.
- Configure packet-field specifics.
- Create a payload token.
- Enter the signature response event.
- Save and apply the updated policy.
After the signature or signatures are created, it is critical to test them. Your IDS infrastructure is only as good as these are, so put the time! The following are our top three tips or pointers for testing attack signatures on sensors:
- Replay the attacks against vulnerable and invulnerable systems to ascertain unique vulnerable system responses.
- Test the breadth of your signature on other protocols or ports that could be leveraged in an attack. For example, make sure your HTTP signature works
on 80 and 8080, or even over HTTPS on 443. - Test regular expressions by modifying useless customizable attack packets,
but leaving the “kill payload” intact. For example, change HTTP headers and immaterial fields within an MDAC buffer overflow that can be leveraged through IIS over HTTP.
Using Trons
The Trons feature, coincidently spelled Snort backward, can parse in most Snort attack signatures, so they can be used on a RealSecure sensor. ISS took the road of “we can’t beat the Snort community, so we’ll join them” with this feature. This lets you quickly enable this feature with a trons=enabled line within the configuration file, and then specific a local file on your file system where the desired Snort-formatted attack signatures resides. The file configuration line could be something as simple as trons.filename=c:snort apache_rules.conf.
| Caution |
Bugs have been identified within Trons in the past to include properly formatted Snort rules that are not functioning properly within Trons because of negation flags, binary used in regular expressions—new features within Snort that had yet to be implemented within ISS’s parsing engine. Testing signatures added within RealSecure’s Trons feature is critical. |
Upgrading
Two types of upgrades are considered for RealSecure 7.0 because of ISS’s acquisition of NetworkICE Corporation. The most common upgrade is RealSecure 6.x to 7.0. As a previous NetworkICE customer, however, you also have the capability to migrate from Sentry to RealSecure 7.0. Throughout this section of the chapter, we refer to upgrading for the 6.x RealSecure software and migration for Sentry. First, the focus is on the procedures for upgrading RealSecure, and then it delves into migrating, with a quick guide on the critical points to remember when you migrate.
Upgrading from the RealSecure 6 Series to 7 0
ISS has enabled its users with two potential options when upgrading their sensors. The first, and obvious, choice for most enterprise deployments is to upgrade the product remotely. This is done in a rather automatic fashion and nearly completely behind the scenes—usually an excellent choice for your average setup and somewhat simple configuration. As with nearly every software installation, the other choice is a manual install, conducted locally at the console of the sensor. The second options is much less scalable for large product rollouts or geographically robust networks.
| Note |
Manual installations are more simple in nature and all come with rather easy-to-follow onscreen instructions for a step-by-step walkthrough for upgrading. Because of this, all our attention is focused here on installation notes for remote upgrades. For detailed instructions on upgrading locally or manually, refer to ISS’s documentation found at http://www.iss.net/support/documentation. |
Preface for Remote Upgrades
In most enterprise environments, upgrading a RealSecure sensor remotely should only take you several minutes because of the extended effort put forth by ISS in the upgrade automation technologies. As system or security administrators, it is critical to quickly upgrade or continuously update your security product investments. In most cases, these investments make significant technological advancements with every major product release because the market is still emerging and remains rather immature. As far as the updates go, these are the bloodlines of the products. In today’s hash environment, these vulnerability signatures must be updated as soon as they are available and, in some cases, sooner (see the previous writing custom-signatures section of this chapter.)
Some reminders before you get started:
- Download or save the product upgrades to a safe, yet accessible, location that can be accessed by SiteProtector.
- Upgrade all management components to the latest version. This includes SiteProtector’s WorkGroup Manager, Databases, and Event Collectors.
- As with any software upgrade, back up any pertinent data before you begin the upgrade process.
- You will be taking down production intrusion-detection systems and, as such, the correct timing is critical. You have the capability to select the best time for upgrading the sensors in your environment. Most people select the time in which the least amount of attacks are realized within your environment. This type of data can be ascertained from the RealSecure Dashboard or a trending report based on High Vulnerable Attacks.
Upgrading Windows Sensors
ISS’s SiteProtector saves the day again, while letting administrators to remotely upgrade one or many sensors simultaneously via the WorkGroup Manager. Provided that the appropriate configurations are in place as stated previously, upgrading Windows systems should be a no-brainer.
Nearly all this upgrade will take place within the SiteProtector Workgroup Manager (from here on, this is called the Workgroup Manager.) Open the Workgroup Manager and select the sensors you want to upgrade. Right-click the desired sensor or sensors, and then select X-Press or Product Update on the pop-up box that appears. Two options should be presented to you at this time. The first options asks if you want to install X-Press Updates. The second option asks if you want to install an Upgrade or a Service Release. In this case, select Upgrade or Service Release.
After selecting Upgrade or Service Release, the option prompts you to specify the location of the installer package. Navigate to the location and select the package, and then click Next. After you select the appropriate package, select the available update that you want to install. Agree to the Strong Encryption Export Agreement, which is mandated by United States Federal Law. The update program will now initiate the download of the package and could take several minutes, depending on the download speed and size of the package. Click Continue on the pop-up message, which tells you this could take a considerable amount of time to finish and you should only proceed if the remote sensor is already at 6.5 or higher.
Shortly thereafter, you will notice some changes within the sensor. The component status will change to Unknown and the control status will show several errors related to the sensor daemon. Specifically, these errors include the following:
- Sensor not running
- Connection refused or closed by remote host
- Sensor restarting
After the upgrade is complete, which could be several minutes, the component status changes back to Active. This is your ticket or acknowledgement that the upgrade is complete and everything finished successfully. Additional Windows sensors can be upgraded in this same fashion.
Take the following steps to quickly upgrade Windows:
- Open WorkGroup manager and select the sensor you want to upgrade.
- Right-click and select X-Press or Product Update.
- Click Upgrade or Service Release.
- Navigate to the upgrade package and select the corresponding product upgrade.
- You are now home free! Click through the rest of the installer until the installation is complete.
Upgrading Unix and Linux Sensors
Similar to the Windows Upgrade process, the majority of the remote upgrade procedures are conducted through the SiteProtector Workgroup Manager interface (Workgroup Manager.) A key differentiator in ease of maintenance, the process to upgrade Linux and Unix systems is identical. Open the Workgroup Manager and select the sensors you want to upgrade. The Workgroup Manager permits you to stop the sensor or sensors being upgraded on the remote system—stop them! You will notice the component status remains in a Connected state, yet the sensor status has changed to Stopped.
Right-click the desired sensor or sensors and select X-Press or Product Update on the pop-up box that appears. Two options should be presented to you at this time. The first option asks if you want to install X-Press Updates. The second options asks if you want to install an Upgrade or Service Release. In this case, select Upgrade or Service Release(1). After selecting Upgrade or Service Release, it prompts you to specify the location of the installer package. Navigate to the location and select the package, and then click Next. After you select the appropriate package, select the available update that you want to install. Agree to the Strong Encryption Export Agreement mandated by United States Federal Law. The update program now initiates the download of the package and could take several minutes, depending on the download speed and size of the package. Click Continue on the pop-up message, which informs you this could take a considerable amount of time to finish and you should only proceed if the remote sensor is already at 6.5 or higher. Shortly thereafter, you will notice some changes within the sensor. The component status will change to Unknown and the control status will show several errors related to the sensor daemon. Specifically these errors will include the following:
- Sensor not running
- Connection refused or closed by remote host
- Sensor restarting
You will know the upgrade is complete for the sensor when the state returns to Connected. Do not worry, the sensor state should still be set to Stopped. In case you have any additional sensors that need to be upgraded, now is the time. Go back to the Workgroup Manager and right-click on the corresponding systems you want to upgrade and repeat the previous instructions.
| Note |
If you remember or have logically named your sensors, the recommended is that you upgrade the sensors in the same order as you originally installed them. |
After you successfully upgrade all the desired sensors, go to the Workgroup Manager and restart all the sensors. Last, but definitely not least, verify all the sensors are connected and active.
Take the following steps to upgrade Unix:
- Open WorkGroup manager and select the sensor you want to upgrade.
- Stop the sensor(s).
- Right-click and select X-Press or Product Update.
- Click Upgrade or Service Release.
- Navigate to the upgrade package and select the corresponding product upgrade.
- Repeat steps 3 through 5 on any additional sensors.
- Start the sensor(s).
Migrating from Sentry to RealSecure
As you learned, SiteProtector is used to centrally manage all the RealSecure sensors via HTTP and HTTPS. The first consideration to make when you are attempting to upgrade is architecture. Your network architecture must be modified to support the new platform and software. In general, network location is the same, but RealSecure leads the market in enterprise-class sensor deployment speeds. RealSecure was the first to offer functional gigabit processing capabilities and the first to implement dropped packet alerts. The following is a checklist that can be used to assist in migrating from the outdated NetworkICE’s Sentry to RealSecure 7.0:
- Location SiteProtector can go in the same location as that of ICEcap Manager, while Sentry can also be replaced with RealSecure. In general, the location needn’t change. Running tests on a regular basis is critical, however, to ensure that all potentially dangerous traffic is being captured and analyzed.
- Management routes Sentry utilizes ports 8081, 8089, 9091, and 9089 to communicate to and from ICEcap, whereas RealSecure uses the standard web ports of 80 and 433, in addition to 3998 and 3999 for the application server. It is pertinent to ensure the network devices between your sensors and management systems are configured to securely allow SSL communication between the systems on the previously specified ports.
Note Port 80 is not required if you only allow encrypted communication over 443.
- Hardware In general, the hardware requirements for both applications are extremely similar and dependant on networks the residing and supporting sensors. The only two differences we acknowledge are disk space and CPU recommendations. RealSecure recommends a minimum of 9GB of hard disk space and Pentium II processing capabilities, obviously created with enterprise networks as the focus point. NetworkICE has a minimum of 10MB and does not require as much processing power. One of the big reasons for these differences is reporting options and increased policy rules within RealSecure.
- Successful installation of RealSecure Detailed RealSecure installation tips and tricks can be found earlier in the chapter, but we did want to include that a working version of RealSecure is necessary for a “happy” transition.
- Tasks All scheduled tasks should be migrated to the new sensors before they roll into production status. You can view your created tasks in ICECap by navigating to and clicking the Scheduled Tasks tab. The SiteProtector tasks can be viewed by clicking the Sensor tab. Unfortunately, no easy method exists to migrate these tasks. The best solution is to reenter one from the other. Take your time because these steps are critical!
- Events Events are also extremely important when configuring your sensor. You have the capability to view and verify your sensor events by clicking the Sensor Analysis tab. This provides you with the capability to look at all the events. If you click on the top of the Events column, you have the capability to see the events ordered by the number of times they have been executed. This is one of the quickest and easiest methods to determine attack trends.
- Configuration responses E-mail, audio alerts, visual pop-ups, and logging are only some of the options users must be alerted to when vulnerabilities are triggered. These are some of the most time-consuming tasks, but they are equally important to any of the other tasks listed.
- System accounts In general, RealSecure and SiteProtector implement two types of application accounts. Both operator- and administrator-level accounts are used to allow the appropriate permissions to Sensor users. Administrators have full control of the system.
- Alerting policy Configuring your alert policy to be effective requires that you also ensure it is efficient. Too many alerts decrease the effectiveness of each alert and increase the overall cost of ownership for your intrusion detection deployment. Because of the number of signatures included within RealSecure, this can take some time to set and configure properly.
These steps are meant to be used as a complementary guide to your ISS documentation, which can assist in your transition to RealSecure from Sentry and ease your deployment frustration.
Summary
Throughout this chapter, we covered ISS’s latest revision of the market-leading RealSecure intrusion detection system. RealSecure was created to minimize the complexities and intricacies of installing and engineering an intrusion detection network within enterprise environments. The minimal effort required during installation permits the security administrators to focus their time and resources on ensuring that the system is configured and customized properly, so all critical attacks and attempted attacks are identified and quickly alerted. We also discussed the multiple reporting options that provide the appropriate amount of detail to each target audience: executive management, management, and technicians. SiteProtector, ISS’s product line for central management of security products, was briefly touched on to the extent that you now should have an understanding of how it can make your job easier. Last, and, by far the most important section of the chapter, described the process taken and details required to write accurate and efficient attack signature rules. The IDS rules are the bloodline for all intrusion detection products and Real Secure is no different. Real Secure comes with attack signatures, but it also provides you with the capability to design your own attack signatures if you choose to do so.
Part I - Intrusion Detection: Primer
- Understanding Intrusion Detection
- Crash Course in the Internet Protocol Suite
- Unauthorized Activity I
- Unauthorized Activity II
- Tcpdump
Part II - Architecture
Part III - Implementation and Deployment
Part IV - Security and IDS Management
EAN: 2147483647
Pages: 163
- Chapter V Consumer Complaint Behavior in the Online Environment
- Chapter XIII Shopping Agent Web Sites: A Comparative Shopping Environment
- Chapter XV Customer Trust in Online Commerce
- Chapter XVI Turning Web Surfers into Loyal Customers: Cognitive Lock-In Through Interface Design and Web Site Usability
- Chapter XVIII Web Systems Design, Litigation, and Online Consumer Behavior
