| Linear Timewarp is the simpler of the two speed-change filters, and it is also the one you used during the four-point edit technique we looked at in Chapter 6. Unlike Dynamic Timewarp, this filter has no keyframable abilities, but it still has many uses for everyday editing.  Tip Tip
To add a Linear Timewarp filter 1. | Right-click the clip on the Timeline and select Add linear Timewarp from the menu (Figure 9.68).
Figure 9.68. Adding a Linear Timewarp using the right-click menu. 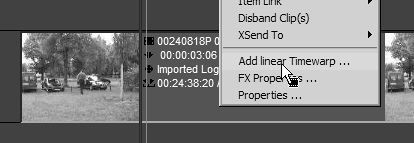
This automatically opens the Add Timewarp dialog (Figure 9.69).
Figure 9.69. The Add Timewarp dialog. 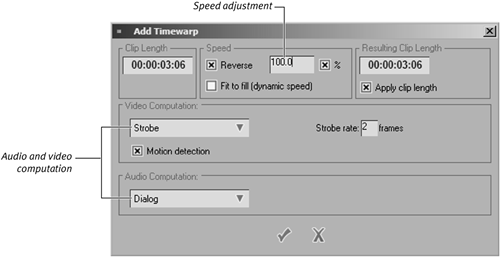
| 2. | To speed your clip up, alter the number in the Speed box so that it is greater than 100; to slow it down, enter a number less than 100.
| 3. | To reverse the direction of the clip, click the Reverse check box and then alter the speed if you want.
| 4. | Select the Video Computation method (see the sidebar "Which Computation Method Should You Use?" for details).
| 5. | If you're applying a Timewarp to an audio track, select the Audio Computation most suitable for the clip you've selected.
| 6. | Once you are happy with the settings, click the check mark at the bottom of the dialog to apply these changes.
|
Tips When increasing the speed of a clip, Liquid Edition subtracts frames from a clip, making it physically smaller on the Timeline. When decreasing the speed, Liquid Edition adds frames to a clip, making the clip physically larger on the Timeline. Therefore, you need to make sure you know which Timeline mode you are working in, Film Style or Overwrite Style. You can find details of these Timeline modes and the effects they have in Chapter 6. You can undo a Dynamic Timewarp using the Timeline Undo key or the Ctrl+Z shortcut. In the Speed section, you can click the check box next to the percent sign (%) to change the settings so that the speed shows as a decimal value rather than a percentage.
The Fit to Fill Check Box You'll find the Fit to fill (dynamic speed) check box just under the Reverse box in the Speed section of the Add Timewarp dialog. Checking this is exceptionally useful when you want to fill areas of your video that, for one reason or another, you no longer want to move on the Timelinea clip that matches a voice-over, for example. In this case, you can add a clip to the Timeline and then select the Fit to fill (dynamic speed) check box. When you do so, this clip automatically increases the speed the required amount to exactly fill the gap to the next clip on the Timeline. This is effectively the same as the four-point edit technique, but you can use it on clips you have dragged onto the Timeline. Clips with Fit to fill selected don't overwrite other clips on the Timeline. |
Which Computation Method Should You Use? You can use seven different computation methods in both Linear and Dynamic Timewarps. The default is Cut Fields, but for DV editing, many find that Mix Fields is the better choice because it tends to play back more smoothly, although the focus may be a little soft. If the sharpness of the picture is an issueon a close-up, for examplethen Cut Fields provides a clean image, but the speed increase/decrease isn't as smooth. In all cases, I recommend that you leave Motion Detection selected if the clip contains a lot of action. You obviously have to experiment with each different clip to find out which setting suits it best. If you don't like either Cut Fields or Mix Fields, try Cut Frames or Mix Frames, but be aware that both of these filters are really aimed at film users as opposed to DV users, so results may vary. You use the other computation methods for special effects, and these directly affect the visual finish of the clip. Strobe cuts frames out to create a strobe light effect. You can select the flicker rate of this strobe by altering the Strobe rate. When you use Trailing, you can get the effect of a ghost image following the moving objectthe swing of a golf club, for example. With a bit of imagination, you can use this setting so your clip looks like the viewpoint of a recently concussed man. You can select the severity of the trails by altering the Trail Length. You can use the final computational method, Progressive, to convert interlaced clips to non-interlaced clips. Normally you use a speed setting of 100 percent. |
|