2.7. Starting the Samba Daemons Two Samba processes, smbd and nmbd, need to be running for Samba to work correctly.[*] There are three ways to start them: [*] You will see in Chapter 10 that nmbd is not always needed, but for now just consider it to be a required daemon.
2.7.1. Starting the Daemons Manually If you're in a hurry, you can start the Samba daemons by hand. As root, enter the following commands: $ /usr/local/samba/sbin/smbd -D $ /usr/local/samba/sbin/nmbd -D
Samba will now be running on your system and is ready to accept connections. However, keep in mind that if either of the daemons exit for any reason (including system reboots), they must be restarted manually. 2.7.2. Automatic Startup To have the Samba daemons started automatically when the system boots, add the commands listed in the previous section to your standard Unix startup scripts. The exact method varies depending on the flavor of Unix you're using. 2.7.2.1. BSD Unix With a BSD-style Unix variant, append the following code to the rc.local file, which is typically found in the /etc or /etc/rc.d directories: if [ -x /usr/local/samba/bin/smbd]; then echo "Starting smbd..." /usr/local/samba/bin/smbd -D echo "Starting nmbd..." /usr/local/samba/bin/nmbd -D fi
This code is very simple: it checks to see whether the smbd file exists and has execute permissions, and if so, starts up both of the Samba daemons. 2.7.2.2. System V Unix and most Linux distributions With System V, things can get a little more complex. Depending on your Unix version, you might be able to get away with making a simple change to an rc.local file as with BSD Unix, but System V typically uses directories containing links to scripts that control daemons on the system. Hence, you need to instruct the system how to start and stop the Samba daemons. The first step to implement this is to modify the contents of the /etc/rc.d/init.d directory by adding an init script. The samba-3.0.x/packaging/sysv directory contains an example init script that should work on most System V based hosts. It is at least a place to begin making any local tweaks necessary for your system. Assuming that we have installed this script using the name smb and set the execute permissions on it, we can now start and stop smbd and nmbd like this: # /etc/rc.d/init.d/smb start Starting SMB services: Starting NMB services: # ps ax | grep mbd 1268 ? S 0:00 smbd -D 1269 ? S 0:00 smbd -D 1270 ? S 0:00 nmbd -D 1465 pts/2 S 0:00 grep mbd # /etc/rc.d/init.d/smb stop Shutting down SMB services: Shutting down NMB services:
If you are having trouble modifying the existing SysV init script or are unable to write your own, check to see whether there is a packaged release of Samba (available from your Unix vendor or the Samba FTP site). If so, you might be able to extract a startup script from it to use as a starting point. Typically, this script doesn't change much (if at all) from release to release, so using a script from an older Samba version should not be a problem. Finally, we need to add symbolic links to the smb script in the /etc/rc.d/rcn.d directories: # for i in 3 5; do > ln -s /etc/rc.d/init.d/smb /etc/rc.d/rc$i.d/S35smb > done # for i in 0 1 2 4 6; do > ln -s /etc/rc.d/init.d/smb /etc/rc.d/rc$i.d/K35smb > done
The first for loop, with a link name starting with an S (S35smb), causes Samba to be started when entering runlevels 3 or 5, which are the runlevels in which network file sharing (NFS) is normally enabled. The next for loop, with a link name starting with a K, causes Samba to be shut down when entering any of the other runlevels (0, 1, 2, 4, or 6). The links starting with S are used to start the daemons, and the links starting with K are used for killing them. When the runlevel is changed, the links starting with K in the corresponding directory (e.g., the rc3.d directory for runlevel 3) are executed, followed by the links starting with S. If we wanted, we could have Samba restarted when switching between runlevels 3 and 5 by adding a K35smb link to each rc3.d and rc5.d directory. The number after the K or S in the link names is used to set the order in which all the daemons with links in the directory are started or killed off. Get a long listing of the rc3.d or rc5.d directories to see how this is set up on your system. We use 35 to match the behavior of Red Hat's Samba RPM package. The important thing is to make sure that when starting Samba, all services that it requires are started before it. When shutting down, it is a good idea to shut down Samba before services it requires, to avoid excess error messages in the logfiles, but the shut down order is not as crucial. 2.7.2.3. Mac OS X An installation of Samba is bundled with Mac OS X.[*] In true Apple style, all of the startup and shutdown details have been hidden beneath the System Preferences  Sharing applet. Selecting the Services sheet displays a list of network services that are installed (although all may not be currently running). See Figure 2-4 for a screenshot of this window. Under the Services tab, turn on Windows File Sharing. In technical terms, enabling Windows File Sharing launches nmbd as a daemon and enables smbd to be run via the xinetd meta-server. The OS X included smb.conf file is located in the /etc directory. Sharing applet. Selecting the Services sheet displays a list of network services that are installed (although all may not be currently running). See Figure 2-4 for a screenshot of this window. Under the Services tab, turn on Windows File Sharing. In technical terms, enabling Windows File Sharing launches nmbd as a daemon and enables smbd to be run via the xinetd meta-server. The OS X included smb.conf file is located in the /etc directory. Figure 2-4. Mac OS X sharing preferences 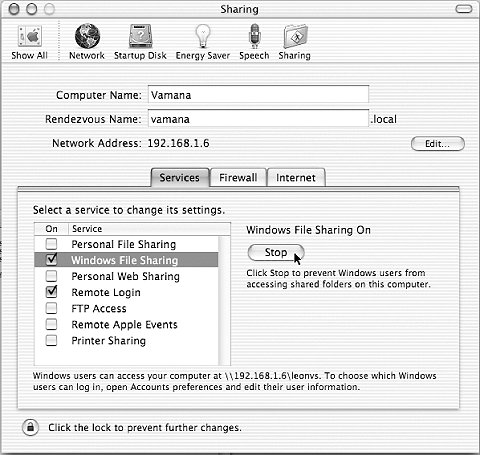
If you decide to install Samba yourself on Mac OS X, it's best not to stomp on the installation provided with the operating system. Use the procedures detailed earlier in this chapter to install the software into /usr/local/samba or some other area unaffected by operating system upgrades. You can then rename the original smbd and nmbd binaries and create soft links from /usr/sbin/smbd and /usr/sbin/nmbd to your newly installed ones. If you install Samba yourself and you're using encrypted passwords, remember to set up users with smbpasswd, as described earlier in this chapter. This step is handled automatically if you're using the built-in server on Mac OS X. 2.7.2.4. Testing automatic startup If you can afford a few minutes of downtime, reboot your system and again use the ps command to confirm that the smbd and nmbd daemons are running. And if you are managing a 24/7 server, we highly recommend that you find some downtime in which to reboot and perform this check. Otherwise, your next unscheduled downtime might surprise you with a mysterious absence of SMB networking services when the system comes up again! 2.7.3. Starting from inetd/xinetd These days, memory and disk space tend to be very cheap. This is probably one of the reasons why running the Samba daemons from the inetd meta-server has fallen into disuse. The other is that nmbd needs to maintain state when participating in network browsing elections. The inetd server is not really geared towards this type of long-term service. The best advice is to simply run smbd and nmbd as daemons using the methods previously discussed. However, if you wish to start from inetd, first open /etc/services in your text editor. Add the following two lines if you don't already have them defined: netbios-ns 137/udp netbios-ssn 139/tcp
Next, edit /etc/inetd.conf. Look for the following two lines and add them if they don't exist. If you already have smbd and nmbd lines in the file, edit them to point at the new smbd and nmbd you've installed. Your brand of Unix might use a slightly different syntax in this file; use the existing entries and the inetd.conf manual page as a guide: netbios-ssn stream tcp nowait root /usr/local/samba/sbin/smbd smbd netbios-ns dgram udp wait root /usr/local/samba/sbin/nmbd nmbd
Finally, kill any smbd or nmbd processes and send the inetd process a hangup (HUP) signal to tell it to reread its configuration file: $ kill -TERM -a smbd $ kill -TERM -a nmbd $ kill -HUP -a inetd
After that, inetd should be listening on the two NetBIOS ports and will spawn the appropriate Samba daemon when it receives a packet destined for either port. As we've pointed out before, modern Linux distributions and perhaps other Unix vendors supply xinetd rather than inetd. If you need to use xinetd, you must supply configuration files in the /etc/xinetd.d directory for both smbd and nmbd, as shown here: ## configuration file for smbd ## save as /etc/xinetd.d/netbios-ssn service netbios-ssn { disable = no socket_type = stream protocol = tcp wait = no user = root server = /usr/local/samba/sbin/smbd } ## configuration file for nmbd ## save as /etc/xinetd.d/netbios-ns service netbios-ns { disable = no socket_type = dgram protocol = udp wait = yes user = root server = /usr/local/samba/sbin/nmbd }
2.7.4. Testing the Samba Daemons We're nearly done with the Samba server setup. All that's left to do is to make sure that everything is working as we think it should. A convenient way to do this is to use the smbclient program to examine what the server is offering to the network. If everything is set up properly, you should be able to do the following: $ smbclient -L localhost -N Anonymous login successful Domain=[GARDEN] OS=[Unix] Server=[Samba 3.0.22] Sharename Type Comment --------- ---- ------- test Disk For testing only, please IPC$ IPC IPC Service (Samba 3.0.22) ADMIN$ Disk IPC Service (Samba 3.0.22) Server Comment --------- ------- RAIN Samba 3.0.22 Workgroup Master --------- ------- GARDEN RAIN
This example used an anonymous connection. But because we've already added a Samba account for lizard, we can also connect to and browse a specific share. Being greeted by the smb: \> is an indication of success. $ smbclient //localhost/test -U lizard Password: <enter password> Domain=[GARDEN] OS=[Unix] Server=[Samba 3.0.22] smb: \>
If there is a problem, don't panic! Try to start the daemons manually, and check the system output or the debug files at /usr/local/samba/var/log.smbd to see if you can determine what happened. If you think it might be a more serious problem, skip to Chapter 12 for help on troubleshooting the Samba daemons. If it worked, congratulations! You now have successfully set up the Samba server with a disk share. It's a simple one, but we can use it to set up and test the Windows clients in the next chapter. Then we will start making it more interesting by adding services such as home directories, printers, and security, and by seeing how to integrate the server into a larger Windows domain.
|