Defining Custom Properties
3 4
If you want to track information with your drawings, you probably also want to customize the custom properties. Perhaps your company uses a specific nomenclature for fields that you want your drawing to reflect. Or maybe you want to remove some custom properties to streamline data entry. You can add and remove custom properties as well as edit their labels and the format used to display the values. Visio features two ways of accessing custom properties:
- Through the Custom Properties window, which lets you work with the properties of a single shape or master shape.
- newfeature! Through a new add-on called Edit Custom Property Sets, which is described later in this chapter. This add-on lets you define multiple properties at once (that is, a custom property set), which can be applied to multiple shapes at once.
Whether you work with individual shapes in the Custom Properties window or create custom property sets via the add-on, you will encounter the Define Custom Properties dialog box, as Figure 6-11 shows. Working with this dialog box can be a little tricky, because as soon as you specify an option, it's applied to a property.
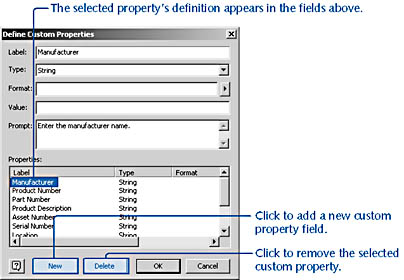
Figure 6-11. You can change the definition for an existing custom property in the Define Custom Properties dialog box; for example, you can type a new label, which then appears in the Custom Properties window.
The options in this dialog box let you define the properties that appear in the Custom Properties window as Table 6-2 shows. If you're working with a shape that already has custom properties, the existing properties are listed at the bottom of the Define Custom Properties dialog box in the Properties box. When a property is selected in this box, the dialog box displays its definition in the fields on top, so if you make changes to one of the options, the change is immediately reflected in the custom property's definition.
Table 6-2. Options in the Define Custom Properties Dialog Box
| Option | What It Does |
|---|---|
Label | Provides the name of the property as you want it to appear in the Custom Properties window. |
Type | Lists Visio data types that you can specify for a value. If you aren't sure what to choose, select String. |
Format | Specifies a format for the type of data. The options change depend-ing on the type you select. Not all property types have formats that you can choose. When you select an option, a format code appears in the Format box that tells Visio how to display the property's value. |
Value | Shows the current value of the property or lets you set an initial value for a new property. If you leave it blank, an empty field is displayed in the Custom Properties window. |
Prompt | Provides an instructional or descriptive prompt about the property. Prompts are optional, but they're useful for describing the purpose of the custom property. Your prompt text appears as a ScreenTip in the Custom Properties window or in the Prompt area of a shape's Define Custom Properties dialog box. |
Properties | Lists the custom properties that are already defined for a shape. If you select a property from the list, you can then change the Label, Type, Format, Value, and Prompt settings, and your changes are immediately applied to the custom property definition. |
New | Creates a new custom property and initializes the Label, Type, Format, Value, and Prompt options so that you can define the new property. |
Delete | Deletes the custom property selected in the Properties box. |
Defining Custom Properties for Individual Shapes
If you really want to revise the custom properties for one shape in one drawing, you can do so. You can edit shape properties directly in the Custom Properties window or Custom Properties dialog box without affecting any custom property sets that have been defined for the shapes. The changes you make are saved only with the drawing. If the shape is based on a master shape, your changes to the shape do not affect the master or any other instances of the master you've dragged onto the drawing page.
To add or edit custom properties for one shape, follow these steps:
- Select a shape on the drawing page.
- If the Custom Properties window is not already open, choose View, Custom Properties Window.
If no properties have been defined for the shape, Visio displays a message to that effect in the Custom Properties window.
- Right-click anywhere in the Custom Properties window, and then choose Define Properties.
- If the shape already includes custom properties, in the Properties box, select the property you want to edit, or click the New button.
When you select an existing property, its settings are displayed in the dialog box. As soon as you change a setting, the new specifications are applied to the selected property.
- Define the new property, or revise the selected property, by typing or selecting the values you want for Label, Type, Format, Value, and Prompt. For details about these options, see Table 6-2.
- When you've defined the property, do one of the following:
- Select a new property to edit in the Properties box.
- Click the New button to define a new custom property.
- Click OK to close the Define Custom Properties dialog box.
Visio adds the properties to the shape, which you can see in the Custom Properties window.
Defining Custom Properties for Master Shapes
One time when it is handy to add or edit an individual shape's custom properties is when you're working in a stencil file instead of a drawing file. You might apply a set of custom properties to all the shapes on a stencil and then edit a particular master shape to customize its properties. The procedure is basically the same as the one for a shape on the drawing page. The difference is in the first couple of steps, in which you open a stencil and edit a master.
To add or edit custom properties for a master shape, follow these steps:
- Open the stencil containing the master shape you want to edit by doing one of the following:
- To edit a master shape on an existing stencil, right-click the stencil's title bar, and then choose Edit.
- To edit the copy of a master shape used by the shapes in a drawing, choose File, Stencils, Document Stencil to open the document stencil.
- Right-click a master shape in the stencil, and then choose Edit Master to open the shape in a new drawing window.
- If the Custom Properties window is not already open, choose View, Custom Properties Window.
- Select the master shape.
If the shape includes custom properties, they are displayed in the Custom Properties window. Otherwise, Visio displays a message in the window.
- Right-click anywhere in the Custom Properties window, and then choose Define Properties.
- Select the property you want to edit, or click the New button.
When you select an existing property, its settings are displayed in the dialog box. As soon as you change a setting, it's applied to the selected property.
- Define the new property, or revise the selected property, by typing or selecting the values you want for Label, Type, Format, Value, and Prompt. For details about these options, see Table 6-2.
- When you've defined the property, do one of the following:
- Select a new property to edit in the Properties box.
- Click the New button to define a new custom property.
- Click OK to close the Define Custom Properties dialog box.
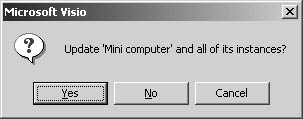
When you're ready to save your changes to the master shape, click the Close Window button in the master shape's drawing window. Make sure you click the correct button. Don't click the Visio window's Close button. Visio displays a message asking whether you want to update the master.
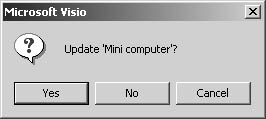
If you edited the document stencil, the message differs slightly.
- Click Yes.
If you edited a document stencil, all the shapes in the drawing that are based on the master shape you edited will include the revised custom properties. You can save your changes by doing either of the following:
- If you edited a Visio stencil, right-click the title bar, choose Save As, and then specify a file name and location for the stencil.
- If you edited a document stencil, choose File, Save to save the changes with the drawing file.
EAN: 2147483647
Pages: 211