Getting Started
|
| < Day Day Up > |
|
Most computers today can boot (start up) from the CD-ROM. This means that if you put disk one of the Red Hat installation disks into your CD drive and reboot (restart) your machine, it should start up the Linux installation. However, if it does not, the reason is probably that your PC is not booting through the CD drive. Don’t worry, all PCs have their floppy drive somewhere in the boot sequence, so we can do an install from a floppy. Let’s begin by examining how this is done.
Making a Bootable Floppy Disk
If your PC boots through the CD drive, you can skip this part. It is for those readers whose machines will not boot through the CD drive. This process is not particularly complicated. Your first step is to find a working PC that you can use to create the bootable disk. If you find a machine with Windows on it like the one you are about to install Linux on, that would be perfect. Simply place the first CD-ROM of your installation set into the CD drive and place a blank floppy into your floppy drive. Using either My Computer or Windows Explorer, find the folder located on your CD that is named \dosutils\rawritewin. If you are using My Computer, you should see something much like what is shown in Figure 2.1a. If you prefer to use Windows Explorer™, then your screen will appear much like what is shown in Figure 2.1b.
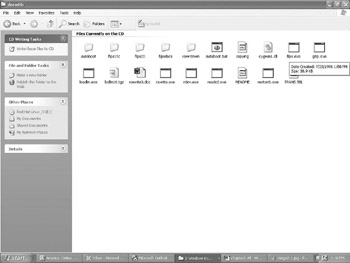
Figure 2.1A: The DOS utilities via My Computer.
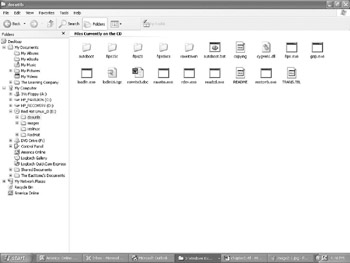
Figure 2.1B: The DOS utilities via Windows Explorer.
You should notice a file named rawwritewin.exe. This program is going to make the blank disk you put into your floppy drive into a boot disk for the Linux install. When you launch this application (by double-clicking on it) you should see something very much like what is shown in Figure 2.2.

Figure 2.2: The rawwritewin application.
| Note | rawwritewin is actually a Windows wrapper for an old Unix/Linux utility called rawwrite. That utility is used to write material to disks. |
You now have to use the small button next to the text box titled “Image file” to select the image you want to place on the disk. When you press that button, you will be presented with a standard dialog box that enables you to select a particular file from a specific folder. You will see several files with the extension .img. These are images, and each is used to create a different type of boot disk. You should select the bootdisk.img file, as shown in Figure 2.3. On some Linux distribution disks, the file is called boot.img, so if you do not see bootdisk.img, then select boot.img.
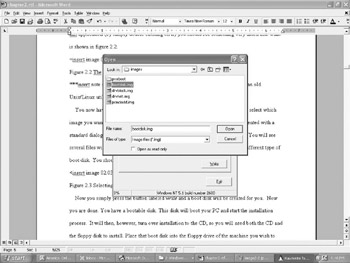
Figure 2.3: Selecting the boot.img file.
Now you simply press the button labeled Write, and a boot disk will be created for you. Now you are done. You have a bootable disk. This disk will boot your PC and start the installation process. It will then turn over installation to the CD, so you will need both the CD and the floppy disk to install. Place the boot disk into the floppy drive of the machine you want to install Red Hat Linux on, and put the first of your installation CDs into the CD drive. Then, reboot your PC and the install process will start.
| Note | The installation described in this chapter makes some specific choices. These choices will install specific applications. These applications will be covered later in this book. If you do not follow this installation process exactly as it is detailed in this book, you might not be installing all the applications we will be covering later. |
Now we are ready to install Linux. Simply place disk one in the CD drive and restart your PC (unless you were using a floppy disk install, in which case your floppy disk and your CD should already be in their respective drives). After it boots up, you will see the opening screen. There is very little information on this screen; it simply notifies you that you are ready to start the installation.
| Note | If you have ever watched a Microsoft Windows machine boot up, you will notice that the Linux bootup shows a lot more information. What you are seeing is virtually every detail of the boot process. |
You are asked how you wish to proceed with the installation. You almost always will want to choose the first option, Install in Graphical Mode. You can select this option by simply pressing the Enter key. In fact, the only good reason not to use graphical mode would be if your PC were so outdated that it would not support a graphical installation. Of course, if your machine does not support a graphical installation, then it probably will not support most of the really cool graphical Linux products such as KDE*, GNOME, GIMP, and Open Office. If you will recall our earlier discussion about system requirements, then consider that the author has personally installed Red Hat 9.0 with all options in graphical mode on a Pentium II 233MHz with only 64 megabytes of memory. (However, it should be noted that the machine does not perform as well as one might like.) To put this in perspective, a machine like the one just described has not been sold new in stores since about 1998. This means that you probably have a machine that is more than capable of using graphical mode and running everything that Linux has to offer.
| Note | This is another strong point in favor of Linux. Unlike Microsoft Windows, it is not resource intensive. Red Hat 9.0 will run on machines that do not support later versions of Windows, such as Windows XP. |
With some installation disks you will be asked next if you want to test your CD. Several editions of Red Hat 8.0 and earlier include this screen, particularly installations from third parties. The Personal Edition of Red Hat 9.0 does not include it. If you purchased a packaged version of Linux such as Red Hat, then this is probably unnecessary, and you can select No. If you downloaded Linux onto your own CDs, you probably want to select Yes. The reason for this is simple. If you copied downloaded install files to a CD using your own CD burner, a variety of things may have gone wrong, and it is possible that the CD is not in proper working order. If you are using a packaged installation purchased commercially, it is very unlikely that the CD has any damage.
On the next screen, you will find an introduction to Red Hat Linux. It will explain what is going to happen and tell you a little about Red Hat. If this is your first time installing Linux, it is recommended that you carefully read this screen before pressing the Next button at the bottom of the screen. It will give you an overview of what the installation process will be doing.
The next two screens are very simple. They ask what language you want to use and what keyboard setup you want. Select your language from the options provided. These steps are shown in Figures 2.4 and 2.5. It is interesting to notice the plethora of languages you have to select from. Linux is now available to users in a variety of nations, using a wide range of languages.
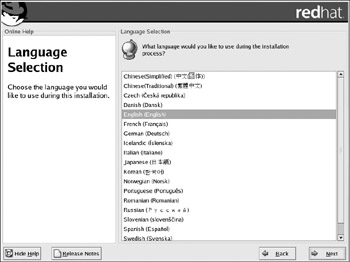
Figure 2.4: Choosing a language.
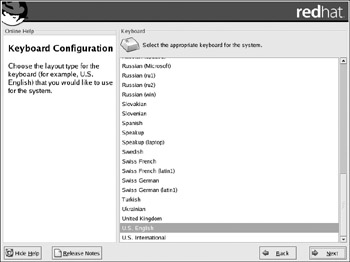
Figure 2.5: Keyboard setup.
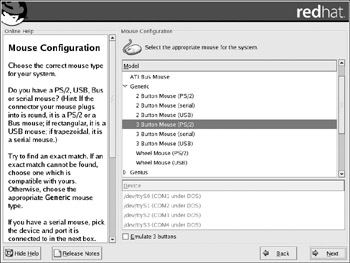
The next screen, shown in Figure 2.6a, asks what type of mouse you have. If you don’t see your model, select either the two-button PS2 generic mouse or the two-button serial generic mouse. There is also a check box labeled “Emulate a Three Button Mouse” that is checked by default. You can choose to leave it checked or not.
| Note | If your mouse connector (the end that connects to the PC) is a small round plug, then it is a PS2 connector. If it is a horizontal plug with several pins (usually there are nine pins), it is a serial connector. If you are unfamiliar with mice and connectors, you should probably read Appendix D, “PC Hardware,” before continuing with this book. It will give you a brief crash course in PC hardware. For readers who do not know how to tell what type of mouse they have, a picture of the connector for each of the three major types is shown in Figures 2.6b, 2.6c, and 2.6d. |


If the machine you are installing on already has a previous version of Linux on it, then you will be asked whether you want to wipe out the old installation completely and start from scratch or simply upgrade. This is shown in Figure 2.7.
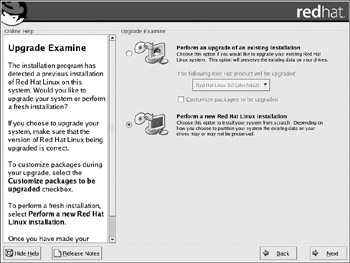
Figure 2.7: Installation or upgrade?
The next step is to select packages. A package is a logical grouping of a number of separate applications. The various applications that you can install with Linux are grouped so that you can easily pick the set of applications you are most likely to need, depending on how you intend to use the machine. Your choice of packages will determine what software gets installed on your PC. The options are:
-
Personal Desktop
-
Workstation
-
Server
-
Custom
Each of these is designed for a specific type of user. These various package configurations are summarized in Table 2.1.
| Package | Contents/Purpose |
|---|---|
| Personal Desktop | This includes things the average home user would want, including Internet software such as Web browsers and e-mail clients. It also includes graphics programs and games. |
| Workstation | This is intended for the business user and includes productivity tools such as Open Office. |
| Server | This option is for servers. It will install a Web server, an FTP server, an e-mail server, and other server software. |
| Custom | This option allows you to pick any packages you want to install. |
Each of these packages is provided to make installation for a certain type of machine simple. However, this simplicity comes at a cost. If you choose Personal Desktop or Workstation, you will not be installing the Web server, FTP server, or other server packages. Conversely, if you select Server, you will not be installing many personal use items such as games. Since each of the preset options has some limitations, for our purposes we will choose Custom because we want several elements drawn from more than one package. When you select Custom, you will be prompted during the installation to select individual packages and applications to install. Later in this chapter we will cover the options you should select. For now, select Custom. This screen is shown in Figure 2.8.
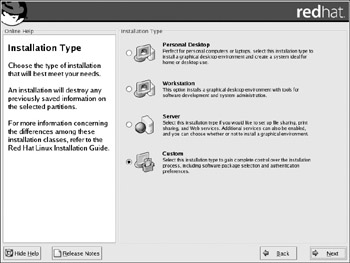
Figure 2.8: Selecting packages.
The next screen will take you into the process of disk partitioning. This is probably the most important and complex part of the installation. As such, it warrants a separate part of this chapter, which will explain exactly what disk partitions are and how to partition.
|
| < Day Day Up > |
|
EAN: 2147483647
Pages: 247
- Assessing Business-IT Alignment Maturity
- Linking the IT Balanced Scorecard to the Business Objectives at a Major Canadian Financial Group
- A View on Knowledge Management: Utilizing a Balanced Scorecard Methodology for Analyzing Knowledge Metrics
- Managing IT Functions
- Governance in IT Outsourcing Partnerships
- Chapter I e-Search: A Conceptual Framework of Online Consumer Behavior
- Chapter VIII Personalization Systems and Their Deployment as Web Site Interface Design Decisions
- Chapter X Converting Browsers to Buyers: Key Considerations in Designing Business-to-Consumer Web Sites
- Chapter XII Web Design and E-Commerce
- Chapter XVI Turning Web Surfers into Loyal Customers: Cognitive Lock-In Through Interface Design and Web Site Usability