| MIDI Regions are containers of data that can hold various types of MIDI events. The events in a MIDI Region can be altered individually by using one of Logic's MIDI editors (Matrix, Event List, Hyper Edit, Transform, and so on), or all at once by using the Region Parameter box. The Region Parameter box gives you access to a variety of parameters that affect the data in MIDI Regions. These functions invite experimentation, as they are entirely nondestructive, and the MIDI data can be returned to an unaltered state at any time. Think of these parameters as filters that can be applied to single or multiple MIDI Regions in varying degrees of intensity, without permanently altering the data. Earlier, you used the Loop function in this box to create multiple iterations of a selected Region. In this exercise you will utilize more of the settings in the Region Parameter box to work with the Bass Drum and Rim Shot Regions you split apart in the last exercise. 1. | Bring up Screenset 1 by pressing the number 1 key.
| 2. | Click the Track Solo button on the Bass Drum track (Track 7).
| 3. | Select the Bass Drum Region on Track 7.
Look at the Region Parameter box at the far left side of the Arrange window. Notice that the top of the box reads Bass Drum, the name of the Region you selected. This signifies that any alterations within the box will affect the Bass Drum Region only.
|
Transposing Regions Note events in any MIDI Region can be transposed all at once with the Transpose parameter in the Region Parameter box. This is most effective with pitched material, but it is also handy for changing sample selection in drum parts. In the EXS24 drum kit used in the current song, the bass drum contains the same audio sample mapped across a range of two adjacent keys (B0 and C1). The EXS24 pitch-shifts these samples accordingly, producing bass drum sounds that vary slightly in pitch. The song currently uses the higher of these two choices (C1) but would benefit from a slightly deeper bass drum. By transposing the Bass Drum Region down a semitone, you can change all MIDI notes contained in the Region to B0, triggering the lower of the two bass drum samples. 1. | Play the soloed Bass Drum track.
| 2. | Next to the Transpose parameter, double-click the 0, and enter -1 in the text input box. Press Return.
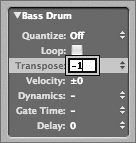
NOTE The parameter headings may be slightly cut off, depending on your screen size and resolution. | 3. | Play the Bass Drum track again, listening to the slight change in pitch.
The lower bass drum sound is played.
|
Changing Velocities in a MIDI Region The Region Parameter box also provides a quick way to alter note velocities within a MIDI Region. You can boost or reduce velocities, adding or subtracting a numerical value to or from each event. The bass drum part is a little loud in the Chorus section. Rather than dynamically change the volume level in the mixing stage, you can make a velocity adjustment to the MIDI note events in this section. This provides a more musical result, as lower velocities trigger different, softer samples of the bass drum with less attack. When you reduce the event velocities, the sound not only gets quieter but also changes its timbre, much as a real drum does when struck with less force. To affect only the events within the Chorus section, it is necessary to divide the Bass Drum Region, isolating the events that need to be adjusted. 1. | Use the Goto Next/Previous Marker key commands (the less-than and greater-than keys) to locate to the Chorus section.
| 2. | In the Arrange window's local menus, choose Region > Split/Demix > Split Regions by Locators.
The Bass Drum Region divides at the borders of the Chorus section.

| 3. | Use the Play from Selection key command (Option-spacebar) to listen to the bass drum part.
| 4. | In the Region Parameter box, double-click the Velocities parameter, and enter -18 in the text input box. Press Return.
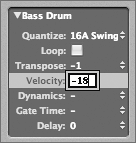
| 5. | Use the Play from Selection key command to listen to the results of the velocity adjustment.
|
Compressing or Expanding the Dynamics of a Region The Dynamics parameter in the Region Parameter box also acts upon MIDI note velocities, but rather than adding or subtracting a fixed value, it scales the difference between the greatest and smallest velocity values. In this way it functions similarly to the way a compressor or expander acts upon the dynamics of an audio signal, increasing or decreasing the dynamic range for the selected MIDI Region. When applying a value larger than 100 percent, the differences between "soft" and "loud" notes are increased as they would be by an expander, and they are decreased with values of less than 100 percent (as they would be by a compressor). 1. | Click the Track Solo button on the Bass Drum track to turn soloing off.
| 2. | Click the Track Solo button on the Rim Shot track (Track 8).
| 3. | Select the Rim Shot Region (Track 8).
The Region Parameter box displays Rim Shot at the top.
| 4. | Use the Play from Selection key command (Option-spacebar) to listen to the rim shot part.
| 5. | Choose Windows > Event List.
An Event List window opens, displaying the MIDI events in the Rim Shot Region.
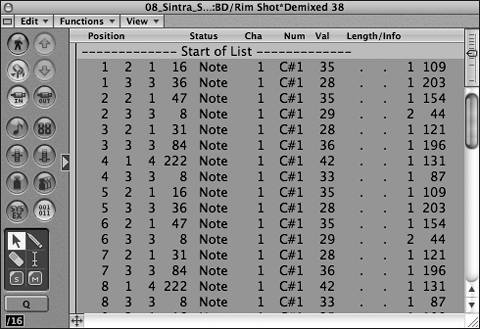
Look at the numbers displayed in the Val column, which indicate the velocities of each note. While they're not too disparate in range, the dynamics could use a little velocity "compression" to achieve a more consistent sound.
| 6. | In the Region Parameter box, click next to the Dynamics parameter and choose 75% from the pop-up menu.
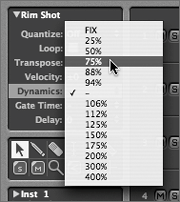
| 7. | Play the song, listening to the rim shot part.
The dynamics are evened out, with a reduction in the range between the highest and lowest values.
| 8. | Close the Event List window.
| 9. | Click the Track Solo button on the Rim Shot track, disabling the solo.
|
Using Delay to Adjust the Feel The Delay parameter is used to move a Region forward or backward in time by small amounts. By choosing a positive value, you can delay the playback of a Region, achieving a laid-back or dragging feel, while negative values push the Region earlier, creating a rushing or driving feel in relation to the beat. The current song's musical material warrants a laid-back groove, especially in the drum tracks, so let's apply a delay setting to the rim shot to better fit in the pocket created by the other instruments. Delay settings can be displayed in ticks (the smallest possible bar subdivision or system quantization), note values, or milliseconds. Most people who have worked with digital delay devices are used to thinking in terms of milliseconds, so let's switch the default setting of ticks to milliseconds before changing the Delay setting. 1. | Play the song, listening to how the rim shot lays in the rhythm section.
| 2. | In the Arrange window's local menus, choose View > "Delay in ms."
| 3. | With the Rim Shot Region selected, click the two vertical arrows next to the Delay parameter, and choose 1/192 = 11.3.
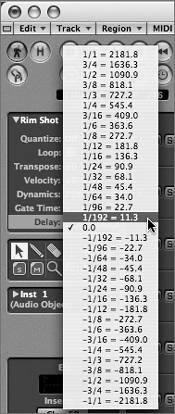
By selecting this value, you are delaying the playback of the Rim Shot Region by a 1/192 note, or 11.3 milliseconds.
| 4. | Play the song from the beginning, listening to how the rim shot now lays within the arrangement.
|
NOTE Settings made in the Region Parameter box, with the exception of Loop and Quantize, have no visual effect when displayed in the editors. The changes take effect during playback, however. These changes can also be written permanently to the Region: in the Arrange window's local menu, choose MIDI > Region Parameters > Normalize Region parameters.
Quantizing Regions Just as musical rhythm is expressed in relation to the grid formed by beat and meter, so sequencers map MIDI event timings to a grid determined by the base resolution provided by the individual software application. To ensure that the placement of an event in time is as accurate as possible, Logic offers a resolution of 1/3840 notes (this division equals one tick). This allows for a vast range of rhythmical placement, but there will be occasions when you need to adjust the accuracy of events in relation to more musical divisions (eighth notes, sixteenth notes, triplets, and so on). This can be done with quantization, which compares events to a chosen resolution and then corrects their time placement by moving them to the nearest position on a beat/time grid. Logic offers multiple ways of quantizing events, including using the Region Parameter box to adjust the data contained in a Region. Let's check out the aural and visual effects upon note events when quantizing. 1. | Bring up Screenset 4 by pressing the number 4 key.
This screenset conveniently contains both an Arrange window and a Matrix Editor.
| 2. | In the Arrange window (now located at the bottom half of the display), select the Bass Drum track (Track 7) in the Track List.
All three Regions on the track are selected.
Region parameters can be applied to single Regions and also to multiple Regions simultaneously.
Take a look at the Region Parameter box. Instead of the name of the individual selected Region, the box displays "3 regions selected," indicating the number of selected Regions that will be affected by the adjustment of the parameters. In addition, an asterisk, instead of a value, is placed next to the Velocity parameter. This is because one of the selected Regions already has a value entered in the Velocity parameter. If you were to enter another setting here, the Region with the preexisting setting would retain this relationship as an offset, applying the new setting in addition to the older one.
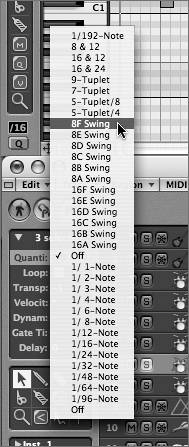
TIP You can override this offset by holding down Option while changing the value. This will eliminate any relative adjustment and alter all Regions equally. | 3. | While keeping your eye on the bass drum part in the Matrix Editor, click the vertical arrows next to the Quantization parameter and choose 8F Swing.
The events shift in the Matrix Editor.
| 4. | Click the Toggle Metronome button in the Transport window at the bottom of the screen.
| 5. | Play the song, listening to the quantized bass drum part against the metronome. The feel is completely transformed from a straighter pattern to a swing feel, where every other note is delayed.
While applying a swing feel illustrates the power of quantization, it definitely does not work with this song.
| 6. | Choose 1/16-Note from the Quantization parameters.
| 7. | Click the Toggle Metronome button to disable the click.
| 8. | Play the song, listening to the bass drum part with the new quantization setting.
|
TIP You can also have the settings in the Region Parameter box affect incoming MIDI signals. This is done by changing settings without a Region being selected (the box reads MIDI THRU instead of a Region name). This can be very useful for transposing incoming notes up or down an octave, increasing the range of a small MIDI controller. In this case, the events are recorded with the parameter settings applied.
Using the Extended Region Parameters So far, you've performed straightforward quantization, aligning all notes contained in a Region to the selected value. Strict quantizing can sometimes make things sound too mechanical, however. Unless a performance is especially sloppy, you might want to have quantization applied only partially, maintaining the original feel but with a closer alignment to the timing grid. Among the extended Region parameters, you will find many ways of changing quantization as applied to a selected Region. 1. | In the Arrange window, select the Rim Shot Region.
| 2. | Choose Options > Extended Region Parameters.
The Extended Region Parameters box appears as a floating window.
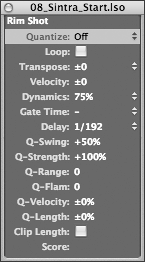
TIP The floating Extended Region Parameters window can also be opened quickly by double-clicking the name of any parameter in the Region Parameter box. At first appearance, this looks just like the Region Parameter box. While the first seven parameters are identical, an additional eight parameters are listed, mostly applying to quantization (the Q signifies this). Within this box you can see the Delay and Dynamics settings you applied earlier as well.
Let's use this box to further refine the Rim Shot Region by applying some of the Quantization parameters offered here. While working in the Extended Region Parameters box, keep an eye on the Matrix Editor to observe the changes that take place.
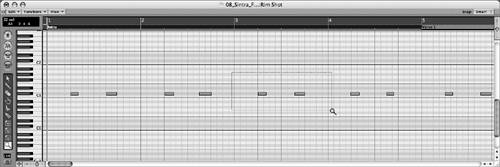
| 3. | In the Matrix Editor, use the Magnifying Glass tool to zoom into measure 3.
 In the Extended Region Parameters box, choose 1/8-Note from the Quantization pop-up menu. In the Extended Region Parameters box, choose 1/8-Note from the Quantization pop-up menu.
The notes align to the grid, which can be easily seen in the Matrix Editor.
Quantize off. 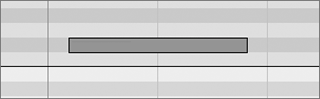
Quantize 1/8-Note. 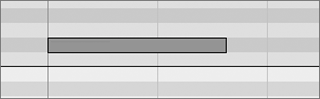
While there are some slight timing discrepancies in the rim shot performance, overall it is worthwhile to retain the original feel and only use quantization to move inaccurate events closer to the grid instead of aligning them perfectly. This can be done by entering a value other than 100% (which is full quantization) for the Q-Strength parameter.
| 4. | In the Extended Region Parameters box, double-click next to the Q-Strength parameter, and enter 78 in the text-input box. Press Return.
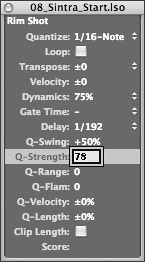
The inaccurate note events shift slightly forward from the grid.
Quantization strength set to 78%. 
By limiting quantization strength, you are only moving events toward the grid without perfectly aligning them. Think of this as applying weight to the Quantization parameter, wherein any value above 0 percent pushes the affected notes toward the value specified in the Quantization parameter.
| 5. | Play the song, listening to the quantized Region in context with the full arrangement.
|
|