Caching Arbitrary Data
Like the intrinsic Application and Session objects in classic ASP, the ASP.NET cache engine offers a simple, straightforward means of saving arbitrary data to the cache and accessing that data through key/value pairs. The following code shows how to add a simple text value to the cache and retrieve it:
Cache("myFoo") = "foo" Response.Write(Cache("myFoo")) An important difference is that unlike the Application and Session collection objects, which you can access by either key or numeric index, you can access cache items only by their key.
You can also use this technique to store more than just strings. For instance, the code in the following example, CacheAuthors.aspx, checks the cache to see if a dataset already exists. If not, it calls a method that creates a dataset containing data from the Authors table of the Pubs sample Microsoft SQL Server database, and then it saves that dataset to the cache before setting the DataSource property of an ASP.NET DataGrid control to the default view of the first table in the dataset (0). In this example, rather than adding controls via the designer, you will add controls in HTML view and then see the results in design mode. Visual Studio .NET is a true two-way design tool.
Cache a DataSet
-
In the same project as the previous exercise, add a new Web Form and type its name as CacheAuthors.aspx.
-
Change the pageLayout property of the page to FlowLayout.
-
Switch to HTML view by clicking on the tab control at the bottom of the design window. Between the beginning and ending <form> tags, add the following code:
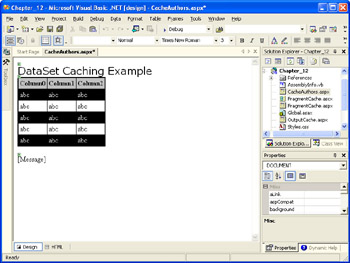
<asp:label text="DataSet Caching Example" font-name="Verdana" font-size="18" runat="server"/><br> <asp:datagrid bordercolor="black" borderwidth="2" cellpadding="3" runat="server"> <headerstyle backcolor="silver" font-bold="true"/> <itemstyle backcolor="black" forecolor="white"/> <alternatingitemstyle backcolor="white" forecolor="black"/> </asp:datagrid><br> <asp:label font-style="italic" runat="server"/>
-
Switch to Design view by clicking on the tab control at the bottom of the design window. The resulting screen should look similar to the illustration on the next page.
-
Select View, and then select Code, or press F7 to move to the code window.
-
Add the following Imports statements at the top of the code-behind file:
Imports System.Data Imports System.Data.SqlClient
-
Scroll down to the Page_Load event handler and add the following code:
Dim DS As DataSet = Cache("myDS") If Not DS Is Nothing Then Message.Text = "Dataset retrieved from cache" Else DS = GetData() Cache("myDS") = DS Message.Text = "Dataset retrieved from database" End If MyGrid.DataSource = DS.Tables(0).DefaultView MyGrid.DataBind() -
Add the following function definition below the Page_Load event handler (but above the End Class statement):
Private Function GetData() As DataSet Dim myDS As New DataSet() Dim ConnStr As String ConnStr = "server=(local)\VSDotNET;" ConnStr &= "database=pubs;Trusted_Connection=yes" Dim SQLSelect As String SQLSelect = "SELECT au_id, au_lname, au_fname, " SQLSelect &= "zip FROM Authors WHERE zip = '94609'" Dim mySqlDA As New SqlDataAdapter(SQLSelect, ConnStr) mySqlDA.Fill(myDS) Return myDS End Function
-
Save the CacheAuthors.aspx and its code-behind file, and then build the project.
-
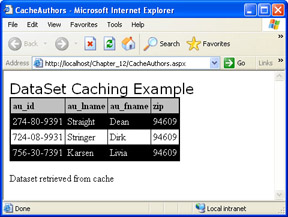
Browse the page using Internet Explorer. The output should look similar to the following illustration. Note that the data was retrieved from the database.

-
Refresh the browser, and the output will look similar to the illustration on the following page. Note that now the data was retrieved from the cache. This data will remain in the cache until the app domain containing the application is recycled, or until the data is scavenged from the cache because of memory pressure. You’ll learn how to programmatically remove data from the cache later in this chapter.
Note To use a trusted connection to connect to SQL Server (as shown in the preceding listing), you will need to either enable Windows authentication and impersonation or set up the ASPNET worker process account as a SQL Server login, as described in Chapter 9.
Using the Cache APIs
At this point you’re probably wondering, “How do I remove the dataset from the cache?” There are a couple of answers to this question—one simple and one more complex. We’ll leave the more complex answer for the next section. The simple answer is that you can remove an item from the cache programmatically by calling the Remove method of the Cache class and passing it the key of the item to be removed. For example, you could add an ASP.NET button to the preceding example, and then add the following line to the Click event handler for the button:
Cache.Remove("myDS") This would clear the dataset from the cache and force the page to be rendered again using fresh data. (Note that because the Page_Load event fires before the Click event for the button, you might need to click the button twice before the datagrid and the label are updated.)
Understanding Expiration and Scavenging
The more complex answer to the question of how to remove items from the cache is that ASP.NET will actually do it for you. What makes this complex is that if you want to control how ASP.NET decides which items to remove from the cache and when it does so, you need to provide ASP.NET with that information when you add an item to the cache.
You can do this by using the Add or Insert methods of the Cache class. Both methods let you pass parameters that tell ASP.NET when and on what basis to expire your cached content, as well as the priority your cached content should have when ASP.NET scavenges the cache for items that can be removed to free memory.
ASP.NET determines the order in which items are scavenged from the cache based on their priority. Over time, if an item is not accessed, ASP.NET will reduce its priority periodically. When its priority reaches a predetermined point, it can be scavenged. You can set the priority of an item by passing one of the values of the CacheItemPriority enumeration when calling the Add or Insert method. The following code is an example of the Insert method:
Cache.Insert("myDS", myDS, Nothing, DateTime.Now.AddMinutes(2), _ TimeSpan.Zero, CacheItemPriority.High, Nothing) This code performs the following steps:
-
Inserts a dataset stored in the myDS object variable into the cache with the key “myDS”
-
Passes Nothing as the CacheDependency parameter
-
Sets the expiration for two minutes from the time when the item is added to the cache
-
Sets the SlidingExpiration parameter to TimeSpan.Zero (no sliding expiration)
-
Sets the cache priority for the item to High
-
Sets the callback function for the item to Nothing (no callback function)
| Note | The Add and Insert methods of the Cache class provide essentially the same functionality, with two differences. The first difference is that all parameters of the Add method are required, so even if you are not using a particular parameter, you must still pass a placeholder parameter. The Insert method is overloaded, which makes it the easier method to use when you want to pass only some of the possible parameters. The second difference is that the Add method returns an object that represents the item just added to the cache, while the Insert method doesn’t return a value. |
You can also call the Insert method passing just the Key (String) and Item (Object) parameters, passing the Key, Item, and CacheDependency parameters, or passing the Key, Item, CacheDependency, AbsoluteExpiration (DateTime), SlidingExpiration, and (TimeSpan) parameters.
Understanding File and Key Dependencies
Another important parameter that you can pass to either the Add or Insert method is the CacheDependency parameter, which takes an instance of the CacheDependency class as its value. The CacheDependency class allows you to create a dependency for a cached item on one or more files or directories (known as file dependency), or on one or more other cached items (known as key dependency). The constructor for the CacheDependency class has the following three forms:
'Monitor a file or directory for changes Dim myDependency As CacheDependency myDependency = New CacheDependency("myFileorDirName") 'Monitor an array of file names and/or paths for changes Dim myDependency As CacheDependency myDependency = New CacheDependency(myFileorDirArray) 'Monitor an array of file names and/or paths, and an 'array of keys for changes Dim myDependency As CacheDependency myDependency = New CacheDependency(myFileorDirArray, myKeyArray) Note that to set up a key dependency without any file dependencies, you must create an array of keys (even if there is only one key), pass Nothing as the first argument to the constructor, and pass the array of keys as the second:
Dim Keys(0) As String Keys(0) = "myKeyName" myDependency = New CacheDependency(Nothing, Keys)
Once you create the instance of CacheDependency, it can be passed as a parameter to the Add or Insert method of the Cache class:
Cache.Insert("myDS", myDS, myDependency)
Using the Response Object to Set Dependencies
In addition to using the Insert method of the Cache object to set up file and key dependencies, you can use helper methods available from the Response object—which is implemented by the HttpResponse class—to set up file and key dependencies for page output caching. Four helper methods are available: AddCacheItemDependencies, AddCacheItemDependency, AddFileDependency, and AddFileDependencies. Each helper method takes either a string or an ArrayList of strings as an argument.
The syntax for the AddCacheItemDependency method, which takes a String argument that specifies the key on which the cached output depends, is
Response.AddCacheItemDependency("myCacheKey") The syntax for the AddCacheItemDependencies method, which takes an ArrayList argument containing strings that specify the keys on which the cached output depends, is
Dim alKeys As New ArrayList() alKeys.Add("myFirstCacheKey") alKeys.Add("mySecondCacheKey") Response.AddCacheItemDependencies(alKeys) The syntax for the AddFileDependency method, which takes a String argument that specifies the path to the file on which the cached output depends, is
Response.AddFileDependency("c:\myfile.txt") The syntax for the AddFileDependencies method, which takes an ArrayList argument containing strings that specify the files on which the cached output depends, is
Dim alFiles As New ArrayList() alFiles.Add("c:\myfile.txt ") alFiles.Add("c:\myfile2.txt ") Response.AddFileDependencies(alFiles)
Invalidating the Cache Automatically on Data Change
One of the biggest challenges in using caching in your application is how to get the most out of it, even when you’re dealing with data that either is frequently updated or must always be fresh. Setting absolute or sliding expiration times for a cached item can reduce—but not eliminate—the likelihood of a user getting stale data.
What you need is a way to notify the ASP.NET cache when a table has been updated, in order to remove an item from the cache. Fortunately, the CacheDependency class and the SQL Server Web Assistant make this process easy.
To force a cached copy of the Authors query seen in the CacheAuthors.apsx example to be expired whenever the data in the Authors table is modified, you need to first create a trigger on the Authors table that uses the SQL Server Web Assistant to write a new HTML file when the data in the table changes.
| Note | Because MSDE, the desktop version of SQL Server, does not support the SQL Server Web Assistant, the following example requires the use of the full version of SQL Server. If you do not own a copy, you can download or order a trial version of SQL Server at http://www.microsoft.com/sql/evaluation/trial/default.asp. |
Create a trigger on the Authors table
-
While logged in using an account with administrative permissions to the SQL Server instance (or by using the Run As feature), open SQL Server Enterprise Manager, then drill down to and select the Tables node of the Pubs database. (This should be the Pubs database in your SQL Server instance, rather than the VSdotNET MSDE instance you’ve used for other examples.)
-
Right-click the Authors table in the table list, select All Tasks, and then select Manage Triggers.
-
Make sure that the <new> item is showing in the Name drop-down list. Add the following text to the trigger, replacing filepath with the path to the directory where you have saved the examples for this chapter and the filename authors.htm (for example, C:\aspnetsbs\Chapter_12\authors.htm), and click OK.
CREATE TRIGGER WriteFile ON [dbo].[authors] FOR INSERT, UPDATE, DELETE AS EXEC sp_makewebtask 'filepath', 'SELECT * FROM authors'
The second part of the process is to create the page that will use the cache by consuming the cached data.
Consume cached data
-
In the same project as the last exercise, add a new Web Form named AuthorsTrigger.aspx. Follow the steps in the previous exercise so that AuthorsTrigger.aspx and its code-behind match the code from CacheAuthors.aspx.
-
Change the Text property of the title label to Cache invalidate with trigger Example.
-
Select View, and then select Code, or press F7 to move to the code window. Add the following line to the Imports clauses at the top of the code file:
Imports System.Web.Caching
-
Change the name of the class in AuthorsTrigger.aspx from CacheAuthors to AuthorsTrigger.
-
In the Page_Load event handler, replace the line that reads Cache(“myDS”)=DS with the following code, which adds a file dependency on the file created by the SQL Web Assistant:
Cache.Insert("myDS", DS, _ New CacheDependency(Server.MapPath("authors.htm"))) -
In the GetData function, modify the connection string in the file to point to the SQL Server instance where you created the trigger.
-
Save AuthorsTrigger.aspx (and its code-behind module) and build the project.
-
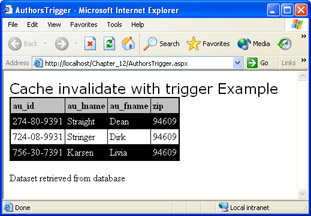
Browse the page using Internet Explorer. The output should look similar to the following illustration. Note that the data was retrieved from the database.
-
If you click the Refresh button in the browser, the data will be served from the cache and the output will look similar to the illustration on the next page.
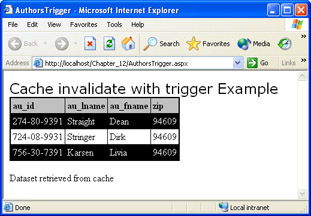
To make sure this procedure was successful, open the Authors table in SQL Enterprise Manager (by right-clicking the Authors table and selecting Open Table, Return All Rows) and change one of the values in a row in the table that matches the query criteria for AuthorsTrigger.aspx (zip=94609). (Move the cursor off the row being updated to make sure the update occurs.) Now refresh the browser. Except for any data that you’ve changed, the output should look like the illustration that follows step 8.
| Important | While the preceding example is effective in purging the cached data when the underlying database table changes, there is a caveat to its use. Because this technique relies on the update of a file in the file system, it is possible that a problem with that file (such as incorrect permissions) could prevent the trigger from updating the file, which could lead to a blocking situation. Since what you're after with caching is improved performance and scalability, clearly blocking would be a bad thing. So if you're considering using a technique like this in your application, take care to minimize as much as possible the things that could go wrong, and make sure to test the application thoroughly, particularly under loads similar to what you expect the application to bear. |
EAN: 2147483647
Pages: 126