Section 4.1. Terminal Overview
4.1. Terminal OverviewWhen you launch the Terminal application, shown in Figure 4-1, you are greeted with a single, rather plain-looking window. What you see here is essentially the same command-line interface that Unix users have been seeing since the days when eight-track tapes were en vogue. The system greets you with a friendly "Welcome to Darwin!" message and then gives you a prompt for the bash shell, indicated by the dollar sign ($). This is your cue that you are interacting with the command line. At this point, you have direct access to the internals of Mac OS X. And, if you have administrator privileges and a little bit of know-how, you can do everything you ever wanted to, and more. Figure 4-1. The Terminal window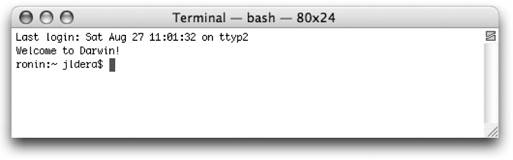 The prompt displayed in the Terminal is the output from a program known as the shell. The shell is the mediator between you and the internals of the Unix system. The shell's job is to interpret the commands you type and invoke the various programs on your system to satisfy those instructions. Each command you enter typically consists of a program name and some parameters to pass to that program. When the shell executes the program, its results are displayed in the Terminal window. Example 4-1 shows the use of the date command, which returns the current date and time. Example 4-1. Using the date command$ date Thu Jul 14 13:52:36 EDT 2005 After the date command exits, the shell resumes control of the display and outputs another prompt enabling you to enter your next command.
4.1.1. Essential Filesystem CommandsIn the Finder, it's easy to find your way around; after all, it was designed to be easy. The command line isn't such a walk in the park. It's just you and the prompt. So, how do you find your way around? Quite simply, by using a set of commands at the prompt. Table 4-1 lists the commands that you will most often use to navigate your way around.
4.1.1.1. Getting around the filesystemAs Chapter 3 began to explain, Mac OS X's filesystem (and mostif not allother filesystems) can be visualized as a tree-based structure. At the very top of this tree is the root directory , which is represented by a simple / in the Unix shell. The root directory is the partition from which the system has been booted, usually named Macintosh HD. Beneath the root directory, you'll find the filesystem domains that were discussed in Chapter 3. You'll also find a folder named Volumes. The Volumes directory is where Mac OS X mounts any filesystems besides the root filesystem. For example, if you had a FireWire disk drive named Taco, it would be mounted in the Volumes folder as Taco. When you're working in the Terminal, there are two ways to refer to a file or directory's location. The first is the absolute path . An absolute path lists every directory that must be traversed to reach the file (or directory) to which you're referring. The absolute path starts at the filesystem root (/) and then lists each subdirectory in order, from top to bottom. As an example, the Documents folder in the user alisa's Home directory has an absolute path of /Users/alisa/Documents. The Applications folder at the top of Macintosh HD is simply /Applications. The other way to refer to a file's location is by using its relative path . The relative path of a file (or directory) starts at the current working directory. For instance, if you are working in the user alisa's Home directory, the Documents folder is just Documents. A file within that folder has a relative path of Documents/SomeFile.doc. Many times when working with relative paths, you need a way to refer to either the current directory or its parent directory. There are two entries reserved in each directory for just this purpose. By using the ls command with the -a option, you can see these two special entries. One is named dot (.), and the other is dot-dot (..).The dot directory always refers to the current directory. For example, the path ./foo.txt refers to the foo.txt file in the current directory. The dot-dot directory always refers to the parent of the current directory. The path ../bar.txt refers to the bar.txt file in the parent directory of the current directory. Using a combination of absolute and relative paths, you can navigate around the filesystem more quickly than you can with the Finder. While changing to the /Applications/Utilities folder in the Terminal takes only one command, it takes quite a few clicks in the Finder to get to the same location. This speed is why many Unix users feel more comfortable dealing with file operations in the Terminal than they do in the Finder. The command you'll use most often when moving around your Mac's disk is the cd command, which is short for change directory. The cd command is dead simple to use. Like most Unix commands, you invoke the command by its name, followed by a space and any parameters you're passing to the command. The cd command uses an absolute or relative path for its parameter. To change into the /Users folder, type cd in the Terminal window, followed by a space and then the folder's path (/Users). Finally, to execute the command, press the Return key. The results look something like Example 4-2. Example 4-2. Changing directories on the command lineronin:~ jldera$ cd /Users ronin:/Users jldera$ If you've never used a Unix system before, it may seem like nothing has happened. No text is presented to confirm that it worked; no new windows pop up. Instead, the shell faithfully prints out another prompt, waiting for your next command. When working with many command-line tools, you won't receive much feedback from a command. And, in just about every case, that means the command executed successfully. You can tell that the cd command was successful, because your shell prompt has changed. Where there was previously a ~, you can see that the path /Users is shown. You can also confirm what your current directory is by using the pwd command, as shown in Example 4-3. Example 4-3. Using pwd to see the current directoryronin:/Users jldera$ pwd /Users At this point, you may be wondering what the ~ was for. When you first open a Terminal window, you are placed in your user's Home directory. The ~ symbol is used as a shorthand way of referring to your Home directory. You can use this shortcut to construct a file's relative path from your Home directory. For instance, the Documents folder in alisa's Home directory could have a path of /Users/alisa/Documents, ~/Documents, ./Documents, or just plain Documents. However, the absolute path of /Users/alisa/Documents will always work, regardless of the current directory or user. It's important to remember that the ~ shortcut is valid only for your own Home directory. If you're moving another user's files around, you'll need to forego its convenience. 4.1.1.2. Viewing a directory's contentsAnother potentially confusing caveat of using the Terminal is that a directory's contents are not immediately shown when you change to that directory. In the Finder, you can tell right away what files are in which folders. It's a visual environment that easily conveys the concept of a container. The command line isn't quite so simple. To see what files are in a directory, use the ls command, as shown in Example 4-4. Example 4-4. Using ls to view a directory$ ls Desktop Library Music Public Documents Movies Pictures Sites There is a myriad of options and switches available for the ls command. You can get a lot more detail on them from the ls manpage (enter the command man ls to take a look). However, there are only a few that are used on a regular basis. The common ls options are listed in Table 4-2.
4.1.1.3. Viewing a file's contentsThe ls command is great for viewing the contents of a directory, but it will do little to help you view the contents of a file. For this purpose, the command line has several different utilities. The following list discusses each of these in brief, while their manpages contain more detailed information, in case you need a more advanced feature.
4.1.1.4. Working with files and directoriesNow that you're more comfortable with moving around the filesystem, you're probably wondering how to move your files and directories around as well. Once again, the Finder does a better job of visualizing file operations. Dragging a file to move it from one folder to another gives an excellent indication of the process. However, given the Finder's somewhat limited view of the filesystem (see Chapter 3 for more discussion of hidden files and folders), you'll find yourself having to perform file operations on the command line whenever you want to work with the innards of the OS.
Perhaps the simplest task you'll want to perform on a file is deleting it. For this purpose, the command line supplies the rm command. One extremely important difference between deleting a file in the Finder and deleting it on the command line is that the rm command does not send the file to the Trash. It is immediately removed from the system once you press the Return key. To remove a file on the command line, enter the command: rm SomeFile.txt
Removing a directory is very similar, except you use the rmdir command. The directory must be empty to be removed, so you should use the rm command to remove its contents before removing the directory. Or, you can use the rm command's switch for recursion, -R, to remove the directory and its contents all in one go: rm -R SomeDirectory The rmdir command's counterpart is mkdir , which you use to create new folders. A convenient switch you can use with mkdir is the -p option. When using -p, you can specify that mkdir create a series of nested folders. For example, the command: mkdir -p Folder1/Folder2/Folder3 creates Folder1 in the current directory, Folder2 within the Folder1 folder, and Folder3 within the Folder2 folder. Another common file operation you'll want to perform is copying a file. To copy a file, use the cp command: cp OriginalFile FileCopy The cp command also has a switch for recursion, -R, which you should use when copying a directory and its contents. For moving files and directories, use the mv command. Unlike the cp and rm commands, there is no special option for recursion when using mv. Even if you pass it a folder for its source, it simply moves the folder and its contents: mv SomeDirectory NewLocation/ 4.1.2. WildcardsQuite often when you use the command line, you will want to perform operations on groups of files at one time. For instance, you may want to copy all the files in a directory that start with a particular prefix. Or, you may just want to see all the files in a directory that end with the .jpg extension. Fortunately, the shell provides a painless way to accomplish this with the help of some wildcards . Table 4-3 lists the most common wildcards.
By far, the most widely used wildcard is the asterisk (*). As an example, to find all the files ending with .plist in the ~/Library/Preferences directory, use the following: $ ls ~/Library/Preferences/*.plist You can also use the asterisk by itself as an argument. This selects every file in a directory. For example, the following command can be dangerous indeed: $ rm * This will remove every file in the current directory. Even more dangerous is combining wildcards with the rm command's -r option, which puts rm into recursive mode and removes every directory as well as every file in a directory. Execute such a command at the root of the filesystem, and you could lose everything. Wildcards are powerful, so use them with care. 4.1.3. Terminal User InterfaceIn many ways, the command-line environment and the GUI are as diametrically opposed as possible. One stresses exactness while the other emphasizes ease of use. However, Apple has provided several features in the Terminal application to help it work better with the Aqua side of Mac OS X. One of these features is the ability to drag and drop files from the Finder to the Terminal. When you do so, the full pathname of the file is inserted on the command line. This means instead of trying to remember a long path to a file, you can quickly find it in the Finder, compose a command in the Terminal, and then drag and drop the file or folder icon into the Terminal window. Also, while using the Terminal, there's a plethora of keystrokes you can use to whiz through tasks with ease. Table 4-4 lists the most commonly used ones.
One keystroke that should be mentioned in particularonce you start using it, you'll never stopis Shift- In addition to the keyboard shortcuts supplied by the Terminal application, the bash shell has some shortcuts for making keyboard input easier. Some of the most common shortcuts are listed in Table 4-5.
Another useful feature of the Terminal is the ability to split the window, as shown in Figure 4-2, and use the top part to scroll back through the buffer while working in the bottom part. You activate and deactivate this feature by using the button directly above the scrollbar. Figure 4-2. The Terminal's split window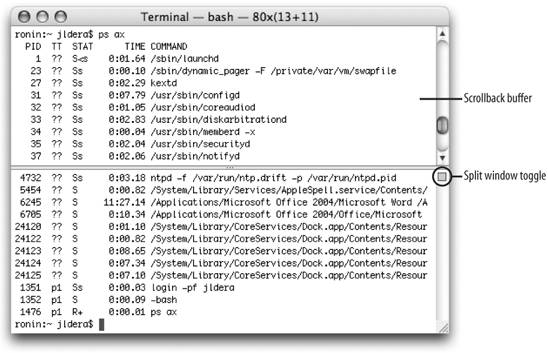 You can change the colors used by the Terminal, including the background and foreground colors, as well as the transparency of the Terminal window. When you are staring at nothing but text, it's nice to be able to set it up with colors that are comfortable for you to use. Just select the Terminal
|

 Window Settings menu item and tweak away. Once youre done, you can have your new settings be the default for all subsequent Terminal windows, or you can make changes and then save them (using File
  Save) as a .term file. When double-clicked, the resulting .term file will open a new Terminal window with your custom settings.
EAN: 2147483647
Pages: 166