Section 15.2. Positioning Images in Relation to Other Content
15.2. Positioning Images in Relation to Other ContentThe images of your interface probably all have designated areas, so there isn't anything to position. You click inside the logo area to place the logo, or you click inside the banner area to place the banner, and you insert the image. Images that appear in the main content area are a different story. Unless the image takes up the entire area, you need to position the image in relation to the rest of the content in the area. There are two main approaches of doing this. The first is to drop the image directly into the surrounding content and then flow the content around it. The second is to insert a table into the main content area and place the image in one of the cells and the content into another. This section describes both methods. 15.2.1. Using Inline ImagesAn inline image is an image that sits within its surrounding content. In fact, you can think of an inline image as a rather large character in the line of type in which it appears, because that's how the browser handles it.
To place an image inline, choose an insertion point inside the main content area (usually to the left of the surrounding text), and click the Image object in the Insert bar. After you fill out the accessibility information, Dreamweaver drops the image into the mix, as Figure 15-4 shows. Figure 15-4. An inline image sits within its surrounding content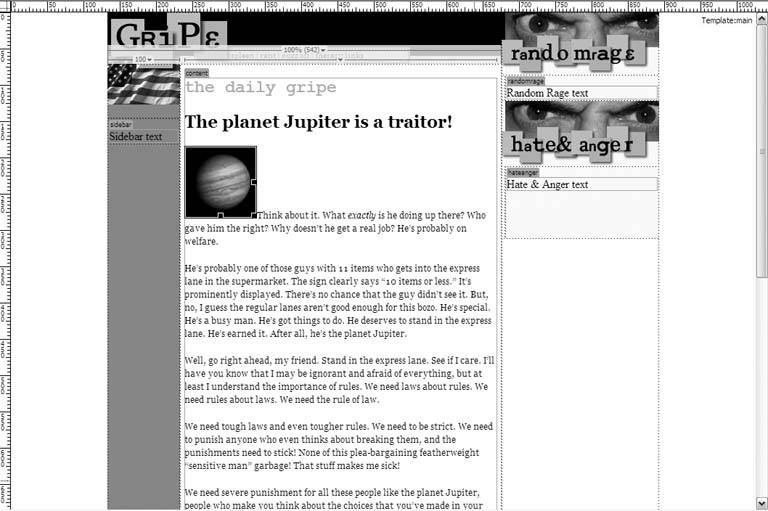 You might want the liberal amount of whitespace that the inline image creates, although you probably don't. To get rid of it, you can align the image to the surrounding text from the Align menu on the Property Inspector. Select the image and choose an alignment setting, and the surrounding content will flow around the image. There are several options available, but the ones of most interest are Left and Right. Choose Left from the Align menu, and the image appears on the left side of the area with the surrounding content flowing around it, as Figure 15-5 shows. Choose Right, and you get the reverse situation. The image appears on the right side of the area with the content flowing around it, as Figure 15-6 shows. Figure 15-5. The image is aligned left Figure 15-6. The image is aligned right To increase the amount of padding between the image and the surrounding content, type values into the V Space and H Space fields of the Property Inspector. The V Space field gives extra padding around the top and bottom of the image and the H Space field gives extra padding around the left and right sides, as shown in Figure 15-7. The units in both cases are pixels, but you don't have to type px. This is an HTML attribute, not CSS. Figure 15-7. This image has a V Space of 2 and an H Space of 4
15.2.2. Using a TableThe alternative to using inline images is to insert a table, much like Dreamweaver did with your nav bar in Chapter 13. The image goes into one cell of the table, and the surrounding content goes into the other. Standards groups like the World Wide Web Consortium (W3C) can't condone this practice, of course, because it goes against the strict reading of the HTML specifications. Tables aren't for page layout. They're for rows and columns of data. Nevertheless, if you need a two-column effect, tables are the most convenient way to go in Dreamweaver. To add a table, choose an insertion point in the document window, and go to the Insert panel. Click the Table object shown in Figure 15-8, and Dreamweaver opens the Table dialog box, as Figure 15-9 shows. Figure 15-8. The Table object icon on the Insert panelFigure 15-9. Table properties available from the Table dialog box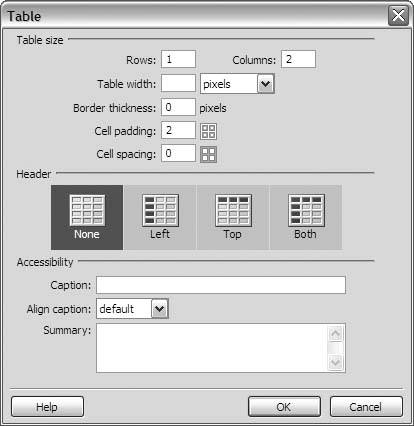 You can skip most of the fields in the Table dialog box, as these are more for data tablestables like the W3C prefers, with information in a grid. You do want to look over the fields under Table Size, though. If you want the image and the content to appear side by side, go for a table with one row and two columns. Leave the width field empty, because the width of the image and the content will determine the size of the table automatically. If you want a visible border around the cells of the table, type a value in the Border Thickness fieldthe larger the value, the heavier the border (in pixels). Otherwise, type 0. As with inline images, you should add a little padding in the Cell Padding field to improve the image's appearance in relation to its surrounding content. You don't need a lot. A couple of pixels are usually plenty. The value in the Cell Spacing field controls the amount of space between the cells in the table. Here, zero is usually the best value. When you're done, click OK, and Dreamweaver inserts the table, as in Figure 15-10. Now, click inside one of the cells of the table and insert the image into it. Next, select all the surrounding content, drag it with the mouse, and drop it into the other cell. As you can see in Figure 15-11, the shorter column (in this case, the one with the image) is centered vertically against the longer column. To position the image at the top of its column, select the image, go to the Tag Selector, and click the <td> tag to select the image's table cell. Then go to the Vert menu on the Property Inspector, and choose Top, as Figure 15-12 shows. Figure 15-10. Dreamweaver inserts the table Figure 15-11. The image is centered vertically at first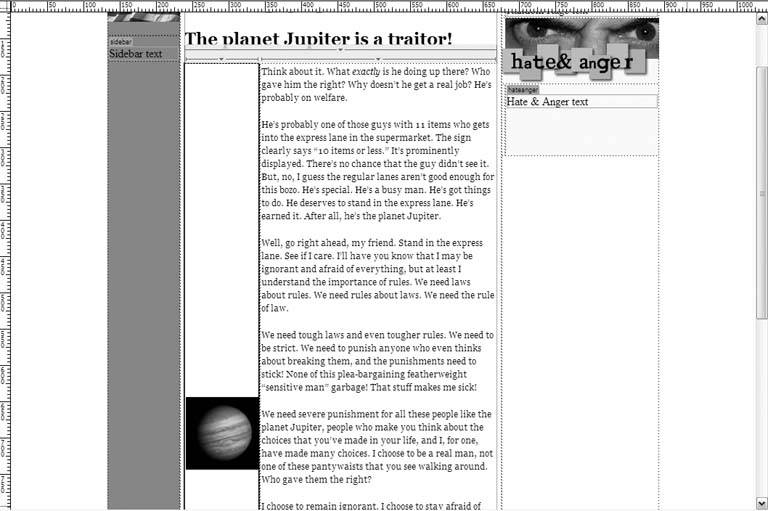 Figure 15-12. The image's vertical alignment is set to Top |
EAN: 2147483647
Pages: 154