Hack 24 From Slideshow to Video Presentation
|
Make a slideshow into a video presentation using the combined power of iMovie, iPhoto, and iTunes. The so-called media iApps iMovie, iPhoto, and iTunes actually form an ad hoc integrated development environment (IDE) for creating digital content. You probably didn't realize this because Apple's marketing focus to consumers is simplicity, not integrated environments. But there's certainly more to the iApps than initially meets the eye. This hack shows you how these components work together by making an iPhoto slideshow into a full-fledged video presentation. All you need is a decent digital camera, a stack of music CDs, and Mac OS X. 24.1 Using Just One Leg of a Three-Legged StoolDuring a recent iPhoto workshop, I learned that many of the participants hadn't opened iMovie or played much with iTunes. When I asked, "Why not?" I heard responses such as, "I don't own a DV camcorder or an iPod, so why would I need those apps?" I realized that many creative people have been influenced by Apple's consumer marketing that aims to keep things simple in order to appeal to the greatest number of potential customers. But the iApps are better than that. Beneath their tantalizing GUI lurk powerful tools capable of producing professional quality media, especially when used as a group. So, let's take a look at how to get some serious work done with this trio of digital media programs. 24.2 Get Your Toolbox in OrderIf you don't have Jaguar (10.2) yet, that's job number one. You need all the performance you can get when working with digital media, and Jaguar is the best Apple has to offer. Next, make sure you have iMovie, iTunes, and iPhoto accessible, because you'll be opening them a lot. I keep them in the Dock. Put them wherever you want, but make sure they're easy to get to. If you haven't upgraded to QuickTime Pro, Version 6 (http://www.apple.com/quicktime/download/), now's the time to do it. The player version is fine for playback, but you'll need the pro tools to do serious work. And for $29.95, it's not a bad deal, especially since the iApps come bundled with the operating system. Finally, you may want to grab a couple of enhancement applications to expand the capabilities of the media iApps. Here are my favorites:
24.3 How the iApps Can Work TogetherNow it's time to look at how the iApps can work together. First, let's explore the two database applications: iTunes and iPhoto. This is where your music and still images are stored and organized. You can tap these databases from other applications or through the Finder. If you configure them properly, you can easily find the content you're looking for when you're outside the cozy confines of the application interface. What do I mean by this? Let's say you want to find a song in iTunes to accompany a slideshow (as we're going to do later in this hack). If all of your songs in iTunes have their database records completed (artist, album, song, etc.), then you'll be able to find what you're looking for quickly when searching your music DB via iPhoto (yes, iPhoto can talk to iTunes) or when looking for a particular tune via the Finder. If you haven't completed those iTunes records, then all you'll see is Unknown Artist and Track 01 not much help. More on this later. I'm assuming that you have data in iTunes and iPhoto. If you haven't used these two programs much, go upload some pictures and rip a few CDs so you have media in there to play with. You'll be surprised at how often you'll tap this information after it's in there. Once you have content in your databases, then you can use QuickTime Pro, iMovie 2, and BBEdit to assemble and enhance your media. The basic process looks like this:
Obviously, there are many variations on this theme of iApps working together. If you're shooting digital video, for example, you may think you never have to leave the iMovie environment. But what if you want to import still images into your movie (iPhoto)? How about adding music (iTunes)? Why continue to shuffle through music CDs when you have your entire library sitting there in iTunes? Once you understand the iApp relationships, you'll find that you can create better productions in less time, regardless of which medium you're primarily working in. To work with this example, you'll need a decent digital camera and some good music on a CD. We're going to build a better slideshow. iPhoto enables you to export pictures and music to QuickTime, but the final product is a little rough around the edges. By enhancing the core slideshow with iMovie, iTunes, and QT Pro, you can transform your humble iPhoto slideshow into a polished presentation. After a few minutes of work, you'll see how the iApps function as a full-fledged development environment. This is only one scenario. There are many other exciting ways to use these tools. So, let's start by digging into the two database applications: iTunes and iPhoto. 24.3.1 iTunesI probably don't have to say this, but you need to have a good variety of music in your iTunes library. So, take a stack of your favorite CDs and rip them. Before doing so, however, remember two things:
When you first load a CD in iTunes, you see only the most basic data, such as Track 01. If you were to rip the music at this point, you wouldn't have much data to accompany the MP3 files, which makes it difficult to use them outside of iTunes later on. If you're online, you can access the CDDB resource to automatically populate the important fields in your songs' database records. Select Advanced Now, after accessing the CDDB, you have much richer song records, as shown in Figure 3-24. iTunes will use this information to build a logical folder structure on your hard drive (as long as you have "Keep iTunes music folder organized" checked in the Advanced preferences). Figure 3-24. CD in iTunes showing richer song records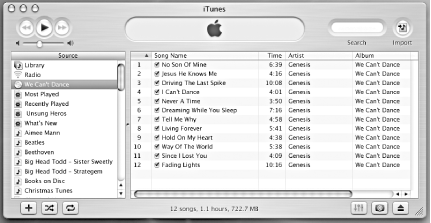 24.3.2 iPhotoNow it's time to get your image database in order. As with iTunes for music, there are a few details to tend to when populating your database that will make your workflow smoother later on:
iPhoto also lets you add valuable data to your digital content. The four key areas are: custom albums (e.g., Tues Uploads in Figure 3-25), Title, Date, and Comments. When you add information in these record fields, iPhoto stores it in the iPhoto library with the image files. Now you can search for images across many iPhoto libraries using catalog apps such as CDFinder. Figure 3-25. Added data associated with a picture in iPhoto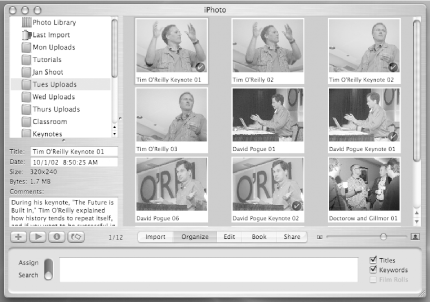 24.4 Working Example: Use iMovie and iTunes to Add Professional Touches to Your Still ImagesOne of the most powerful methods I have for presenting still images is the QuickTime slideshow. The pictures seem to come to life as they are organized by story line and accompanied by music. For example, in my photo business I now show these two-minute shows at the beginning of wedding appointments before I hand over the actual prints. The combination of pictures and music telling the story of their marriage makes a tremendous impact on clients, and the rest of the appointment always seems to go well. But like everything else good in life, there's an art to making a persuasive presentation, whether it be for clients, coworkers, friends, or family. My best slideshows use iPhoto to create the core presentation, iTunes for the music, iMovie for the titles, and QuickTime Pro to stitch everything together. I'm going to breeze through a couple of techniques to give you a feel for how these apps can cooperate with one another. If you don't have experience working in iPhoto, iMovie, and QuickTime Pro, you may wish to refer to my tutorials in the Digital Photography (http://www.macdevcenter.com/pub/a/mac/collections/iphoto.html) and QuickTime and iMovie (http://www.macdevcenter.com/pub/a/mac/collections/qt_imovie.html) collections on MacDevCenter.com. 24.4.1 Create opening titles in iMovieStart by exporting your core slideshow from iPhoto to QuickTime. (Highlight the album that contains the frames for your slideshow, click the Share button, then click on Export, then select the QuickTime tab.) At this point, you don't need to export the music with the slides, even though I usually include it so I have a feel for the raw presentation. You'll actually end up adding a different soundtrack later in this process. Here's where iMovie comes in handy for this project: to build your opening title for the slideshow you created in iPhoto and exported to QuickTime. Open iMovie and create a new project. Then build your opening title using the Titles palette, shown in Figure 3-26. This is an amazing tool. Even though you can create just about any opening sequence possible using Titles in iMovie, keep it simple for now. Figure 3-26. The iMovie Titles box is a gold mine for digital moviemakers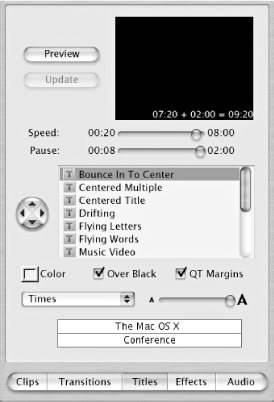 Once you have an opening that you like, you need to render it by dragging it from the Titles work area to the Clip Viewer bar at the bottom of the iMovie interface. iMovie will now take a few seconds to build your opening sequence. Export your sequence by choosing File This is where you need QuickTime Pro to stitch them together. You're going to select the entire contents of your core slideshow (exported from iPhoto), copy it, then add it to the opening sequence you created in iMovie, then exported to QuickTime. Click on the core slideshow, then grab its content by choosing Select All, then Copy. Now click on the opening sequence movie and select Add. QuickTime will add the core slideshow to wherever you have the playback indicator positioned. In this case, it should be at the end of the clip. Now you have a slideshow with an opening sequence. If you have QuickTime Pro, you can stitch various QT clips together by copying the clip from one player, then adding it to the other (Don't use Paste, or one clip will replace the other!). In Figure 3-27 I'm adding the soundtrack I exported from iMovie to my QuickTime slideshow. Figure 3-27. Adding the soundtrack to my QuickTime slideshow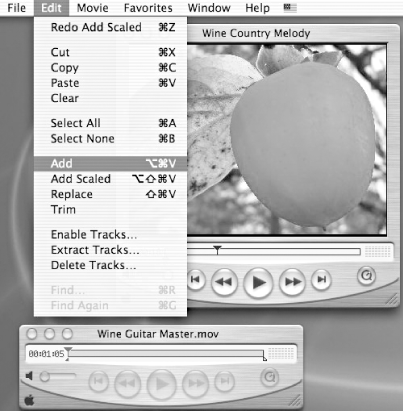 You can create as many sequences as you want in iMovie and add them to your QuickTime presentations. I usually stick with opening and closing titles, but I'm not limited to them. 24.4.2 Fine-tune your music trackOnce you have all of your image sequences stitched together, it's time to add the soundtrack. You probably want to clean out any existing soundtracks in your presentation. This is easy in QuickTime Pro. Go to Edit and select Delete Tracks. You'll see a number of video tracks (don't touch those!) and a couple of soundtracks. Delete all of the soundtracks. Note the length of your movie. Hopefully it's not longer than a couple of minutes. Now open iMovie again and select Import File from the File menu. Navigate to your Music folder where iTunes keeps all of your audio assets. If you've been conscientious about filing out your song records, then you'll see a list of folders by artist, with their respective albums inside. But it gets even better. Open the album folder, and you'll see all of the MP3 files with the song titles as the filenames. Sweet. Import the song you want to use for your presentation into iMovie where it will be placed on the audio portion of the Clip Viewer. Move the endpoints of the track to make it the same length (or a tad shorter) than your slideshow. (For example, if your slideshow is 2 minutes long, then you might move the audio endpoints to create a music track that is 1 minute, 55 seconds in length.) Then, check the Fade In and Fade Out boxes so your music doesn't begin and end abruptly. Fade Out is especially important and worth using iMovie just for that function. Now export your edited music track to QuickTime just as you did your title clip. I usually choose no compression for my music unless I plan on serving it on the Web. When you open the music track in QuickTime, you'll see that it also has an unnecessary video track. Use Delete Tracks to get rid of it, then Select All, Copy, and Add to your slideshow. Now you have a custom soundtrack that is the perfect length for your show and fades at the end. If you want, you can add many soundtracks at various points throughout your presentation. And, for that matter, you can add voiceover too. 24.5 Pulling It All TogetherOnce you have your presentation the way you want it, save it as a self-contained movie. This will put all of your parts in one container that you can play off your hard drive, burn onto a CD, or attach to mail (if it's not too big!). You can serve it on the Web too, but there are some issues involved, such as compression (to reduce download times) and authorization for the music. You can bypass these issues for now by sharing your presentations in person. Once you've finished your work of art, be sure to use the Save As command and click the "Make movie self-contained" radio button, as shown in Figure 3-28. By doing so, QuickTime will place all the movie elements in one portable container that you can burn to CD or share with friends. Figure 3-28. Saving as a self-contained movie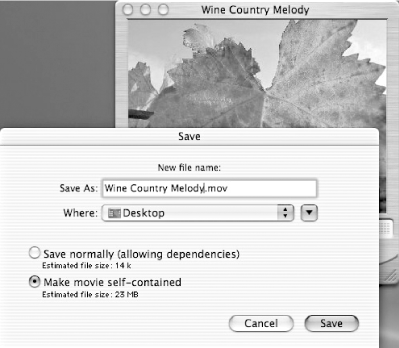 Of course, there are many ways to refine your presentation, but even with these few simple techniques, you can see how well the iApps work together and what great potential they have as a harmonious group. Derrick Story |
EAN: 2147483647
Pages: 161
 Get CD Track Names to have them filled in for you.