Assigning Permissions to Users and Groups
You can apply share permissions to folders either to individual users or to groups. As noted in Chapter 14, it is recommended that you use the group strategy, but either way the processes are similar. When a user attempts to access a shared resource, the operating system must determine what access the user should have.
Windows XP/Server 2003 creates an access token each time users log on to an XP workstation or a Server 2003 domain, and this token is the key to determining whether the user can access network resources. The token specifies the user's unique user identification and any groups that the user belongs to. This information is used by the network to verify that users have share access permissions to the share that they are attempting to access.
access token
A set of credentials that represent you on the network and that contains information about who a user is and what groups they are in.
effective permission
A user's effective permission is the permission that they are actually able to use on an object after all permission elements have been added together (or denied, as the case may be).
If the user has access permissions applied through user and group permissions, or if the user belongs to multiple groups that have access permissions assigned, the user's effective permission will be the most permissive permission that has been assigned. The exception to this rule is if the user has Deny permission through user or group assignment. If Deny has been assigned, users have no access to the resource at the level they have been denied, even if they have been granted that permission through other assignments.
For example, assume that you have two users, Kate and Magda. Kate is a member of the groups Sales and Execs, and Magda is a member of the groups Sales and Temps. These permissions have been assigned:
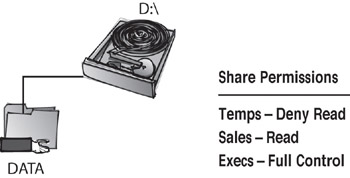
In this case,
-
Kate has Full Control permission, because it is most permissive.
-
Magda is denied access, because she is a member of a group with Deny permission.
Applying Share Permissions
In the exercise below, you will experiment with setting share permissions. Make certain that you are logged on to a Windows XP/Server 2003 computer with sufficient permissions to share folders. Note that in this section, you will first be shown exact steps for sharing a folder, and then you will create test users and experiment with permissions levels.
Sharing a Directory and Setting Permissions
-
From Windows Explorer, right-click the folder that is or will be shared.
-
Click the Sharing And Security option.
-
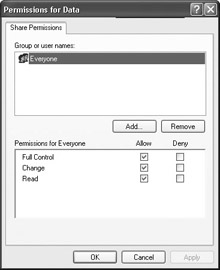
In the Sharing dialog box, click the Permissions button. You will see the following dialog box:
-
If you do not want to leave group Everyone with Full Control permission, highlight this group and click the Remove button.
-
To add new share permission assignments, click the Add button.
-
You add groups by double-clicking them. After the group is added, select them in the Permissions dialog box list and add the proper permissions levels. To add user assignments, complete the same steps that you used to assign the group permission.
| Tip | It is important that you use My Network Places for this test, because this accesses the resource as a share. If you use Explorer or My Computer, you access the resource locally, and no share permissions are applied. |
| Tip | Besides folders that you share, Windows XP/Server 2003 also makes a number of administrative shares, and some applications also create shares. Be sure to research these and to account for them in your security planning. |
-
Start by creating two users on which you can test share permissions. Make sure you are logged on as Administrator, and open Active Directory Users and Computers. Create a user named Kate and a user named Magda.
-
Next, create a folder that the users will share. Right-click My Computer and click Explore. Create a folder. Name your new folder SHAREME.
logging on
The process of authenticating to the network and gaining access to the network as a particular user.
-
To share the folder, single-click the SHAREME folder. Select Sharing And Security. Click the Share This Folder radio button. The folder is now shared. If you go back to Windows Explorer, you will notice that the folder has a hand underneath it, indicating that the folder is shared.
-
In the Sharing And Security dialog box, click the Permissions button. Remove group Everyone from the permissions list by selecting Everyone and then clicking the Remove button.
-
To add users and groups to the shared permission list, click the Add button. Add Kate with Full Control permission and click OK. Repeat the same steps to add the local group Administrators with Full Control permission and Magda with Read permission.
-
You can test share permissions by logging on as Magda and accessing the share through My Network Places. If you try to create a file in the shared folder, you should be denied access, because Magda has only Read permission to the share.
-
Log on as Kate and repeat the test.
|
|