Controlling Processes
Sending a print request starts processes on both the print client and the print server. Once the print job is complete, the processes end. When people think of processes, they generally think of applications running on a system. Although it's true that applications are processes, many other things are processes as well. Any running program in Solaris, whether it's an application, a script, a daemon, or any other "running" component, even the user shell, is considered a process. Simply defined, a process is a single program running in its own memory space. Various applications run multiple processes concurrently to achieve full functionality.
This section explains process management, including viewing system processes, clearing hung processes, and automatically scheduling processes.
Managing Processes
In Solaris, the system kernel manages processes. Programs are free to start or stop processes as necessary, and when a process opens another process, the procedure is called spawning or forking. Parent processes fork child processes, and if necessary, the child process can fork another process and thereby become a parent as well. To manage processes in Solaris, you need to understand the commands used. Table 8.6 lists some commonly used process management commands.
| Command | Description |
|---|---|
| dispadmin | Displays and changes process scheduler parameters. |
| nice | Changes the priority of a running process. |
| kill | Terminates or sends a signal to a process. |
| ps | Reports the status of active processes, including process ID, terminal name, execution time, and command name. |
| pgrep | Finds active processes based on name or other attribute. |
| pkill | Sends a signal to a process. |
| priocntl | Manages process priorities, configures process classes, and displays information on the system's process scheduler. |
| prstat | Reports statistics of active processes. Sorts processes by CPU usage by default. |
| psrset | Creates and manages processor sets. Processor sets allow for the binding of specific processes to groups of processes, rather than a single processor. |
| ptree | Displays the process tree. |
The most popular command used to list processes is ps. If you need information on running processes, ps can provide the status of the process, process ID, parent process ID, user ID, scheduling class, priority, memory used, and processor time used. By default, ps provides the process ID, terminal from which it was executed, processor time taken, and the command that generated the process.
# ps PID TTY TIME CMD 923 pts/4 0:10 ksh 518 pts/4 0:00 ps
By looking at this output from ps, you might think that only two processes are currently running on the system: the shell (ksh) and ps. However, that's not the case. With no arguments, the ps command displays only those processes that have the same effective user ID and the same controlling terminal as the person who ran the command. To see a full listing of all processes, you could use:
# ps -ef UID PID PPID C STIME TTY TIME CMD root 0 0 0 10:28:54 ? 0:13 sched root 1 0 0 10:28:56 ? 0:00 /etc/init - root 2 0 0 10:28:56 ? 0:00 pageout root 3 0 0 10:28:56 ? 1:16 fsflush root 309 1 0 10:29:20 ? 0:00 /usr/lib/saf/sac -t 300 root 243 1 0 10:29:10 ? 0:00 /usr/lib/utmpd root 141 1 0 10:29:06 ? 0:00 /usr/sbin/rpcbind root 124 1 0 10:29:06 ? 0:00 /usr/sbin/in.routed -q root 196 1 0 10:29:08 ? 0:00 /usr/sbin/syslogd daemon 177 1 0 10:29:07 ? 0:00 /usr/lib/nfs/statd root 219 1 0 10:29:09 ? 0:00 /usr/lib/lpsched root 426 331 0 19:45:13 ? 0:00 /bin/ksh ... #
This listing was truncated to conserve space; otherwise, it would take about three pages to list the 63 processes currently running on this computer. Some of the options used with ps are listed in Table 8.7.
| Option | Description |
|---|---|
| -a | Lists information about processes most frequently requested. |
| -A | Lists information about all processes. Identical to -e. |
| -c | Displays the class that the process belongs to. |
| -e | Lists information about all currently running processes. |
| -f | Displays a full listing. |
| -l | Displays a long listing. |
| -P | Lists the number of the processor to which the process is bound, if any. |
| -u uidlist | Displays processes whose effective user ID or login name is the same as the user ID or login name supplied in uidlist. |
The pgrep utility is also used a lot. It's a great search tool for processes; all you need to know is what you want to look for. Here is the syntax for pgrep:
# pgrep options pattern
Therefore, if you wanted to find the process ID of syslog, use:
# pgrep syslog
and you will see the process ID returned. The pgrep utility has quite a number of switches because it's designed to give you a wide variety of options to search for processes. Some useful switches for pgrep are listed in Table 8.8.
| Option | Description |
|---|---|
| -f | The regular expression pattern should be matched against the full process argument string, instead of against only the name of the executable file. |
| -g pgrplist | Displays processes whose process group ID is in the provided list. |
| -G gidlist | Shows processes whose real group ID is in the provided list. Group names or Group IDs can be provided. |
| -l | Long output format. |
| -n | Displays only the newest (most recently spawned) processes that match the provided pattern. |
| -P ppidlist | Shows the processes whose parent process ID is in the provided list. |
| -s sidlist | Displays processes whose session ID is in the provided list. |
| -t termlist | Displays processes that are associated with the terminal identifier supplied in the termlist. |
| -u euidlist | Shows processes whose effective user ID is in the provided list. |
| -U uidlist | Displays processes whose real user ID is in the provided list. |
| -v | Reverses matching. Displays all processes except for those that meet the specified criteria. |
| -x | Requires the process to exactly match the provided pattern in order to be displayed. |
The best way to become familiar with the process management commands is to use them and see which ones meet your needs.
Managing Processes Graphically
By using the Solaris Management Console, you can manage processes through a graphical interface. Using the process management commands gives you greater control, but the graphical interface makes it easier to see the running processes.
The Solaris Management Console's Processes node is shown in Figure 8.3.
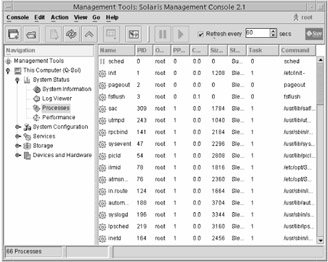
Figure 8.3: Processes in Solaris Management Console
To view the properties of a process, double-click the process, or right-click the process and choose Properties, or select the process and choose Action ➣ Properties. The Properties window for the rpcbind process, PID 141, is shown in Figure 8.4.
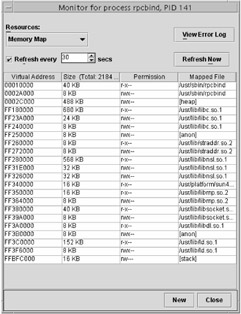
Figure 8.4: rpcbind Properties
In a process' Properties page, you can choose a variety of resources to examine under the Resources menu. Choices are Memory Map, Signal Statistics, Environment, Process Limits, Credentials, Dynamic Link Libraries, Ancestry Tree, Stack Trace, and File Descriptors. Basically, anything you could want to know about the process can be found here. The Ancestry Tree for the inetd process is shown in Figure 8.5. It shows that inetd, PID 164, is the parent process of PID 401 and PID 432.
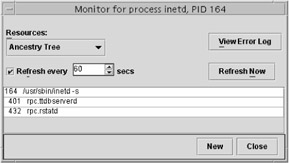
Figure 8.5: inetd Ancestry Tree
To suspend a process, select the process and choose Action Suspend, or select the process and click the Suspend button on the toolbar. It looks like a pause key (two vertical lines) on a CD player.
Processes can also be managed through Process Manager, which is shown in Figure 8.6.
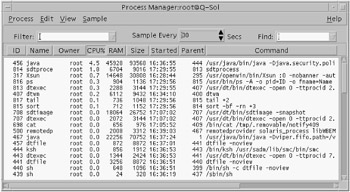
Figure 8.6: Process Manager
Process Manager is invoked by choosing Find Processes from the Tools menu in the CDE manager. Process Manager gives you more options for managing processes than does Solaris Management Console, including the ability to signal processes and kill the process outright.
Using the Process File System
Processes are tracked in Solaris by the Process File System (PROCFS). The /proc directory is also known as the process file system. Although this file system is read-only, it does display images of running processes on your computer. For managing processes, however, use one of the tools already discussed in this chapter.
Terminating Processes
Solaris uses signals to communicate with processes. Signals enable processes to interact with each other without needing extraneous hardware input or control. Signals are sent with the kill and pkill commands. Although the names of these commands imply that they're used exclusively to terminate processes, that's not necessarily the case. There are nearly 40 signals used by Solaris. Some of the more important ones to know are listed in Table 8.9.
| Number | Signal | Description |
|---|---|---|
| 1 | SIGHUP | Hangup. Often used in remote connections to indicate that the remote terminal has disconnected. Can also be used to attempt to reset a modem. |
| 2 | SIGINT | Interrupt. Signal 2 can also be sent by pressing Control+C or the Delete key. |
| 3 | SIGQUIT | Quits the process and creates a core dump. |
| 6 | SIGABRT | Abort. |
| 9 | SIGKILL | Forces the process to terminate unconditionally. This is the "sure kill" signal. |
| 15 | SIGTERM | Termination signal. Shuts down the process but gives the process a chance to terminate properly by cleaning up. |
You can kill any process that you own, and the superuser can kill all processes except those with a PID of 0 through 4.
Used with no arguments, the kill command sends a signal 15 to the PID specified. Note that when you use the kill command, you must specify the process' PID, not its name.
If the process is still around after issuing a kill command, you can send it a kill -9, which should clean up the process without any questions. If you wanted to kill a process with PID 1814, you would use:
# kill -9 1814
The other command used to send signals to processes, pkill, functions nearly identically to pgrep. The difference is, pgrep finds and displays process information, whereas pkill sends signals to processes. Their command-line arguments, however, are very similar. When using pkill, you can specify the PID or the name of the process you wish to signal.
# pkill -9 lpsched
If no signal is specified, signal 15 (SIGTERM) is sent by default.
| Warning | When killing processes, be careful what you kill because you could crash the system. Also, killing a process kills any child processes associated with it. To use the example shown in Figure 8.5, if you kill PID 164, PIDs 401 and 432 will stop as well. |
Setting Process Priorities
At any given time, hundreds of processes might be running on your computer. And if you open multiple applications, all appear to be running all the time. The problem is, processors can do only one thing at a time, and most computers have only one processor. So what's really going on?
Although all processes appear to run simultaneously, only one process can actually be running at a time. Fortunately for humans, processors can perform hundreds of millions of tasks per second. Therefore, it appears that all processes and applications run together without a problem.
Processes in Solaris are given priorities to determine which process gets more CPU time than another. An application sitting idly in the background probably doesn't require much attention- and deserves a lower priority-than the application you are actively working on.
Process Classes
Each process in Solaris belongs to a distinct process class that has a unique scheduling policy. Solaris supports six process classes: real-time (RT), time-sharing (TS), interactive (IA), fair share (FSS), fixed priority (FX), and system (SYS).
With a default configuration, real-time processes run before any other process. Because realtime processes can monopolize processor time, the class should be used sparingly. The SYS class is a special class reserved for system processes. Processes that are not designated as SYS cannot be changed to this class. Table 8.10 provides a brief summary of the usable class characteristics.
| Class | Description |
|---|---|
| RT | Designed for processes that need extensive processor time, at the expense of other processes. |
| TS | Provides fair and effective allocation of processor time among running processes. Enables the user to supply a priority range for running processes within the class, affording users some control over process scheduling. |
| IA | Provides fair and effective allocation of processor time among running processes. Enables the user to supply a priority range for running processes within the class, but individual process priorities will still be balanced by the kernel. |
| FSS | Provides fair allocation of processor time among projects, regardless of the number of processes associated with the project. |
| FX | Configures fixed priorities for processes, preventing the kernel from adjusting the process priority as necessary. |
When processes are spawned, they are assigned a priority based on the process scheduler's policies. To see these policies, use the dispadmin command. The priocntl command displays process class information, assigns processes to configured classes, and manages process class priorities. Here's a sample output from priocntl:
# priocntl -l CONFIGURED CLASSES ================== SYS (System Class) TS (Time Sharing) Configured TS User Priority Range: -60 through 60 FX (Fixed Priority) Configured FX User Priority Range: 0 through 60 IA (Interactive) Configured IA User Priority Range: -60 through 60 RT (Real Time) Maximum Configured RT Priority Range: 59 #
To see which class your processes belong to, use the ps -c command.
Using the nice Command
When a process is started, its process class determines its priority. This priority can be modified by a nice number. Nice numbers have a range of 0 to 39, and the default is 20. Raising the nice number of a process lowers its priority. In a sense, you are making the process "nicer" to other processes, meaning it's more willing to relinquish processor time. It's like when one of your parents told you to play nice with other kids. The nicer you got, the more accommodating you became.
| Note | The C shell (csh) has a built-in command named nice. This section refers to the /usr/bin/nice utility, not the csh built-in. |
By running the nice command with no arguments, you increase a process' nice number by 4 units. You can raise the nice number more by specifying the value, as in:
# /usr/bin/nice +10 command1
This would raise the nice number for command1 to 30. You can also increase the priority of a process by lowering the nice number, as in:
# /usr/bin/nice -10 command1
Users can raise the nice number of any process they own. Only the superuser can lower a nice number, thereby raising the priority of the process.
Troubleshooting Processes
Most of the time, processes run without a problem in Solaris. However, there are some issues to watch out for:
Processes that monopolize CPU time If one process is controlling the CPU, other processes will never be able to run. Use the ps command to see which processes are taking CPU time. It's possible that the process is stuck in a loop and needs to be killed.
Runaway processes These are processes that progressively use more and more CPU time until they monopolize the CPU. The process could be part of a poorly written program or it could be failing.
Process priorities If your computer seems to be running slowly, check to see how many (if any) processes are running in real-time (RT). The use of real-time processes should be minimized. Also check for processes in the time-sharing class that have modified nice numbers.
Identical jobs owned by the same person If a user has started many identical processes, perhaps as a batch program, CPU time can be unfairly constrained. The multiple instances of the identical processes need to be killed.
If a process is misbehaving, and it's not a critical system process, it might be best to attempt to kill it with the kill or pkill commands. If it's a critical system process, you might want to reboot Solaris to reset the process and clear up the problem.
Scheduling Processes
Tasks in Solaris can be scheduled to run automatically. This is useful for batch programs used to clean up systems, maintenance programs, and file backups occurring during non-peak hours. You can schedule two types of tasks: those that need to run at regular intervals and those that need to be run only once.
For scheduling repetitive jobs, you will use crontab. For a job that needs to be run only once, you will use at.
crontab
The crontab command is for repetitive tasks that need to be run on a daily, weekly, or monthly cycle. Items such as security monitoring, backups, maintenance, and the production of reports can be automated with crontab. Tasks located in crontab files are executed by the cron daemon.
Here's a sample crontab file. It's one of the default crontab files, /var/spool/cron/ crontabs/adm.
# cat adm 10 3 * * * /usr/sbin/logadm 15 3 * * 0 /usr/lib/fs/nfs/nfsfind 1 2 * * * [ -x /usr/sbin/rtc ] && /usr/sbin/rtc -c > /dev/null 2>&1 30 3 * * * [ -x /usr/lib/gss/gsscred_clean ] && /usr/lib/gss/gsscred_clean
The first line runs the /usr/sbin/logadm command at 3:10 every morning. The second line runs nfsfind at 3:15 in the morning every Sunday. The third line runs a script that checks for daylight savings time and makes changes if necessary, every morning at 2:01. The last entry checks for and removes duplicate entries in the Generic Security Service table every morning at 3:30. If this seems arcane, don't worry. You'll look at how to read a crontab file in just a bit.
crontab commands are managed and scheduled by the cron daemon. The cron daemon checks the /var/spool/cron/crontabs directory every 15 minutes for new crontab files or changes to existing crontab files. If changes are found, cron reads the execution times and starts the scheduled process at the appropriate time.
Reading crontab Files
Every crontab file has the same format. Basically stated, there are six fields. The first five tell cron when to run the job (the time fields), and the sixth is the job to run, with any arguments. In order, the time fields are as follows:
-
Minute, from 0-59.
-
Hour, from 0-23.
-
Day of the month, from 1-31.
-
Month, from 1-12.
-
Day of the week, from 0-6. (0 is Sunday.)
crontab files support the use of special characters and wildcards for time values. Each field should be separated with a space. Commas can be used to provide multiple values, hyphens designate a range of values, and an asterisk is used to include all possible values. A pound sign (#) at the beginning of the line is used to indicate a comment or blank line. Each command within a crontab file must reside on one line, even if the command is very long.
If you wanted to display a message saying "Happy Birthday!" to a user whose birthday was February 25th, and the message should appear at 4:15 P.M., you would create the following entry:
15 16 25 2 * echo Happy Birthday! > /dev/console
To display a message telling workers to log off and go home at 5:00 P.M., Monday through Thursday, you would create this entry:
0 17 * * 1,2,3,4 echo Log off and go home > /dev/console
It takes a bit of practice, but if you remember the time sequence used, reading a crontab file isn't too terribly painful.
Managing crontab Files
crontab files are created with the crontab -e command. This creates a crontab file with the name of the logged-in user. The superuser can create crontab files for the root or any user he chooses.
To display the contents of a crontab file, use crontab -l. You do not need to have /var/ spool/cron/crontabs as your working directory to use this command or to see all crontab files.
To delete a crontab file, use crontab -r.
Controlling Access to crontab Files
Access to crontab files is controlled through two files: /etc/cron.d/cron.allow and /etc/ cron.d/cron.deny. These files are accessible only to the superuser. Each file contains a list of usernames, one per line.
Here's how the access files work together:
-
If cron.allow does not exist, all users can create crontab files, except for users listed in cron.deny.
-
If cron.allow does exist, only users listed in this file can create, edit, display, and remove crontab files.
-
If neither cron.allow nor cron.deny exists, superuser privileges are required to use the crontab command.
By default, a cron.deny file exists with the following entries: daemon, bin, smtp, nuucp, listen, nobody, noaccess. There is no cron.allow file created by default.
Using Solaris Management Console
The Solaris Management Console can be used to view and create crontab jobs. The Scheduled Jobs node of the Solaris Management Console is shown in Figure 8.7.
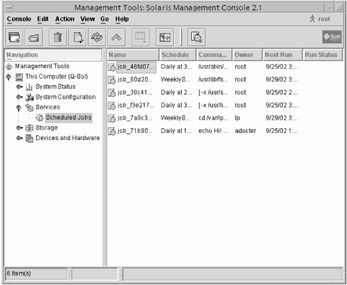
Figure 8.7: Scheduled Jobs node
New crontab files can be created from the Action ➣ Add Scheduled Job menu.
at
Whereas crontab files have quite a number of options, at files are for the simple one-time execution of a command. Users have the ability to create and manage their own at jobs by default. However, to access another user's at job, you must have superuser privileges.
When at jobs are created, they are given a job identification number and the .a extension. This becomes the file's name. The at jobs are read and scheduled by the cron daemon.
Managing at Jobs
Creating at jobs is easier than creating crontab jobs. For at jobs, all you need to know is the time, date, and command you wish to run. Here's an example of creating an at job:
# at 4:15pm Feb 25 at> echo Happy Birthday! > /dev/console at> ^D commands will be exectuted using /sbin/sh job 1046215800.a Tue Feb 25 16:15:00 2003 #
To exit the at editor, press Control+D at the at> prompt. This was done at the second at> prompt in the example, and it created the rest of the output.
Time can be specified by using either A.M. or P.M. or by using a 24-hour clock. Acceptable time words are midnight, noon, and now. For the date, you can supply the first three letters of the month and a date, a day of the week, or the words today or tomorrow.
If you want to view jobs waiting in the at queue, use the atq command. To display information about an at job, use at -l job_ID. at jobs are deleted by using the at -r job_ID command.
Controlling at Access
By default, all regular users are allowed to create their own at jobs. The file that controls access to the at command is /etc/cron/at.deny. Like /etc/cron/cron.deny, the at.deny file contains a list of users, one user per line. Users listed in this file will not have access to the at command.
|
|
EAN: 2147483647
Pages: 194